Data ALM Dynamics 365 Finance Operations

Hello there ! 🙋♂️
New article here to explain a new solution I have made for Data ALM (and automation everywhere) in terms of data movement for Dynamics 365 Finance Operations. For the code ALM part, and even for RSAT, all the way it’s quite really easy to manage from development to release (especially thanks to Azure Dev Ops). But what about data / refresh / copy / backup and restore ? From many years now on, I was (as partner) trying to do it the more automatically I can for customers - and even for me in fact... But as of today, and as a gift for the community, I release a brand new solution to install it and manage that without any MANUAL actions for all steps required for data movement ! I hope that it will help you a lot - like it will help me a lot for me, believe me - tons of hours saved. Let’s jump in !
Why ? Well, back then in April 2020, just before coming Microsoft MVP, I released a Github project of some sample to call LCS API movement via Power Automate. I still use it for me for every customers - like something for me mandatory for an ERP, have a decent PrePROD environment where you have every morning the latest database of production on it and same code, for day-to-day support. That’s quite normal right ? Like we used to do it via a lot of scripts in AX 2012 / AX 2009 onPremise before. And yes we are getting old - fashion memories ;) - BUT, what if, I could easily manage via a central platform ?
Back then I was just doing a refresh Database (reactivate users, batchs jobs and so on) + maybe at the end I was able to do automatically the backup database. The last step missing, which takes a lot of time was : What about Azure Cloud Hosted Environment ? (DevBox) - Sometimes, new colleague starts in a project, you need to provision a new environment where he/she could work - yes I know incredible! Creating the VM from LCS is quite easy, despite the delay (maybe something to improve via Azure Dev/Test Labs), but restoring a database was really very manual…. Sometimes, DEV people need to have a fresh database to debug or test their code (again incredible right ?) - of course, they can still debug a TIER2 remotely, but I often needed it (even for me) always to be sure that before committing a new code, I’m quite sure about it ? So developing on a Contoso database, nope 👎 - spending fewer times on these repetitive tasks was my dream 👍 . Or even without anything to do, just set up at first and no more actions in the future 🚀
How ? You will not maybe surprised, but yes of course, I created this solution via mostly (well maybe all the things) in Power Platform. Simple reason, it’s the future, even for Dynamics 365 F&O. It was also time to help you learn more about it, and well - Microsoft is pushing on 1 Cloud 1 Platform - it’s a long road -but it’s always the right time to jump on board. Maybe you already noticed that some features of LCS are now deprecated, provision of a Trial D365 F&O environment could be done via Dataverse as any type of Model Driven App. Power Platform Admin CLI features will be in the future the central way to operate anything you need, even for D365 F&O. And when you buy D365 F&O, you have 5GB Dataverse, helping to link your D365 F&O instance on a 1-to-1 Dataverse - for LCS Addin, again it’s still not mandatory, but I assume in the future, even you don’t need it, it will be created for you behind the scene.
So in this solution I used :
Power Apps Model Driven App to manage all settings needed for all customers in 1 platform
Power Automate - Core Flows as child flow that you can use any time you want - like standard functions (Refresh DB, Backup DB, Restore DB on Azure CHE)
Power Automate - building some sample flows calling those child flows as examples for you
Azure Automation via Runbook
Powershell (hell yeah) - used AzCopy + D365FO.Tools library (that I will really suggest checking about it - if you are a developer/admin !)
Before jumping to explain how to use it + install - any feedback/suggestions/helping to improve, you are free to share. I will try to release any updates based on what I will see in the field of D365 F&O projects ;) - Disclaimer, I made this solution especially for partners managing SEVERAL environments/customers/tenant, but it’s also useful if you are a customer with fewer environments to manage.
So first, you need to download my Github project released here :

On it, you will find 4 things that we will use to install it after.
1 ZIP File : the solution (Power Platform) ; including the Model Driven App, tables of settings (forms, views, business rules), and all the core and sample flows of Power Automate. I released it unmanaged, so you can have access to all of it, and change anything you want.
2 Powershell script (.ps1) - made to restore anytime on Azure Cloud Hosted Environment (CHE) - a backup from LCS
1 Txt file, the runbook code for Azure Automation
Any new version of it will be released in this Github, so you can subscribe/follow/alert
Installation
AZURE APP REGISTRATION
First, for all customers you manage as partner, you need to create an Azure Application Registration on their Azure AD tenant. I would say that is something to do each time you have a new D365 F&O Project
You need to create an Azure AAD in order to connect to the LCS API.
You can go here for the How-To setup :
Don’t forget to copy somewhere your ClientID : ApplicationID (on the Overview tab) and also to generate a ClientSecret (on the Certificate & secrets tab). Also don’t forget to put the Dynamics Lifecycle Services like below as a Delegated access, with Grant Admin permission.

So, now you have the access to call the LCS API, and you can authenticate to it. But maybe, like me, if you had in the past configure the AzureDevOps release pipeline process to connect to LCS (upload package and release the package to a TIER2), you had maybe already an App Registration in your Azure AD, so you can keep it and reuse for this purpose. (the same one)
LCS Service Dedicated Account
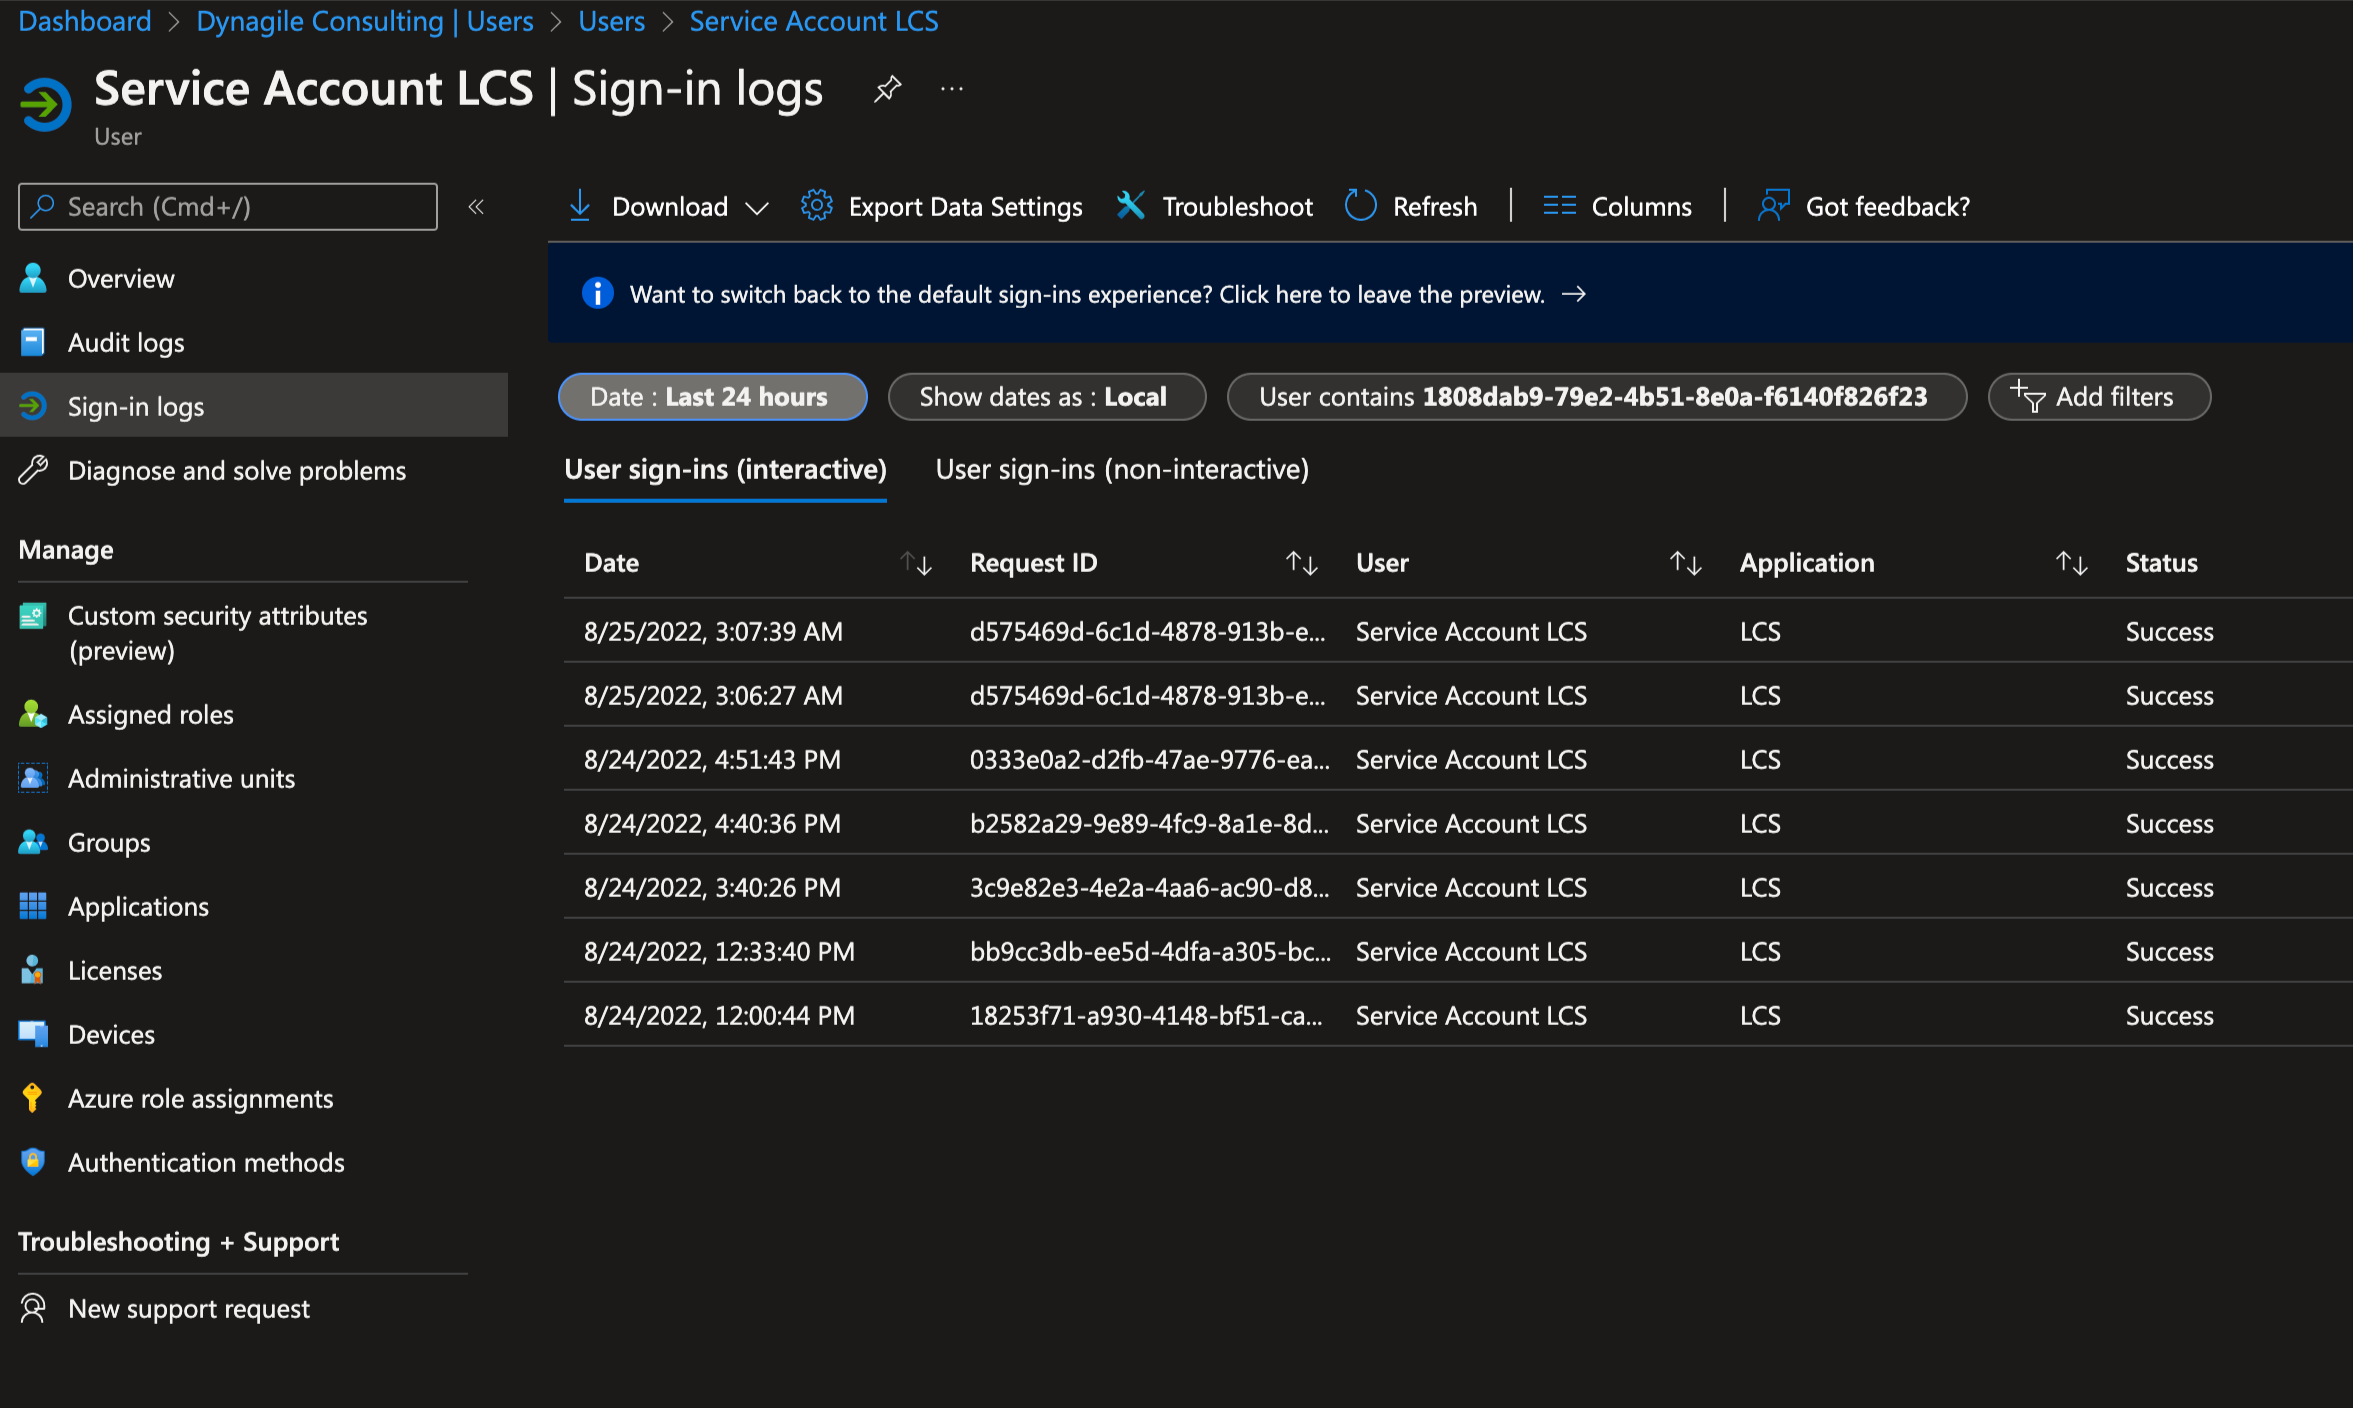
Like for Azure Dev Ops release pipeline + Environment Administrator account of the instance of D365 F&O (mandatory by Fast Track team also), here I would suggest like here to use and creating a dedicated service account on EACH tenant of your customer (like lcs.serviceaccount@domain.com) - without MFA
This account will be just added as a service account for LCS - no more other privileges. You could add other security to this account (like authorize only on LCS App) - after don’t forget to add it to the LCS Project Users as Environment Administrator and connect it manually only 1 time to be well added.
Maybe in the future, it will be possible in LCS to add an account like that with the same Azure App registration - but as of today you still need an account that has access to the LCS Project you manage.
Power Platform Installation
So here we go on the Dataverse side.
First, connect to the maker portal, make.powerapps.com

Pick like below the right environment you want. As a partner, I would suggest installing it on your own partner tenant (like me in Dynagile) - so you manage in just 1 place all your customers.
If you are a customer, install it on 1 Dataverse on your own tenant - you can create a specific one if you need to manage permissions - again you have 5GB free space (even more) - go to the Power Platform Admin Center (PPAC) for that. You need one with a database created, no Dynamics 365 apps needed. Don’t forgot that you can now link your Dataverse to a Billing Policy with Azure PAYG (Pay as you Go) - just in case you are not sure about the Power Platform you have on the tenant.
After, go to “Solutions” and import the ZIP file you have downloaded before from the Github project
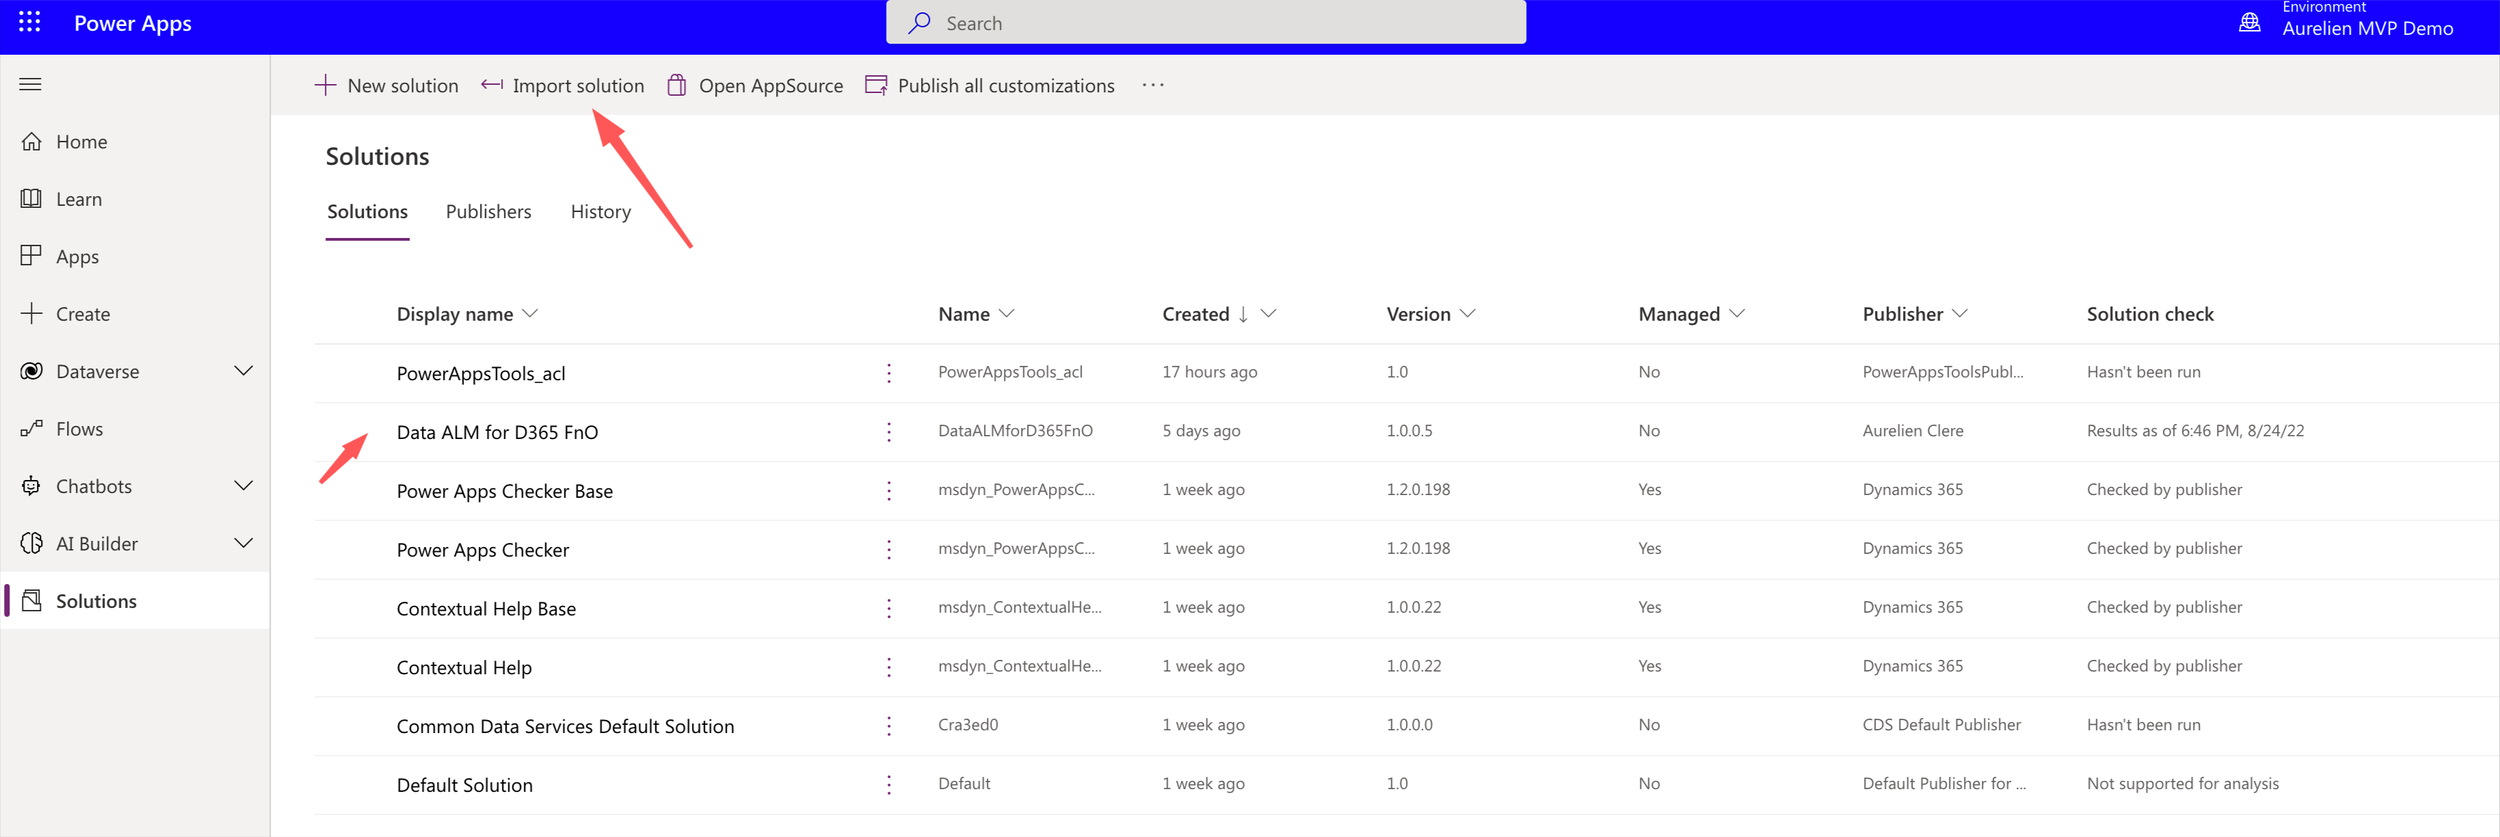
After installation, publish all customizations button.
If you go to Apps, you will see the Model Driven App that I will explain after

Go the Maker Power Automate Portal, https://make.powerautomate.com
You will see the 3 Core Flows and the 3 Sample flows I made. Make sure they are all activated (not grayed out like me) - if not, go to them and click on “TURN ON” button - First, activate the 3 Core Flows and after only the 3 samples in this order. It’s just a reminder, I noticed that it could happen sometimes, and sometimes not… yes Power Platform code ALM is not as best as D365 F&O… :) - Again I will explain after how to use it.

Azure Automation and Runbook Installation + Powershell scripts
As a partner on EACH tenant you manage, you will need to create 1 global Azure Automation - it’s needed for the restore part of Azure CHE of D365 F&O.
As a customer, well again you just need 1.
Go the Azure Portal, and create a resource like me. Pick only SYSTEM identity when you will create the resource

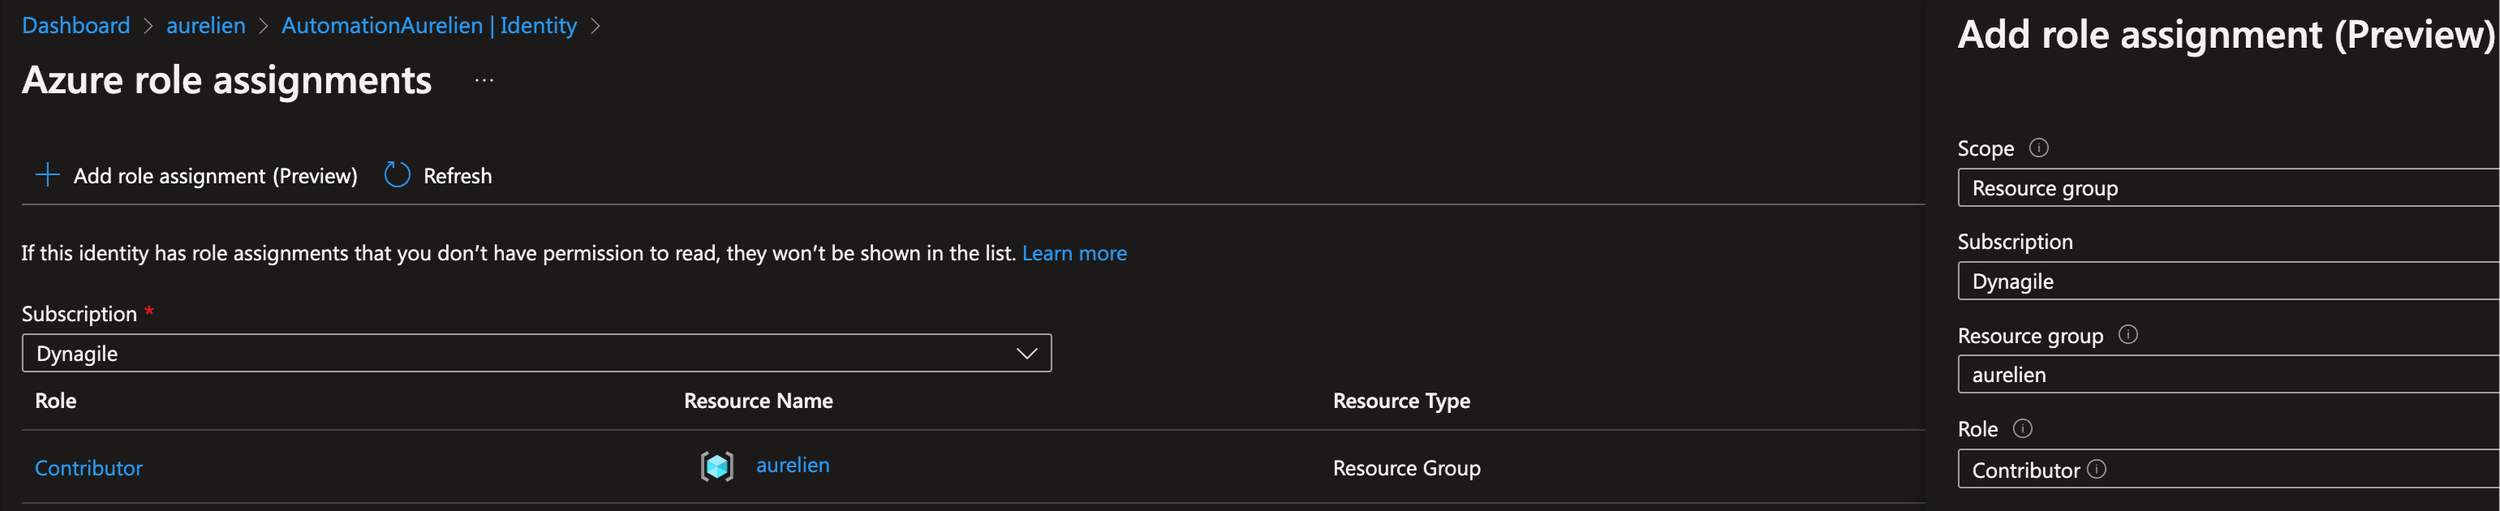
Important step here, you need after to go the IDENTITY part and click on the Azure Role Assignments like below :

Add ALL Azure Cloud Hosted Environments (CHE) VM you have deployed for D365 F&O as Contributor - put the Azure RG (Resource Group) like me, I just have 1 - when you create new one from LCS, remember this step to do ;)
Now, create a new Runbook like me : “DataALM_D365FnO” in Powershell 5.1
(For that, This step needs to be done only 1 time for each tenant, even if you create several new Azure CHE in the future)

When it’s created go to there, and EDIT it, copy/past the code from the TXT file you have downloaded from the Github Project and then publish it. Click on View to check it’s all good.

Now, create the Webhook URL needed after (remember save the URL somewhere, important and put a large expire date)


On the parameter and run settings, go there 1 time, don’t fil anything, just click OK, that will let you have the possibility to have the button “CREATE” available.
Now, on EACH Azure Cloud Hosted Environment, you have, connect to them on RDP/Azure Bastion - this step needs to be done only 1 time also, whenever you have a new one created also.
Copy/paste the 2 Powershell scripts (.ps1) on the C: root folder like me.

The script DataALM_D365FnO is just here as an example, it’s very similar as the runbook, I just gave you the source code in case you want to do it manually for whatever reason. Just explained right after.
BUT, very important, you need to launch the one called _SETUP 1 TIME - if you look at it, it’s only here to here to install the required components, like the D365FO.Tools library and the AzCopy + SQLPackage. Launch it in Powershell ISE in Admin Privileges. If popup comes, click YES/YES to All
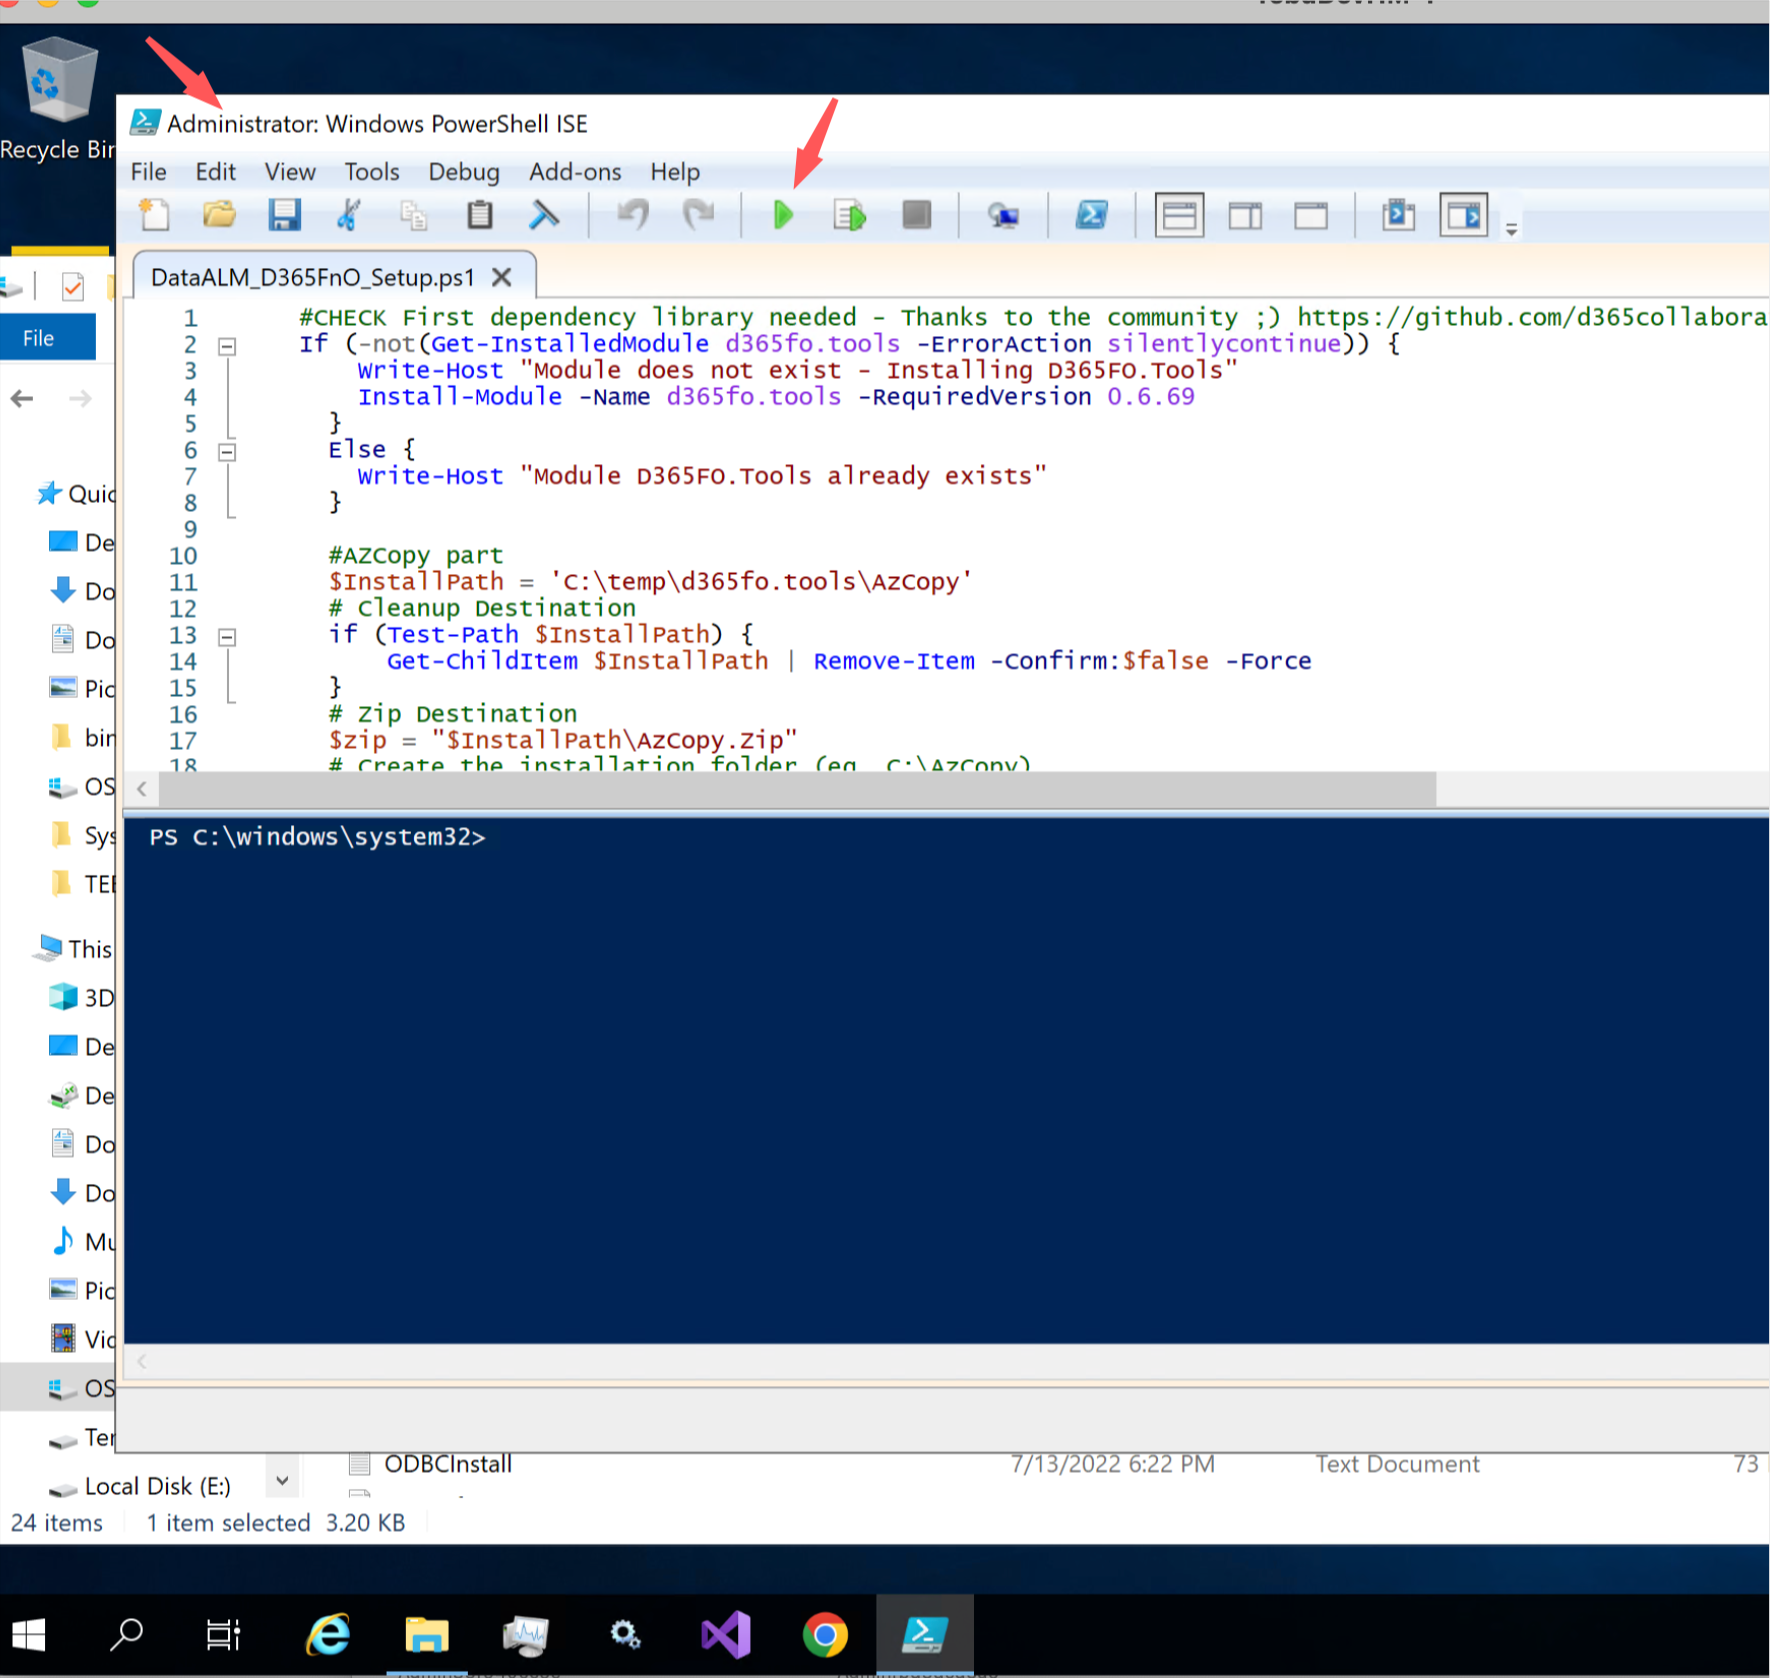
This will create everything needed, especially in the C:Temp folder. With that also, you have now the D365FO.Tools Powershell library for your developer, that can help them for a lot of things ! Amazing work by the way !
    #CHECK First dependency library needed - Thanks to the community ;) https://github.com/d365collaborative/d365fo.tools

      Install-Module -Name d365fo.tools -Force

      #AZCopy part
      $InstallPath = 'C:\temp\d365fo.tools\AzCopy'
      # Cleanup Destination
      if (Test-Path $InstallPath) {
          Get-ChildItem $InstallPath | Remove-Item -Confirm:$false -Force
      }
      # Zip Destination
      $zip = "$InstallPath\AzCopy.Zip"
      # Create the installation folder (eg. C:\AzCopy)
      $null = New-Item -Type Directory -Path $InstallPath -Force
      # Download AzCopy zip for Windows
      Start-BitsTransfer -Source "https://aka.ms/downloadazcopy-v10-windows" -Destination $zip
      # Expand the Zip file
      Expand-Archive $zip $InstallPath -Force
      # Move to $InstallPath
      Get-ChildItem "$($InstallPath)\*\*" | Move-Item -Destination "$($InstallPath)\" -Force
      #Cleanup - delete ZIP and old folder
      Remove-Item $zip -Force -Confirm:$false
      Get-ChildItem "$($InstallPath)\*" -Directory | ForEach-Object { Remove-Item $_.FullName -Recurse -Force -Confirm:$false }
      # Add InstallPath to the System Path if it does not exist
      if ($env:PATH -notcontains $InstallPath) {
          $path = ($env:PATH -split ";")
          if (!($path -contains $InstallPath)) {
              $path += $InstallPath
              $env:PATH = ($path -join ";")
              $env:PATH = $env:PATH -replace ';;', ';'
          }
          [Environment]::SetEnvironmentVariable("Path", ($env:path), [System.EnvironmentVariableTarget]::Machine)
      }

      #SQLPackage part
      $InstallPathSQL = 'C:\SqlPackage'
      # Cleanup Destination
      if (Test-Path $InstallPathSQL) {
          Get-ChildItem $InstallPathSQL | Remove-Item -Confirm:$false -Force
      }
      # Zip Destination
      $zip = "$InstallPathSQL\SqlPackage.Zip"
      # Create the installation folder
      $null = New-Item -Type Directory -Path $InstallPathSQL -Force
      # Download AzCopy zip for Windows
      Start-BitsTransfer -Source "https://aka.ms/sqlpackage-windows" -Destination $zip
      # Expand the Zip file
      Expand-Archive $zip $InstallPathSQL -Force
      # Move to $InstallPathSQL
      Get-ChildItem "$($InstallPathSQL)\*\*" | Move-Item -Destination "$($InstallPathSQL)\" -Force
      #Cleanup - delete ZIP and old folder
      Remove-Item $zip -Force -Confirm:$false
      Get-ChildItem "$($InstallPathSQL)\*" -Directory | ForEach-Object { Remove-Item $_.FullName -Recurse -Force -Confirm:$false }
      # Add InstallPathSQL to the System Path if it does not exist
      if ($env:PATH -notcontains $InstallPathSQL) {
          $path = ($env:PATH -split ";")
          if (!($path -contains $InstallPathSQL)) {
              $path += $InstallPathSQL
              $env:PATH = ($path -join ";")
              $env:PATH = $env:PATH -replace ';;', ';'
          }
          [Environment]::SetEnvironmentVariable("Path", ($env:path), [System.EnvironmentVariableTarget]::Machine)
      }
Again it’s here the only code I have made… NoCode Power Platform / ProCode in Powershell ;)
function Invoke-DataALMD365FnO {

    try
    {

        $identity = [System.Security.Principal.WindowsIdentity]::GetCurrent().Name
        Write-Output "Username launching the Powershell : " $identity

        #PARAMS part - you could also pass through by edtiting this script as arguments
        $UserName = ""
        $Password = ""
        $ClientId = ""
        $ProjectId = ""
        $LcsApiUri = "https://lcsapi.lcs.dynamics.com"
        $ServerInstance = ""

        $stopwatch =  [system.diagnostics.stopwatch]::StartNew()

        #Connect to LCS and set it. No MFA Account (dedicated service account - should have access to LCS - AppReg needed for LCS - could be stored to an Azure Key Vault)
        Write-Output "Connect to LCS..."
        Get-D365LcsApiToken -Username $UserName -Password $Password -ClientId $ClientId -LcsApiUri $LcsApiUri | Set-D365LcsApiConfig
        Set-D365LcsApiConfig -ClientId $ClientId -ProjectId $ProjectId
        Write-Output "LCS Connection is OK."

        #We retrieve only the latest backup made - could be also possible to pass it through as external parameter or via a filter
        Write-Output "Retrieve the last backup on LCS"
        $Backup = Get-D365LcsDatabaseBackups -Latest
        #We will store in a TEMP folder that you have in DevBox already
        $BackupPath = "C:\Temp\"
        $BackupPath += $Backup.FileName
        #Invoke AzCopy to automatically download it
        Invoke-D365AzCopyTransfer -SourceUri $Backup.FileLocation -DestinationUri $BackupPath -Force
        Write-Output "Backup downloaded to " + $BackupPath

        #Part of the Restore SQL
        #1st we shutdown all AX Services (AOS etc...)
        Write-Output "Stop all AX Services"
        Stop-D365Environment -All
        Write-Output "Waiting 60 seconds, just to make sure that all services are really stopped..."
        Start-Sleep -Seconds 60 #Just to make sure...
        #2nd we erase the previous AxDB - I would suggest anyhow to always activate automatic backup in DevBox if needed ;)
        #Replace by the name of your machine for ServerInstance
        Write-Output "Deleting the previous AxDB..."
        Invoke-SqlCmd -ServerInstance $ServerInstance -Query "BEGIN ALTER DATABASE [AxDB] SET SINGLE_USER WITH ROLLBACK IMMEDIATE; DROP DATABASE [AxDB]; END;" -Verbose

        #3rd we restore the backup on it
        Write-Output "Launching the SQL Restore"
        $fileExe = "C:\SqlPackage\sqlpackage.exe"
        & $fileExe /a:import /sf:$BackupPath /tsn:localhost /tdn:AxDB /p:CommandTimeout=1200 /TargetEncryptConnection:False


        #4th SYNC DB + reactivate all AX Services (AOS etc...)
        Write-Output "Launching SYNC DB"
        Invoke-D365DBSync
        Write-Output "Starting all AX Services"
        Start-D365Environment -All
        Write-Output "Waiting 60 seconds, just to make sure that all services are really started..."
        Start-Sleep -Seconds 60

        #After import we could erase it (the .bacpac) - if you like you can move it elsewhere to archive it.
        Write-Output "Erase the backup downloaded"
        Remove-Item -Path $BackupPath -Force

        $stopwatch.Stop()
        $elapsed = $stopwatch.ElapsedMilliseconds
        $stopwatch.Reset()
        Write-Output $elapsed "Milliseconds in total for the whole operation"
        Write-Output "All OK - Finished"

    }
    catch
    {
        Write-Output "Something threw an exception"

    }

}

Invoke-DataALMD365FnO > C:\Log_DataALMD365FnO.txt
This script is globally the same as the one you copy/paste in the Runbook of Azure Automation. Just putting some PARAMS on it that will be send by Power Automate + Starting the VM (you could stop it at the end if you like : Stop-AzVM -ResourceGroupName $rgname -Name $vmname -Force)
But this one can be used even you don’t want the other rest of the solutions, meaning you just want the .PS1 script to restore DB manually without any actions ! (Just replace the few params at the beginning of the script)
A Log file is generated on C folder too.
So globally first, I’m connecting on LCS… that’s not a surprise. I’m using the LCS Service Dedicated account + Azure App Registration created before. I grab the last backup made on LCS / Asset Library. (could be changed here if you like to filter and grab other ones)
We download it locally via AzCopy. We stop everything on the VM (AX Services, like AOS, Batch etc…)
We delete the old AXDB database, remember a backup could be done before.
We restore via the SQLPackage.exe (that is the long step in fact) - and right after, we SYNC the database, relaunching the AX Services - remove the bacpac file ; and voila ;)
ALL the installation is now done, maybe I will create sometime an ARM template for Azure, but despite that, I think the installation is quite easy… I hope so ;)
Configuration
Model Driven App (MDA) - Settings
So now, you have all installed, let’s configure it - not so much you will see.
If you go the maker Power Apps Portal, go the App MDA I made.
You will see 2 parts :

1st one is dedicated to register all CUSTOMER you have as a partner (if you are a customer, well you will have only here 1 record 😁)
It’s important to fill EVERY informations needed.
Don’t forget when you create a new one, to go to the Settings tab (I try to found also a PCF Customer Control with password input field, that works 😰 - no luck…)
LCS API URI : https://lcsapi.lcs.dynamics.com (very often this one is used, but that depends if you are on a dedicated LCS like UAE, France etc…)
LCS Project ID : the LCS number you have it on the URL : Like here when you are on an environment details : https://lcs.dynamics.com/V2/EnvironmentDetailsV3New/xxxxxxxx
LCS Client ID and Secret : the Azure App Registration you have created before for your customer
UserName & Password : the dedicated service account of LCS you have also created before
The webhook automation URL : the one you have created and saved somewhere ;) via Azure Automation & Runbook.

Now last step of configuration, Go to Environments

Create all your Production, Sandbox, and Azure Cloud Hosted Environment (DevBox - CHE) you have for EACH customer.
For Sandbox (TIER2) and Production instance, it’s quite easy, just need the Environment ID you have on the Environment Details

For Azure CHE, it’s a little more
Serverinstance is the local SQL instance (by default the name of the Azure VM)
LocalAccount & Password is the Admin account you have on the Environment Details of the Azure CHE.
Azure RG Name & Azure VM Name : the Azure Resource Group and the name of the Virtual machine

And that’s it ;) - of course when you have new environments - or new customers - just had to enter the new information.
Explanation
Core FLOWS - Power Automate
So I have built 3 main flows, that you can call as we called : Child Flows

Refresh DB : the one used to refresh PROD/Sandbox to another Sandbox
Backup DB : the one used to backup Sandbox (TIER2)
RestoreDBCHE : the one used to call Azure automation and restore locally the DB on an Azure Cloud Hosted Environment DevBox - CHE
Like below, I have also made few Samples as demonstration to see how to call those 3 Child Flows. I made also comments on it.
Because each of them can leverrage the goal of Power Automate : like doing a Worklow Approbation before a refresh via an Adpative Card in Teams, notifiy people that is refresh has been asked by who, when ; doing a recurence or on-demand thing - reactivate users, batch or other things via the Dynamics 365 F&O Connnector automatically. Well the list is very long 🤪
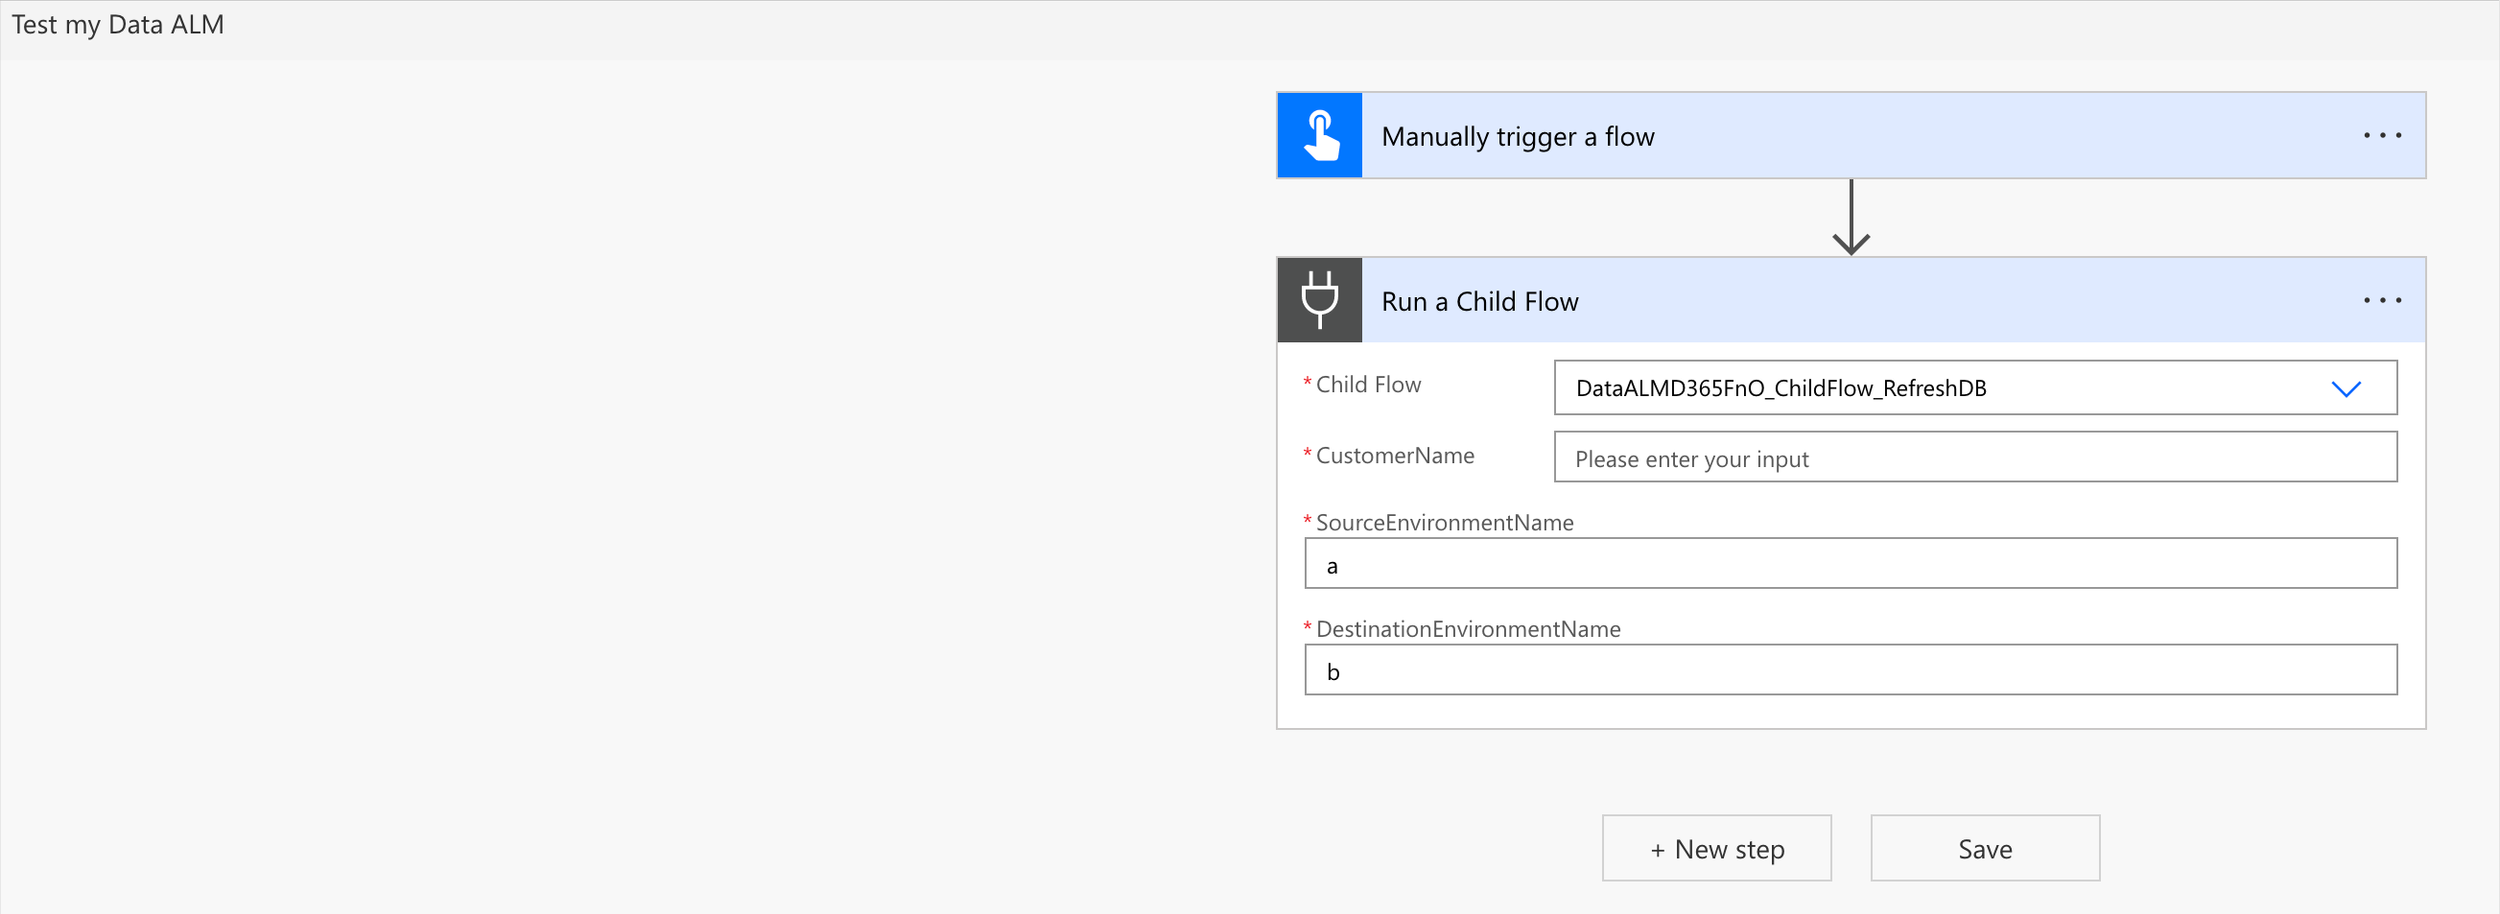
Like before, you check the “source” code if we can call it like this with Power Automate, to check how I’ve done that. Each Core flows return a Status (string) : Finished or Error. As an input, the Child flow require to pass some arguments, often the Customer Name + the environment names you have made as settings in the Model Driven App - stored in Dataverse side.
Examples - Start build your own ones
You can call them as a standard function outside of an another flow
I will suggest to create an another solution on Dataverse (your own one) and create your own FLOWS on YOUR solution
Could be Scheduled (recurence) or an Instant one


Of course you can start building something great, like for EVERY customers I want to refresh DB at 3.00,
Or Every Sunday I want to backup DB on each customers I have, and plus maybe restore all Azure CHE of all customers
Like here for all customers, restore the latest backup on LCS every sunday. To filter on the customer, since it’s a lookup, put something like this on the Customer : _acl_customer_value eq xxxxxxx
For the type of environment - it’s an optionset (990000002 is for CHE, 990000001 for Sandbox, 990000000 for Production)
Btw, customer name is unique (index) in Customer Table - For environment table, the index is : environment name + customer (concat)

But enough words, let’s do a quick demonstration in video - Hope you like this new solution !