Dynamics 365 F&O / DevOps and GitHub - ALM New Generation
Hello the Community!
After a long break, I'm excited to dive back in with a new, in-depth article. My experience working extensively with MCP, AI, Finance & Operations (F&O), and Business Process Automation (BPA), as well as years spent on Lifecycle Services (LCS), has set the stage for the major shift we’re witnessing now. We are moving into a new phase: the Unified ALM experience for Dynamics 365 Finance & Operations with also a lot of help with AI as Copilot is also a good fit to help building your YAML as we will see after 😊
With F&O now converging into the Power Platform Admin Center (PPAC), and the growing influence of GitHub and DevOps automation, it is time to reconsider our approaches to managing the application lifecycle. This transition covers everything from initial development to final deployment, introducing new tools and processes that streamline and modernize our workflows.
This article is the natural continuation of my previous post on the Unified Developer Experience (UDE), where I introduced the shift from LCS to PPAC and the new local development model. If you haven’t read it yet, I highly recommend checking it out here: https://www.powerazure365.com/dynamics-365-finops-unified-developer-experience.
By the way I always updated it from 2023, including the Unified ALM but here we will really cover everything from start, as you were just signed a new F&O project and start directly only in PPAC era.
Now, let’s go deeper. In this guide, I’ll walk you through how to set up a modern DevOps pipeline using GitHub or Azure DevOps, how to manage environments in PPAC, and how to automate deployments using YAML and PAC CLI. We'll also explore the latest enhancements from Microsoft and community tools that make our lives easier.
I will focus more first things first into Azure DevOps mode, but at the end I will finish with GitHub only mode for F&O ! This guide is designed for Dynamics 365 F&O developers and consultants transitioning from traditional LCS and TFVC-based workflows to modern Git and DevOps practices.
Before jumping into my article, of course I’ll highly suggest to review/read 2 very good blog/articles about this subject (and I know that there are more) - of course mine is “just” an another way to give back to the community and try to help you in 2026 in this topic :
AND THEN DURING ALL THIS ARTICLE I WILL SPOKE ABOUT YAML, CODES, SAMPLES etc… all of them are ready to download there, and I will try to push more of them in the coming weeks !
Table of Content :
Git Integration, Branching Strategy & Pull Requests for Dynamics 365 F&O
Automating Environment Management with YAML, PAC CLI & PowerShell
⚠️ Current Limitations & Expected Microsoft Enhancements (2026)
🛠️ Community Power: d365bap.tools for Advanced ALM Automation
Comprehensive Automation with MCP and GitHub Copilot Agent: The Future of X++ Development
☁️ Deploying the X++ MCP Server to Azure App Service: Enterprise-Grade Hosting
Ready to ditch LCS and embrace modern ALM? Discover how to supercharge your Dynamics 365 F&O development with GitHub, Azure DevOps, and YAML automation. From PPAC migration to advanced Git workflows and AI-powered tools like GitHub Copilot MCP—this is your blueprint for next-gen X++ DevOps.
Getting Started: Setup & Prerequisites
Before diving into pipelines and automation, let’s make sure your foundation is solid. Here are the key steps to get started with Unified ALM for Dynamics 365 F&O.
1. Create Your Azure DevOps Organization
If you’re starting from scratch, I’ve already covered the basics of creating a new Azure DevOps organization in this article: https://www.powerazure365.com/blog-1/automation-alm-power-platform#devops . It includes step-by-step guidance on setting up your first project, configuring repositories.
2. Connect Azure DevOps to Your F&O Project
As a quick reminder, DevOps has now blocked access to classic pipelines in the UI, and you can only use the new pipeline experience (YAML only) for builds and releases. Additionally, environment management is fully integrated within this modern setup, so the traditional "release" option is no longer available.
Once your organization is ready:
Create a new project in Azure DevOps.
Choose Git as your version control system (TFVC is not really deprecated for Unified ALM but as of now in 2026 I will highly recommend going forward to use only GIT).
Clone your repository locally using Visual Studio 2022 and soon – officially - 2026 😊
Install the Dynamics 365 F&O Visual Studio extension from the Visual Studio Marketplace.
Connect your Visual Studio to your Azure DevOps project using your credentials or a Personal Access Token (PAT).
3. Install Required DevOps Extensions
To enable build and release pipelines for F&O, install the following extensions in your Azure DevOps organization:
Dynamics 365 Finance and Operations Tools (especially if you are still using LCS, I will cover it a little here just in case, but I will focus more on the new PPAC era only)
Power Platform Build Tools (for the new F&O PPAC era of Unified Experiences environments and even to help you deploying Dataverse solutions in general for Power Platform components)
Azure Key Vault (optional, for managing secrets securely)
I think there are some great other extensions in the marketplace, feel free to check out :
SonarCloud (for code quality and static analysis)
WhiteSource Bolt (for open source security and compliance scanning)
Slack or Teams Integration (for automated notifications and team collaboration)
ServiceNow or JIRA DevOps (for integrating ITSM workflows with your pipelines)
Code Search (to quickly search and explore code across your projects directly from the Azure DevOps search bar)
These extensions can further enhance your build, release, and collaboration workflows, providing valuable automation, quality checks, advanced searchability, and integration with external tools. Review the Azure DevOps Marketplace regularly for new and trending extensions that fit your team's specific needs.
You can find these in the Azure DevOps Marketplace. Then at the end of article we will talk about GitHub only mode.
Additionally, you might consider setting up a dedicated GitHub repository for the technical aspects of your project, such as source code and CI/CD workflows, while leveraging Azure DevOps for project management, work item tracking, and release pipelines. This approach allows you to benefit from GitHub’s developer-centric features and community integrations, while maintaining robust organizational controls and collaboration through DevOps.
Important distinction: GitHub, Git, VSTS (now Azure DevOps), TFVC, and TFS are often confused but serve different purposes. Git is a distributed version control system, while GitHub is a cloud-based platform built around Git for hosting repositories and facilitating collaboration. Azure DevOps (formerly VSTS) provides a suite of tools for CI/CD, project tracking, and integrates with Git or TFVC. TFVC (Team Foundation Version Control) is a centralized version control system, and TFS (Team Foundation Server) is the on-premises predecessor to Azure DevOps, supporting both TFVC and Git. Choosing the right tool depends on your workflow needs: GitHub for open collaboration and Git-based source control, Azure DevOps for enterprise project management and pipelines, and TFVC/TFS for legacy or centralized version control environments.
4. Paid Agents & Storage Limits
When working with build pipelines for F&O, you’ll need to consider:
Azure Artifacts Storage: By default, Azure DevOps provides 2 GB of free storage for artifacts. If you’re building large deployable packages or storing multiple versions, you may need to purchase additional storage.
In addition to Azure Artifacts storage, it's crucial to note that you will need to purchase a paid agent for your build pipelines, especially in the Unified ALM and PPAC era. The free tier now offers 1,800 minutes per month, with a new restriction of 60 minutes maximum per pipeline run. In PPAC, pipeline execution is not asynchronous, meaning you must wait for the entire run to complete and receive full logs before proceeding. Microsoft should ideally provide a more streamlined deployment experience like LCS, where you could simply launch a deployment and receive a notification upon completion.
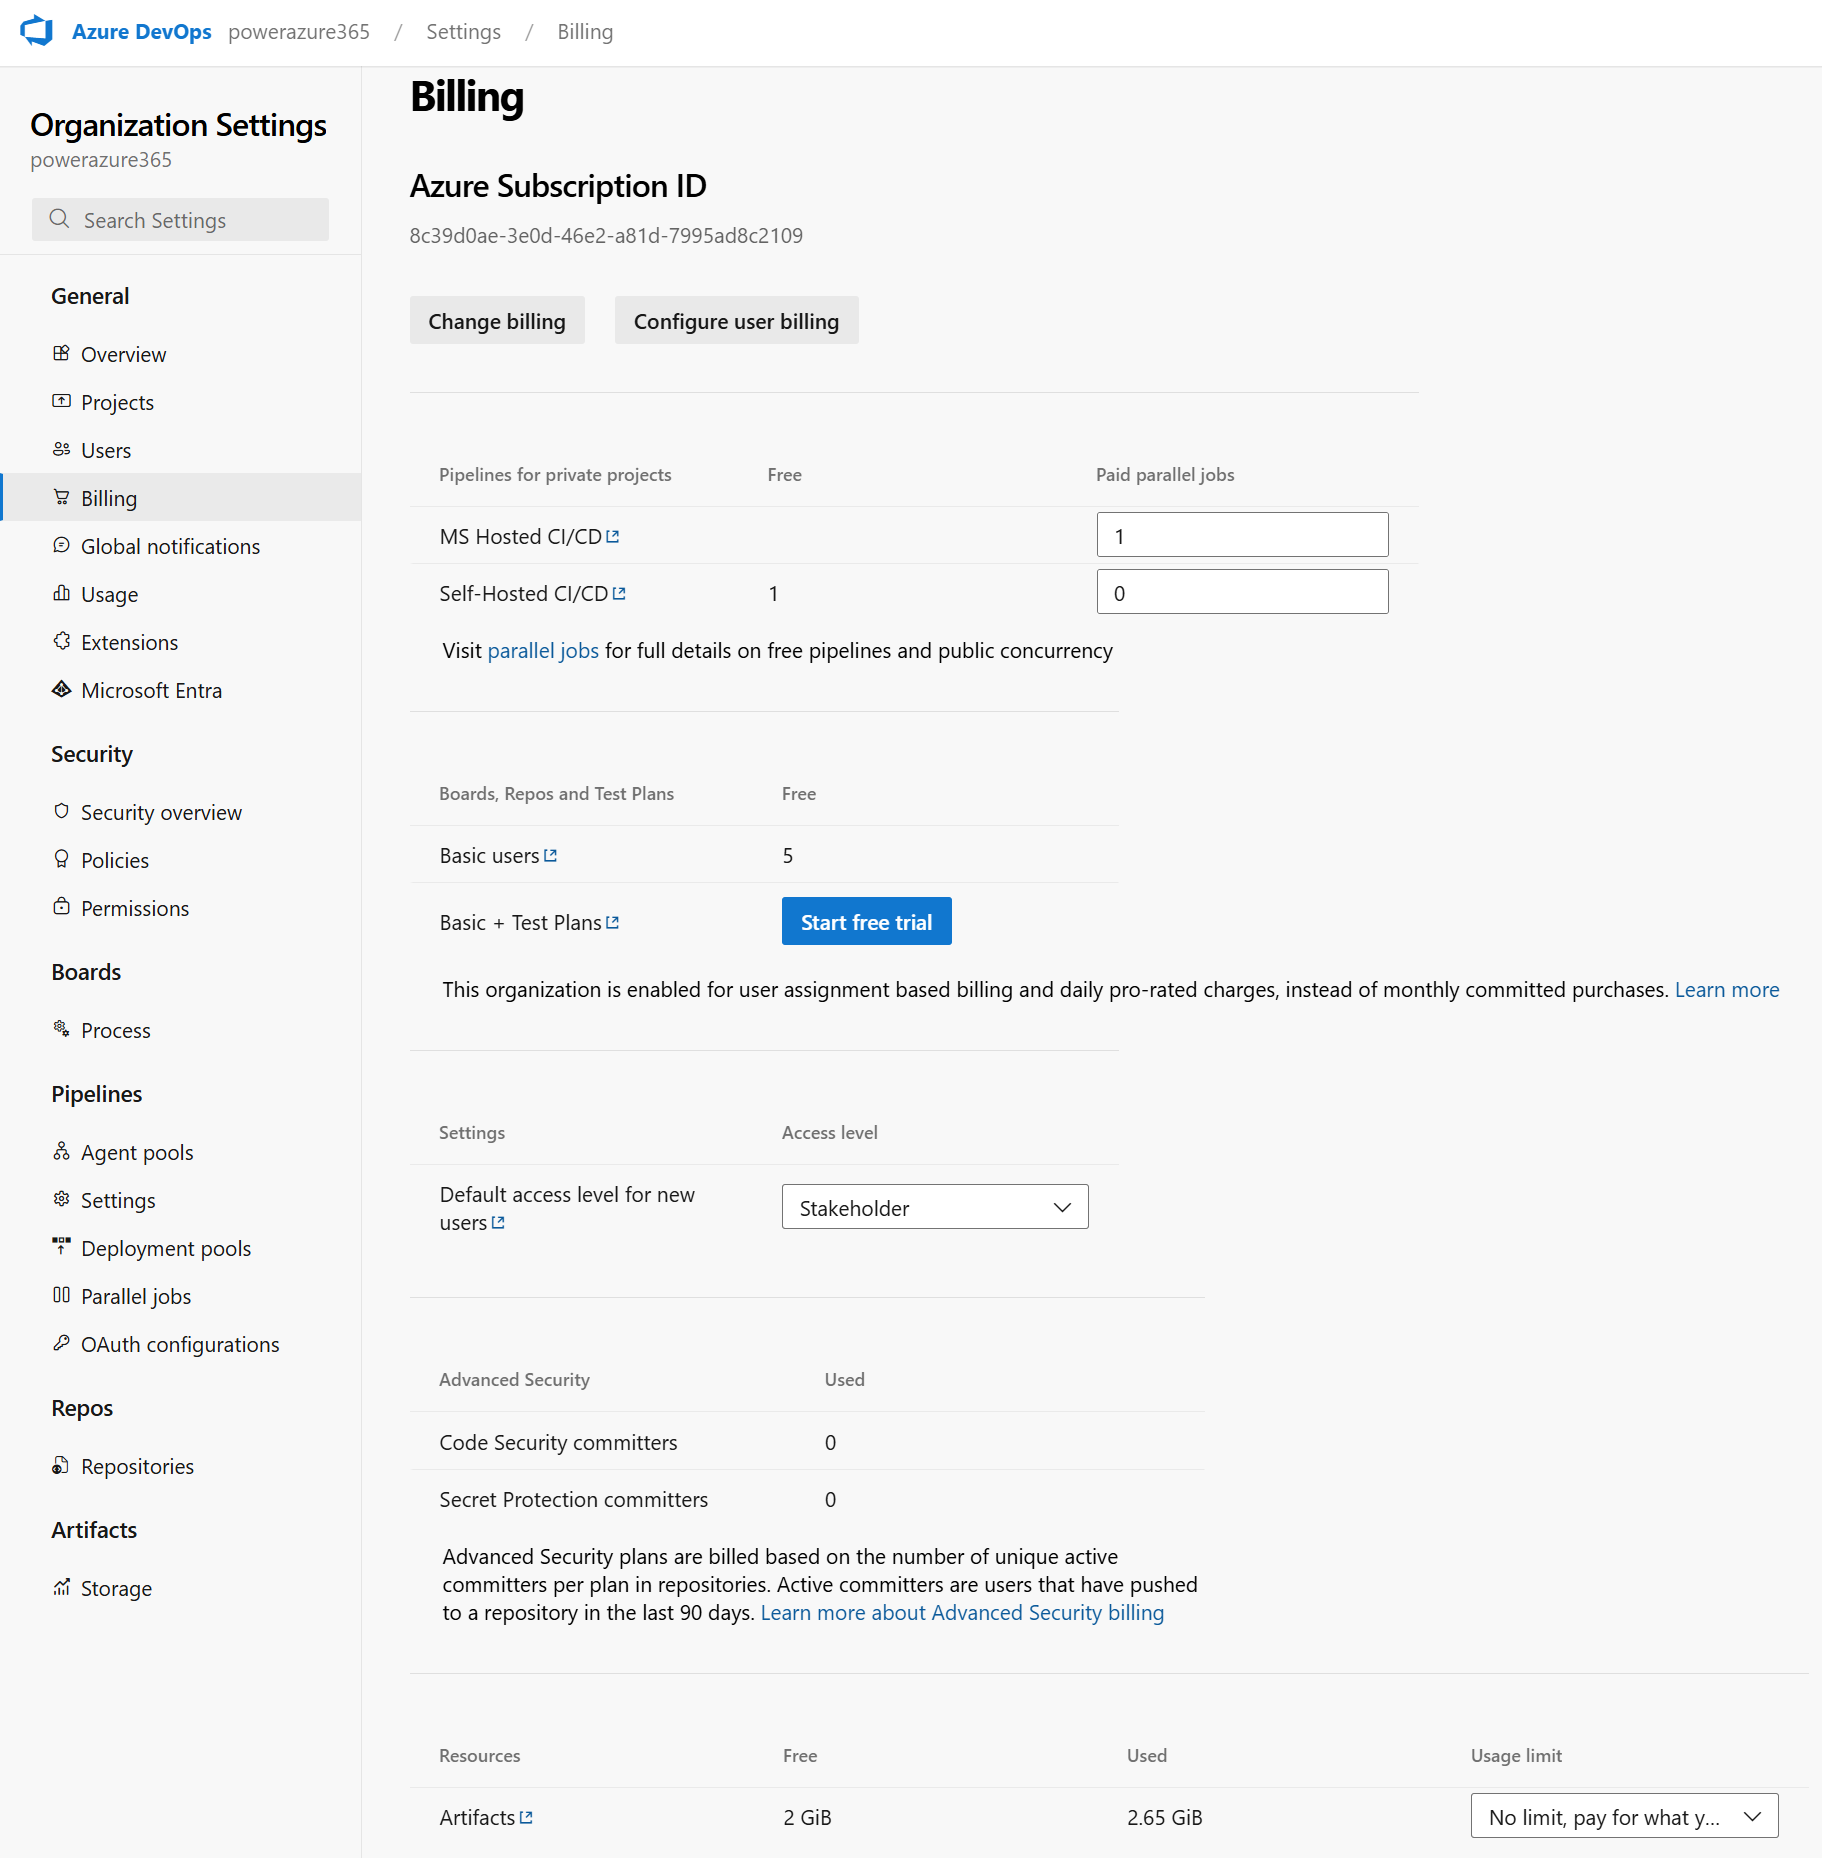
For automated notifications, you can leverage the msprov_operationhistory table in Dataverse (by the way Microsoft: could you put this table in readonly mode for audit purpose… 😊) and quickly build a Power Automate flow to alert you when deployment is finished. Remember to utilize the Model Driven App: Finance and Operations Package Manager for managing deployable packages. Additionally, DevOps offers other OOTB notification features to keep your team informed throughout the process.
💡 Tip: Use retention policies to automatically delete old artifacts and save space.
DevOps Wiki and Effective Markdown Documentation
Azure DevOps Wiki is a powerful tool for creating, sharing, and maintaining project documentation directly within your DevOps environment. Wikis can be used to capture onboarding guides, architecture decisions, troubleshooting steps, and process documentation, making knowledge easily accessible for your team.
To create high-quality documentation, you can use markdown syntax both in Wiki pages and in README.md files. Markdown allows you to format text with headings, lists, code blocks, tables, and links, ensuring your documentation is clear and visually organized. For example, use # for headings, * or - for bullet lists, and triple backticks (```) for code snippets.
Wiki: Start by creating a Wiki in your Azure DevOps project. You can add pages, organize them hierarchically, and collaborate in real time. Use templates for consistency across documentation.
README Files: Place a README.md file at the root of your repository to provide an overview, setup instructions, and links to additional resources. This file is often the first thing new contributors see, so keep it concise and well-structured.
For best results, include screenshots, diagrams, and example commands in your Markdown files. Regularly update documentation to reflect changes in processes or technology and encourage team members to contribute improvements.
You can use Copilot also to generate it for you ☺️. Copilot can help draft initial Wiki pages or README files, suggest markdown formatting, and even automate documentation updates based on your repository changes, saving you time and ensuring consistency.
Then final important actions aka Service Connections: App Registration & Service Principal Setup
To automate deployments and interact with Power Platform or LCS environments from Azure DevOps or GitHub Actions, you need to create a secure service connection using an Azure AD App Registration and a Service Principal.
When creating an App Registration and Service Principal for Azure DevOps service connections, you need to assign specific API permissions to enable secure automation and integration. Typically, you will grant Application permissions rather than Delegated permissions, as the service principal will be acting on behalf of your automation instead of a user.
For most DevOps scenarios, including Power Platform or LCS deployments, you should add permissions such as Microsoft Graph > Application.Read.All (to allow the app to read directory data), and any additional permissions required by the target resource (for example, Dynamics CRM > user_impersonation if working with Power Platform). After adding the required permissions, be sure to click Grant admin consent so the service principal can use them without user interaction.
Always review the documentation for your specific integration to confirm which permissions are necessary and follow the principle of least privilege by only granting what is required for your automation tasks.
Quick Recap: To create an Azure App Registration, your account must have the Application Administrator or Cloud Application Administrator role in Azure Active Directory. Without these permissions, you won't have access to register applications or manage their settings. Check your role in the Azure portal to ensure you have the required access before proceeding.
1. Create an App Registration in Azure AD
Go to https://portal.azure.com > Azure Active Directory > App registrations.
Click New registration.
Name it (e.g., DevOps-PowerPlatform-SP).
Set the redirect URI to https://dev.azure.com (optional for DevOps).
Click Register.
2. Generate a Client Secret
In your App Registration, go to Certificates & secrets.
Click New client secret.
Set an expiration (e.g., 12 or 24 months).
Copy the secret value immediately—you won’t be able to retrieve it later.
3. Assign API Permissions
For Power Platform (Dataverse):
Go to API permissions > Add a permission > APIs my organization uses.
Search for PowerApps Service and Dynamics CRM.
Add delegated and/or application permissions:
user_impersonation (for Dataverse)
Environment.Read.All, Environment.Write.All, etc. (for PPAC)
For LCS (if still used):
Add permissions for Microsoft Dynamics Lifecycle Services. I think I was talking about the way to create App Registration for LCS API long time ago here: https://www.powerazure365.com/blog-1/data-alm-dynamics-365-finance-operations in the Installation part.
Note: LCS integration is being deprecated in favor of PPAC (soon or later, surely in 2027). Again, my article is more for the new generation, aka PPAC era only but if you are already live in F&O for few years, maybe you still have few LCS environments left, so better to know and use this new ALM way and just change the last-mile as you will be already quite good using this new ALM generation.
4. Assign Roles to the Service Principal
For Power Platform:
Go to PPAC : https://admin.powerplatform.microsoft.com
Select the environment > Settings > Users + permissions > Application users. (S2S Apps)
Add your App Registration as an Application User.
Assign the appropriate security role (e.g., System Administrator or custom ALM role).
For LCS:
In LCS, go to your project > Project Users
Add also a dedicated service account, without MFA (argh… yes good enhancement for PPAC here !) , as you will see that you will need when you will configure the DevOps Service Connection for LCS.
Assign the "Environment Manager" role.
5. Create the Service Connection in Azure DevOps
Go to your Azure DevOps project > Project Settings > Service connections.
Click New service connection > Choose:
Power Platform (for PPAC)
Dynamics Lifecycle Services (for LCS)
Fill in:
Tenant ID
Client ID (from App Registration created before)
Client Secret (from App Registration created before and just for the PPAC connection here)
Server URL for PPAC : here it’s the URL CRM environment of your Unified Experiences Environment, not the F&O one!
Username/Password (only for LCS mode)
LCS API endpoint here be careful if you are in the EU, US or other regions in LCS. You can double check that here : https://ariste.info/dynamics365almguide/creating-the-lcs-connection/
Name the connection (e.g., PPAC-ServiceConnection) and save. Remember well this part as you will use it in the YAML files later on !
❗ Common Pitfall:
If your pipeline fails to authenticate, double-check that:
The App Registration has the correct permissions
The client secret hasn’t expired
The service principal is added as an Application User in the environment
The environment URL is correct (e.g., https://org.crm4.dynamics.com)
Security Tip: Always store your client secrets in Azure Key Vault or GitHub Secrets. Never hardcode them in your YAML files.”
Using Variable Groups in YAML Pipelines
In Azure DevOps YAML pipelines, variable groups are a powerful feature that allows you to define and manage sets of variables centrally. These groups can be linked to one or more pipelines, making it easy to reuse configuration values like connection strings, environment names, or credentials across multiple builds and releases.
To use a variable group in your YAML pipeline, first create the group in the Azure DevOps portal and add your variables. Then, reference the group in your pipeline definition using the variables keyword, for example:
variables:
- group: MyVariableGroup
This will make all variables in MyVariableGroup available throughout your pipeline. You can access them using the $(variableName) syntax.
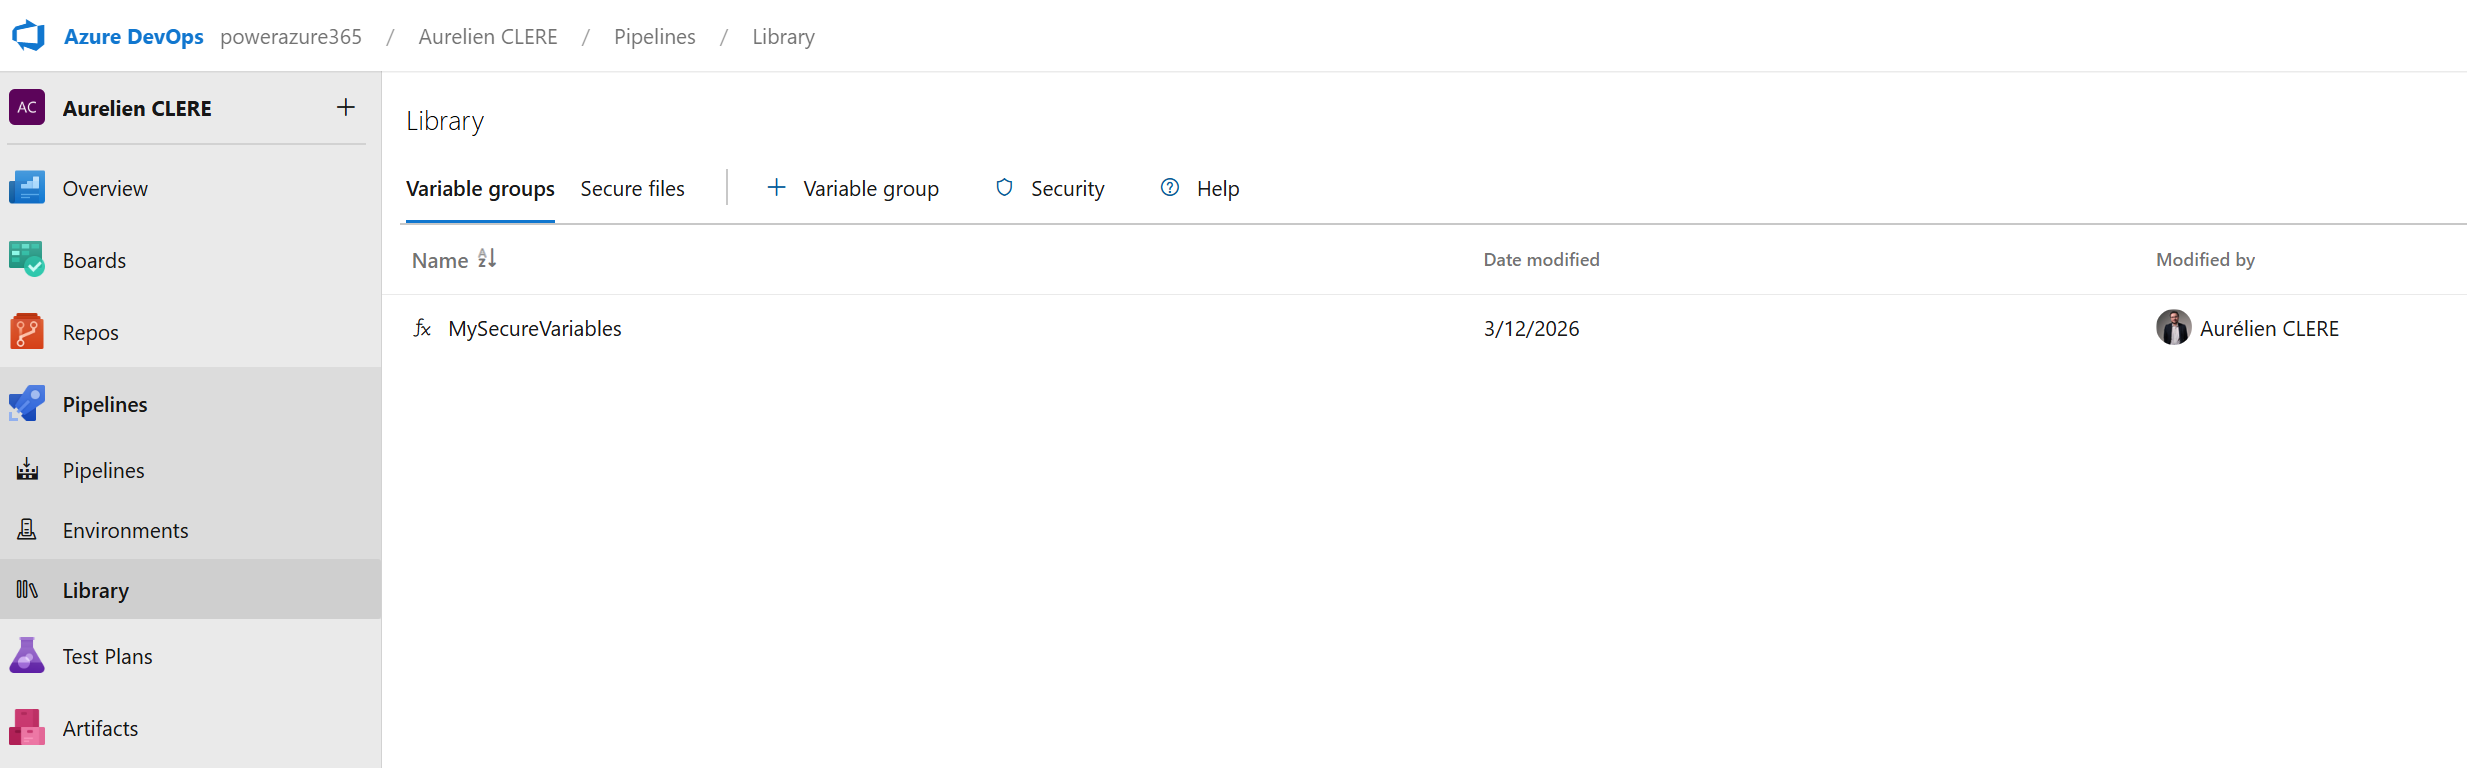
Storing Secrets with Azure Key Vault
For sensitive information, such as client secrets or API keys, it's best to store them securely in Azure Key Vault. Azure DevOps integrates with Key Vault so you can link a variable group directly to a Key Vault, ensuring secrets are never exposed in your pipeline code or logs.
Create an Azure Key Vault and add your secrets.
In Azure DevOps, create a variable group and link it to your Key Vault.
Reference the variable group in your YAML pipeline as shown above. Secrets from the Key Vault will be injected as pipeline variables and marked as secret, so their values are masked in logs.
This approach ensures that sensitive credentials are centrally managed, rotated easily, and never hardcoded in your YAML files—improving both security and maintainability.
If you’re using GitHub instead of Azure DevOps, you’ll use the same App Registration and store the credentials as GitHub Secrets. More on this in the GitHub section.
Let’s move on to the next section—like Git integration, branching strategy and policies, Pull Requests —and I’ll help you draft that too!
Git Integration, Branching Strategy & Pull Requests for Dynamics 365 F&O
Now that our environment and service connections are ready, let’s move into one of the most important shifts in the Unified ALM journey: moving from TFVC to Git.
Many Dynamics 365 F&O consultants and developers have historically used TFVC (Team Foundation Version Control), especially when working with Lifecycle Services (LCS) and Visual Studio. But with the Unified Developer Experience (UDE) and the move to Git-based workflows, it’s time to embrace a more modern, flexible, and collaborative approach to source control.
Let’s break it down step by step.
TFVC vs Git: Quick Comparison
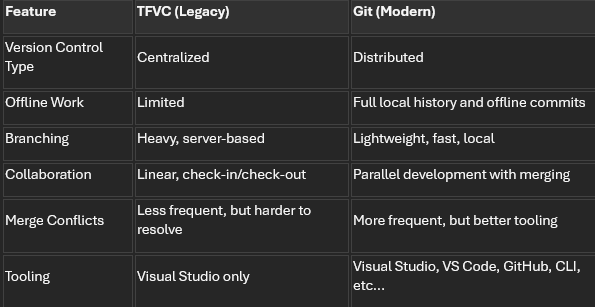
Git is the industry standard today for a reason. It’s fast, flexible, and built for collaboration. And with GitHub and Azure DevOps both supporting Git natively, it’s the foundation of any modern ALM strategy.
Branching Strategy: What Works for Dynamics 365 F&O?
In traditional web or software projects, branching strategies like GitFlow or trunk-based development are common. But for Dynamics 365 F&O, we need to adapt these patterns to fit the realities of ERP development—longer testing cycles, multiple environments (Dev, UAT, PreProd, Prod), and strict release governance.
Here’s a recommended branching strategy tailored for F&O projects:
Main Branches
main or prod: The production-ready code. Only validated, tested, and approved code lives here.
develop: The integration branch for all new features. This is what gets deployed to UAT or PreProd.
Supporting Branches
feature/*: For new features or enhancements. Each developer creates their own feature branch.
bugfix/*: For fixing bugs found in UAT or production.
release/*: Optional. Used to prepare a release candidate from develop before merging to main.
💡 Tip: Keep branches short-lived. Merge early, merge often.
In addition to the strategies mentioned above, some teams may also benefit from adopting hotfix/* branches for urgent fixes that must be applied directly to production, or experiment/* branches for prototyping and testing ideas without impacting main development flows. Another approach is using environment-specific branches, such as dev/* or uat/*, to isolate changes intended for particular deployment stages. The choice of branching strategy should align with the team's workflow and release cadence to ensure smooth collaboration and efficient delivery.
Branch Git Policies: Enforcing Quality
To maintain code quality and avoid chaos, apply these branch policies in Azure DevOps or GitHub:
Require pull requests (PRs) to merge into develop or main (this one very important !!)
Require at least 1–2 reviewers for each PR
Enforce successful build validation before merging
Require linked work items (e.g., DevOps task or GitHub issue)
Enforce commit message formatting (optional but useful)
Disallow direct pushes to protected branches
These policies help ensure that every change is reviewed, tested, and traceable.
Pull Requests: The Heart of Collaboration
A Pull Request (PR) is how you propose changes to a shared branch (like develop or main). It’s not just about merging code—it’s about collaboration, quality, and accountability.
Here’s what happens in a typical PR workflow:
A developer finishes a feature or fix in their personal branch.
They push their changes to the remote repository.
They open a PR targeting develop (or main for hotfixes).
Reviewers (usually a Tech Lead or peer developers) review the code.
Comments, suggestions, or requested changes are addressed.
Once approved and validated by the build pipeline, the PR is merged. Here we will see after the YAML pipelines needed to have this build validation for each PR.
💡 Tip: Use PR templates to guide contributors on what to include (e.g., description, screenshots, linked work items).
Day in the Life of a Developer Using Git with UDE
Let’s walk through a typical daily workflow for a Dynamics 365 F&O developer using Git and the Unified Developer Experience:
Start your day by opening Visual Studio on your local machine, connected to your UDE (Unified Developer Environment). And surely some coffee as you will need to wait before each deployment in UDE 😊…
Pull the latest changes from the develop branch to stay up to date:
git checkout develop
git pull origin develop
Create your personal feature branch:
git checkout -b feature/SCM-1234-add-vendor-validation
(Use a naming convention like feature/SCM-1234-description where SCM-1234 is your work item ID.)
Link your branch to a work item in Azure DevOps or GitHub:
In Azure DevOps: associate your branch with a work item.
In GitHub: reference the issue number in your commit or PR (e.g., Fixes #123).
Do your development work in Visual Studio:
Modify X++ code, metadata, or models.
Build and test in your UDE.
Commit your changes:
git add .
git commit -m "SCM-1234: Added vendor validation logic to VendTable form"
Push your branch to the remote repository:
git push origin feature/SCM-1234-add-vendor-validation
Open a Pull Request:
Target: develop branch
Add reviewers (e.g., Tech Lead, peer developer)
Link the work item or issue
Add a description and screenshots if needed
Wait for review and approval:
Address feedback if any
Once approved and build passes, the PR is merged
Clean up:
git checkout develop
git pull origin develop
git branch -d feature/SCM-1234-add-vendor-validation
Before we dive into YAML pipelines, it's essential to understand how to properly organize your Git repository for F&O development. A well-structured repository makes automation easier, improves collaboration, and ensures your pipelines run smoothly.
My Recommended Repository Layout (but it’s mine, so… you can do other way if you like for sure 😊)
Here's the folder structure I use across my Dynamics 365 F&O projects (and what I recommend you follow):
- /Trunk (or /Main)
- ├── /Metadata
- │ ├── /YourCustomModel1
- │ │ ├── /Descriptor
- │ │ │ └── YourCustomModel1.xml
- │ │ ├── /AxClass
- │ │ ├── /AxTable
- │ │ └── /AxForm
- │ ├── /YourCustomModel2
- │ └── /ISVModels (if applicable)
- ├── /Projects
- │ ├── /AzureBuild
- │ │ ├── YourCustomModel1.rnrproj
- │ │ ├── YourCustomModel2.rnrproj
- │ │ ├── AzureBuild.sln (solution file grouping all projects)
- │ │ ├── nuget.config
- │ │ └── packages.config
- ├── /Tools
- │ ├── /Build
- │ │ ├── nuget.config (alternative location)
- │ │ └── packages.config (alternative location)
- │ └── /Pipelines
- │ ├── build-pipeline.yml
- │ ├── deploy-pipeline.yml
- │ └── pr-validation-pipeline.yml
- ├── /Scripts
- │ ├── /Deployment
- │ │ └── Pre-Post-Scripts.ps1
- │ └── /Utilities
- ├── /Licenses (optional)
- │ └── ISVLicenses.txt
- ├── .gitignore
- └── README.md
Why This Structure?
Let me explain the reasoning behind each folder:
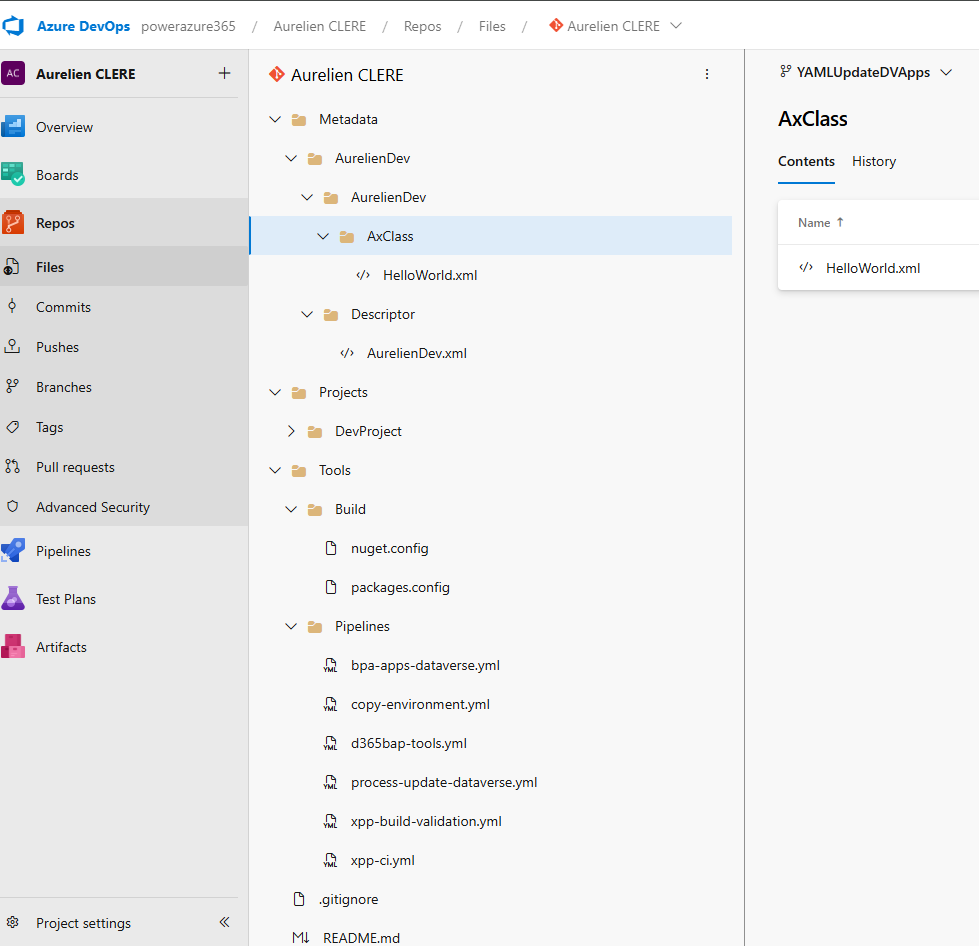
/Metadata
This is where all your X++ source code lives. Each custom model has its own folder with:
Descriptor folder: Contains the model descriptor XML (required for build)
Element folders: AxClass, AxTable, AxForm, etc.
💡 Tip: Never manually edit files in /Metadata. Always use Visual Studio to ensure consistency.
/Projects
This contains Visual Studio projects (.rnrproj) for each package you want to build. Key points:
One project per package: You only need one project per package, even if the package contains multiple models
Solution file (.sln): Groups all your projects together and defines build order
Empty projects are OK: The project doesn't need to contain objects—it's just used to tell the compiler which package to build
/Tools/Build or /Projects/AzureBuild
This is where your nuget.config and packages.config files live. These files are critical for build pipelines (we'll cover them in detail below).
You can place them in either location—just be consistent and reference the correct path in your pipeline variables.
/Tools/Pipelines
Store your YAML pipeline definitions here. This keeps your automation code versioned alongside your source code.
/Scripts
Any PowerShell or other scripts you need for deployment, environment setup, or utilities.
Essential Files: .gitignore – but I will give you mine in my GitHub example project of all the YAML files.
Create a .gitignore file at the root to exclude unnecessary files:
########################################
# Visual Studio – User-specific files
########################################
*.user
*.userosscache
*.suo
*.rsuser
*.sln.docstates
*.wsuo
*.DotSettings.user

########################################
# Visual Studio – Build results
########################################
[Bb]in/
[Oo]bj/
bld/
x64/
x86/
[Ww][Ii][Nn]32/
[Aa][Rr][Mm]/
[Aa][Rr][Mm]64/
#*.dll
*.exe
*.pdb
*.cache
*.dbmdl
*.ipch
*.aps
*.ncb
*.opendb
*.opensdf
*.sdf
*.VC.db
*.VC.VC.opendb
*.pidb
*.tlog
*.log
*.tmp
*.tmp_proj
*.vspscc
*.vssscc
*.psess
*.vsp
*.vspx
*.coverage
*.coveragexml
*.e2e
*.sbr
*.tlb
*.tli
*.tlh
*.ilk
*.meta
*.obj
*.iobj
*.pch
*.rsp
*.svclog
*.scc
*.binlog

########################################
# Visual Studio – IDE folders
########################################
.vs/
.vscode/
.vscode/*
!.vscode/settings.json
!.vscode/tasks.json
!.vscode/launch.json
!.vscode/extensions.json
!.vscode/*.code-snippets

########################################
# GitHub Copilot / AI Indexing
########################################
.vs/**/CopilotIndices/
.vs/**/CopilotIndices/*
.vs/**/CopilotIndices/**/*.db
.vs/**/CopilotIndices/**/*.db-shm
.vs/**/CopilotIndices/**/*.db-wal
CodeChunks.db*
SemanticSymbols.db*

########################################
# D365FO – Build artifacts and metadata
########################################
Metadata/**/bin/
Metadata/**/Reports/
Metadata/**/Resources/
Metadata/**/WebContent/
Metadata/**/XppMetadata/
Metadata/**/XppSource/
Metadata/**/BuildModelResult.xml
Metadata/**/BuildProjectResult*.xml
Metadata/**/CompileLabels.xml
Metadata/**/BPCheck.xml
Metadata/**/Resources/**/*.resources.dll
Metadata/**/Resources/**/*.delete
Metadata/**/Resources/*.dll
Metadata/*/*.xml
Metadata/*/*.xref
*.version
*.rdl
*.xref
*.tmp
*.log

# Keep label resources
!Metadata/**/LabelResources/

#GIT ignore exemptions if needed
!Metadata/**/bin//MyISVDLLExample.dll
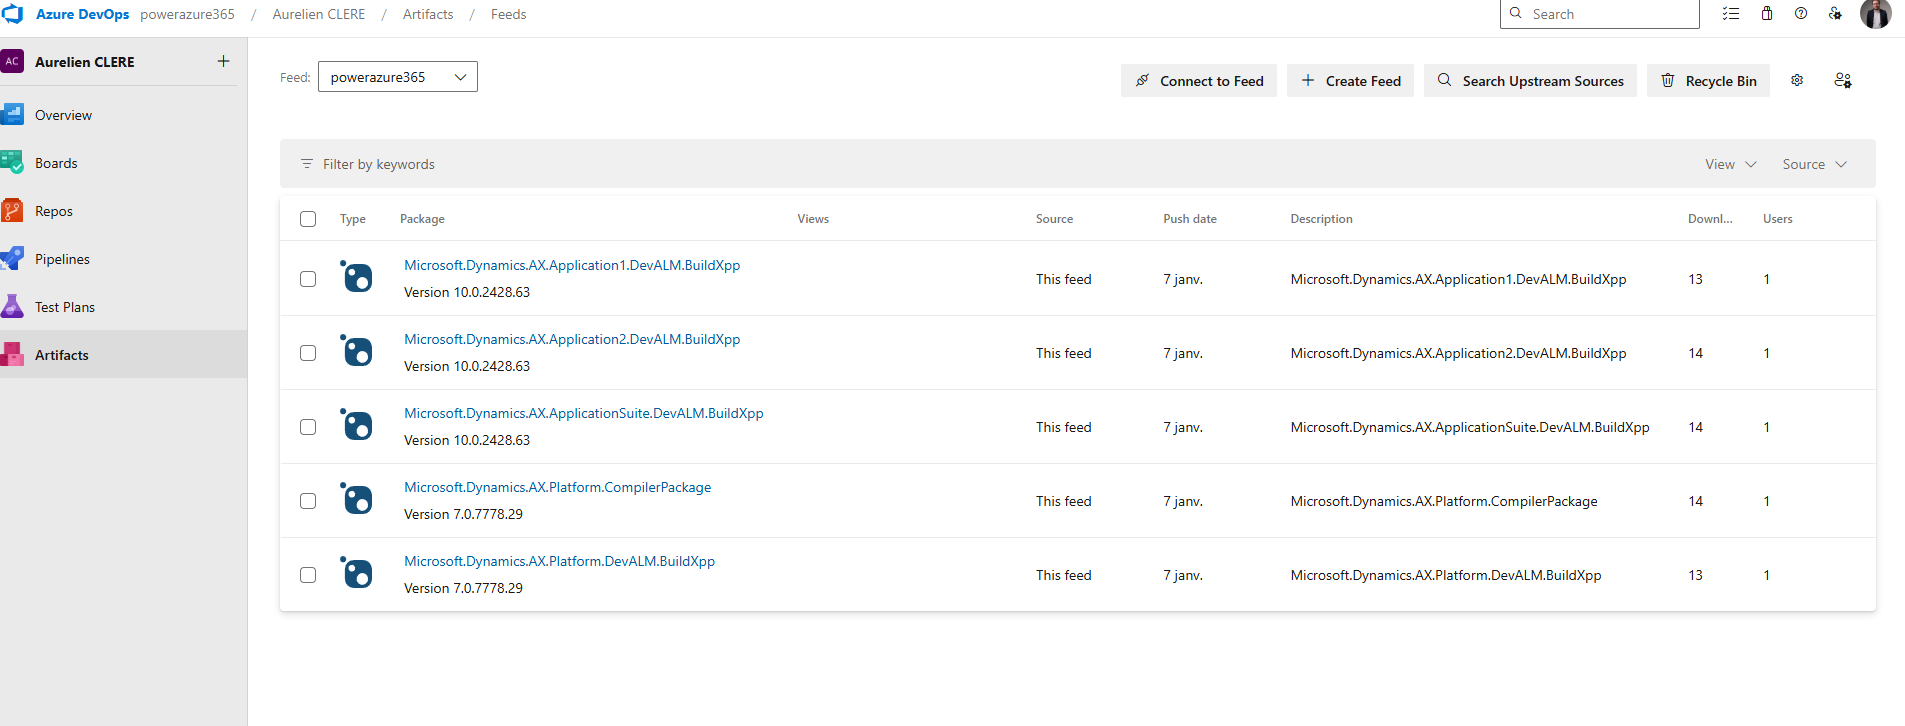
Azure DevOps Artifacts & NuGet Packages for F&O
Now let's cover one of the most critical parts of F&O build automation: managing NuGet packages. To build F&O packages without a full build VM, we rely on NuGet packages that contain the compiler and reference binaries. Let’s see how to set this up.
What Are These NuGet Packages?
To build X++ code without a full Build VM, you need compiler tools and reference binaries distributed as NuGet packages. Microsoft provides these in LCS Shared Asset Library (we will see how and when Microsoft will change that with PAC CLI via a semi-public feed that will replace all this part) :
Microsoft.Dynamics.AX.Platform.CompilerPackage (~200 MB)
Contains xppc.exe (X++ compiler) and build tools
Name in LCS: PUXX/10.X.XX – Compiler Tools
Microsoft.Dynamics.AX.Platform.DevALM.BuildXpp (~150 MB)
Compiled Platform code (optimized for building)
Name in LCS: PUXX/10.X.XX – Platform Build Reference
Microsoft.Dynamics.AX.Application1.DevALM.BuildXpp (~80 MB)
Application 1 compiled code
Name in LCS: PUXX/10.X.XX – Application 1 Build Reference
Microsoft.Dynamics.AX.Application2.DevALM.BuildXpp (~80 MB)
Application 2 compiled code
Name in LCS: PUXX/10.X.XX – Application 2 Build Reference
Microsoft.Dynamics.AX.ApplicationSuite.DevALM.BuildXpp (~150 MB)
Application Suite compiled code
Name in LCS: PUXX/10.X.XX – Application Suite Build Reference
Important: Download NuGet packages that exactly match the version of your target Finance & Operations environment, or an earlier version—never a newer one. For example, if your environment is on 10.0.46, use NuGet packages for 10.0.46 or an earlier compatible version. In addition, it is recommended to always download the General Availability (GA) version, rather than every release Microsoft provides for each Platform Quality Update (PQU). Please also take care to update it as soon as possible when you are updating your F&O versions on your environment.
Step-by-Step: Setting Up Azure Artifacts Feed
1. Create an Artifacts Feed
Go to your Azure DevOps project
Navigate to Artifacts > Create Feed
Name it (e.g., Dynamics365FO or D365-NuGet-Feed)
Visibility: Keep it private to your organization
Storage note: You get 2 GB free storage. The 5 NuGet packages total ~660 MB, so you should be fine. Use retention policies to clean up old versions.
2. Download NuGet.exe
Download from https://www.nuget.org/downloads
Save it to a local folder (e.g., C:\D365Build\)
Optionally, add it to your Windows PATH
Alternative: Use dotnet nuget commands if you have .NET SDK installed.
3. Install Credential Provider
Run this PowerShell command to install the Azure Artifacts credential provider:
Via PowerShell
iex "& { $(irm https://aka.ms/install-artifacts-credprovider.ps1) }"
If it keeps asking for credentials, try:
Via PowerShell
iex "& { $(irm https://aka.ms/install-artifacts-credprovider.ps1) } -AddNetfx"
4. Create nuget.config
In Azure DevOps, click Connect to feed > Select nuget.exe
Copy the XML content shown
Create a file named nuget.config in your local folder
Example content:
XML
<?xml version="1.0" encoding="utf-8"?>
<configuration>
<packageSources>
<clear />
<add key="Dynamics365FO" value="https://pkgs.dev.azure.com/YourOrg/YourProject/_packaging/Dynamics365FO/nuget/v3/index.json" />
</packageSources>
</configuration>
The feed URL must match exactly what's shown in your "Connect to feed" page.
5. Create packages.config
Create a packages.config file listing all NuGet packages and their versions:
XML
<?xml version="1.0" encoding="utf-8"?>
<packages>
<package id="Microsoft.Dynamics.AX.Platform.CompilerPackage" version="7.0.7521.60" targetFramework="net40" />
<package id="Microsoft.Dynamics.AX.Platform.DevALM.BuildXpp" version="7.0.7521.60" targetFramework="net40" />
<package id="Microsoft.Dynamics.AX.Application1.DevALM.BuildXpp" version="10.0.2177.37" targetFramework="net40" />
<package id="Microsoft.Dynamics.AX.Application2.DevALM.BuildXpp" version="10.0.2177.37" targetFramework="net40" />
<package id="Microsoft.Dynamics.AX.ApplicationSuite.DevALM.BuildXpp" version="10.0.2177.37" targetFramework="net40" />
</packages>
💡 How to get version numbers: Right-click the .nupkg file > Properties > Details tab. Or extract the package and look at the .nuspec file inside.
6. Upload NuGet Packages to Azure Artifacts
Now push each package to your feed with Powershell :
# Navigate to folder with NuGet packages
cd C:\D365Build\
# Push each package (update feed name and paths)
nuget.exe push -Source "Dynamics365FO" -ApiKey az Microsoft.Dynamics.AX.Platform.CompilerPackage.7.0.7521.60.nupkg
nuget.exe push -Source "Dynamics365FO" -ApiKey az Microsoft.Dynamics.AX.Platform.DevALM.BuildXpp.7.0.7521.60.nupkg
nuget.exe push -Source "Dynamics365FO" -ApiKey az Microsoft.Dynamics.AX.Application1.DevALM.BuildXpp.10.0.2177.37.nupkg
nuget.exe push -Source "Dynamics365FO" -ApiKey az Microsoft.Dynamics.AX.Application2.DevALM.BuildXpp.10.0.2177.37.nupkg
nuget.exe push -Source "Dynamics365FO" -ApiKey az Microsoft.Dynamics.AX.ApplicationSuite.DevALM.BuildXpp.10.0.2177.37.nupkg
If you have a slow or unreliable internet connection, you may encounter timeout errors during the NuGet push process. By default, the timeout is set to 5 minutes, but you can increase it by adding the -Timeout parameter to your command. For example:
nuget.exe push -Source "Dynamics365FO" -ApiKey az -Timeout 1200 Microsoft.Dynamics.AX.Platform.CompilerPackage.7.0.7521.60.nupkg
In this example, -Timeout 1200 sets the timeout to 20 minutes (1200 seconds). Adjust this value as needed to accommodate your connection speed.
7. Commit nuget.config and packages.config to Git
Once uploaded, commit these two files to your repository:
git add Projects/AzureBuild/nuget.config
git add Projects/AzureBuild/packages.config
git commit -m "Add NuGet configuration for build pipeline"
git push origin develop
These files tell your build pipeline:
nuget.config: Where to find the NuGet feed
packages.config: Which packages and versions to restore
Tips & Best Practices
One nuget.config per repository
You don't need a separate file for each project. Use one centralized location and reference it via variables in your pipeline.Update packages regularly
When Microsoft releases new quality updates, download the new NuGet packages and upload them. Update the version numbers in packages.config.Use feed views for stability
Create a @Release view in your Artifacts feed and promote stable package versions to it. Reference this view in production pipelines.Storage management
If you hit the 2 GB limit, delete old package versions you're no longer using:Artifacts > Select package > Versions > Delete old versions
⚠️ Common Pitfall:
If your build fails with "Unable to find package", double-check:
Feed URL in nuget.config is correct
Package versions in packages.config match what's in your feed
Your build agent has access to the feed (service connection or PAT)
Now that we have:
A clean Git repository structure
Visual Studio projects for each package
NuGet packages uploaded to Azure Artifacts
nuget.config and packages.config in source control
This Git-based workflow brings structure, traceability, and collaboration to your Dynamics 365 F&O development process. It may feel different from TFVC at first, but once you get used to it, you’ll never want to go back!
Next up, we’ll dive into YAML pipelines and how to automate your build and release process for F&O and Dataverse using PAC CLI and Unified Packages.
Let’s keep going!
YAML Pipelines, Environments & Workflow Approvals
Now that we've covered Git, branching, and repository structure, let's dive into the heart of automation: YAML pipelines. This is where all your DevOps magic happens—compiling X++ code, creating deployable packages, and deploying them to UAT and Production environments with proper governance and approvals. (By the way, you have good YAML online editor on the web) to help building it and with the right indentation)
What Are Pipelines?
A pipeline is a series of automated steps that build, test, and deploy your code. Think of it as a conveyor belt in a factory: code goes in at one end, and a production-ready deployable package comes out at the other end.
In Azure DevOps, pipelines can be defined in two ways:
Classic Pipelines (GUI-based) — deprecated and not recommended
YAML Pipelines (code-based) — modern, version-controlled, and recommended
Why YAML?
Your pipeline is stored in Git alongside your code
Changes to the pipeline go through Pull Requests and code review
Pipelines are portable and reusable across projects
Full transparency and traceability
Pipeline Organization Strategy
For a Dynamics 365 F&O project, I recommend organizing your pipelines into three separate YAML files, each with a specific purpose:
· xpp-build-validation.yml
o Purpose: Validate Pull Requests. Runs on every PR to ensure code compiles successfully before merging.
o Trigger: Manual or PR only. Does NOT deploy to any environment.
· xpp-ci-uatonly.yml
o Purpose: Continuous Integration to UAT. Builds code and deploys only to UAT environment.
o Trigger: Scheduled (e.g., daily at 2 AM) or manual.
· xpp-ci.yml
o Purpose: Full CI/CD pipeline. Builds code, deploys to UAT, then to Production after approval.
o Trigger: Scheduled or manual. Requires approval before Production deployment.
This separation keeps your workflows clean and gives you flexibility. Let's break down each pipeline step-by-step. Of course, it’s just an example for you, you can adapt based on your own needs 😊
Pipeline Anatomy: Step-by-Step Breakdown
I'll use xpp-ci.yml as the main example since it contains all the components (build + UAT + Production). The other pipelines follow the same structure but with fewer stages.
Pipeline Header & Triggers
YAML
name: $(Date:yy.MM.dd)$(Rev:.r)
trigger:
- none
What this does:
name: Defines the build number format. Here it's YY.MM.DD.revision (e.g., 26.03.06.1). This becomes your model version.
trigger: none: Disables automatic triggers on commits. The pipeline only runs manually or on schedule.
💡 Why disable triggers? For F&O projects with long build times (10–20 minutes, sometimes even more based on the number of extensions and models), you don't want every commit triggering a build. Instead, use Pull Request validation or scheduled builds.
Scheduled Builds
YAML
schedules:
- cron: "0 2 * * *" # 2:00 AM every day
displayName: Daily Build at 02:00 UTC
branches:
include:
- main
always: false
What this does:
Runs the pipeline daily at 2:00 AM UTC
Only if there have been changes to the main branch since the last build (always: false)
💡 Tip: Schedule builds during off-peak hours to avoid competing for resources.
Global Pool & Variables
YAML
pool:
vmImage: 'windows-latest'
variables:
App1Package: 'Microsoft.Dynamics.AX.Application1.DevALM.BuildXpp'
App2Package: 'Microsoft.Dynamics.AX.Application2.DevALM.BuildXpp'
AppSuitePackage: 'Microsoft.Dynamics.AX.ApplicationSuite.DevALM.BuildXpp'
PlatPackage: 'Microsoft.Dynamics.AX.Platform.DevALM.BuildXpp'
ToolsPackage: 'Microsoft.Dynamics.AX.Platform.CompilerPackage'
MetadataPath: '$(Build.SourcesDirectory)\Metadata'
NugetConfigsPath: '$(Build.SourcesDirectory)\Tools\Build'
NugetsPath: '$(Pipeline.Workspace)\NuGets'
What this does:
pool: Specifies the build agent. windows-latest is a Microsoft-hosted agent with Windows Server and Visual Studio pre-installed.
variables: Defines reusable values throughout the pipeline. Notice the NuGet package names match what we uploaded to Azure Artifacts.
Stage 1: Build X++ Code & Create Deployable Package
Now we get to the meat of the pipeline—the build stage.
YAML
stages:
- stage: Build
displayName: X++ Build & Package
jobs:
- job: BuildXpp
displayName: Build solution and create deployable package
steps:
A stage is a logical grouping of jobs. A job is a series of steps that run sequentially on the same agent.
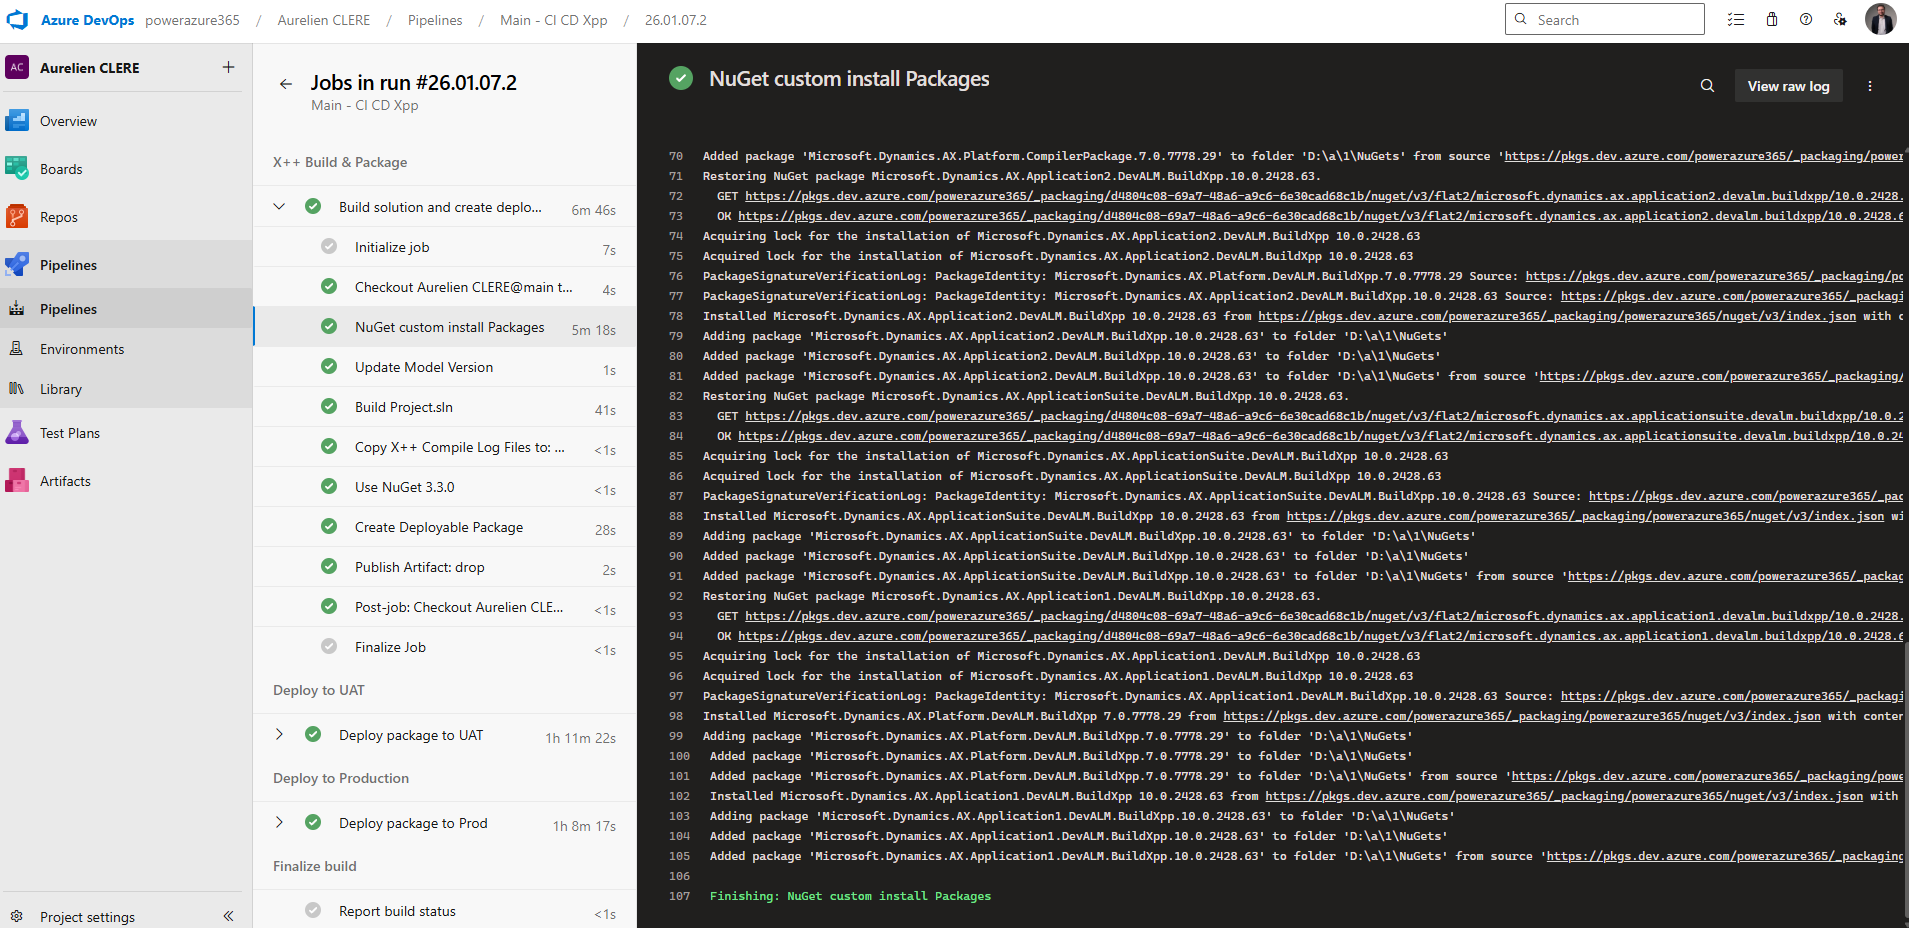
Step 1: Restore NuGet Packages
YAML
- task: NuGetCommand@2
displayName: 'NuGet custom install Packages'
inputs:
command: custom
arguments: 'install -Noninteractive $(NugetConfigsPath)\packages.config
-ConfigFile $(NugetConfigsPath)\nuget.config -Verbosity Detailed
-ExcludeVersion -OutputDirectory "$(NugetsPath)"'
What this does:
Downloads the 5 NuGet packages we uploaded to Azure Artifacts earlier
Uses packages.config to know which packages and versions to download
Uses nuget.config to know where the feed is located
-ExcludeVersion: Critical! This removes version numbers from folder names, so paths like $(NugetsPath)\$(ToolsPackage) work consistently
Example output:
NuGets/
├── Microsoft.Dynamics.AX.Platform.CompilerPackage/
├── Microsoft.Dynamics.AX.Platform.DevALM.BuildXpp/
├── Microsoft.Dynamics.AX.Application1.DevALM.BuildXpp/
├── Microsoft.Dynamics.AX.Application2.DevALM.BuildXpp/
└── Microsoft.Dynamics.AX.ApplicationSuite.DevALM.BuildXpp/
Step 2: Update Model Version
YAML
- task: XppUpdateModelVersion@0
displayName: 'Update Model Version'
inputs:
XppSourcePath: '$(MetadataPath)'
VersionNumber: '$(Build.BuildNumber)'
XppLayer: 8
What this does:
Updates the version number in your model descriptor XML files
VersionNumber: Uses the build number (e.g., 26.03.06.1)
XppLayer: 8: Represents ISV layer (use 7 for VAR, 6 for CUS)
Why update the version? This ensures every deployable package has a unique, traceable version number. It's critical for rollback and auditing. Again here you can change from what you need !
Step 3: Copy Binary Dependencies
YAML
- task: CopyFiles@2
displayName: 'Copy Binary Dependencies to: $(Build.BinariesDirectory)'
inputs:
SourceFolder: '$(MetadataPath)'
Contents: '**/bin/**'
TargetFolder: '$(Build.BinariesDirectory)'
What this does:
Copies any existing compiled DLLs from /Metadata/**/bin/ folders to the build output directory
Required if you have ISV or binary dependencies that aren't recompiled
Step 4: Build the Solution with MSBuild
This is the most complex step—compiling X++ code.
YAML
- task: VSBuild@1
displayName: 'Build Project.sln'
inputs:
solution: 'Projects/BuildProject/BuildProject.sln'
vsVersion: '17.0'
msbuildArgs: >
/p:BuildTasksDirectory="$(NugetsPath)\$(ToolsPackage)\DevAlm"
/p:MetadataDirectory="$(MetadataPath)"
/p:FrameworkDirectory="$(NuGetsPath)\$(ToolsPackage)"
/p:ReferenceFolder="$(NuGetsPath)\$(PlatPackage)\ref\net40;$(NuGetsPath)\$(App1Package)\ref\net40;$(NuGetsPath)\$(App2Package)\ref\net40;$(NuGetsPath)\$(AppSuitePackage)\ref\net40;$(MetadataPath);$(Build.BinariesDirectory)"
/p:ReferencePath="$(NuGetsPath)\$(ToolsPackage)"
/p:OutputDirectory="$(Build.BinariesDirectory)"
What this does:
solution: Points to your Visual Studio solution file
vsVersion: 17.0: Uses Visual Studio 2022 (MSBuild 17)
msbuildArgs: Passes critical parameters to the X++ compiler:
BuildTasksDirectory: Where MSBuild can find X++ build tasks
MetadataDirectory: Your source code location
ReferenceFolder: Semi-colon separated list of paths containing reference DLLs (Platform, App1, App2, AppSuite, your metadata, and binaries)
OutputDirectory: Where compiled DLLs are written
💡 Key insight: The ReferenceFolder is what allows the compiler to resolve dependencies without a full Build VM. It points to the ref\net40 folders inside your NuGet packages.
Step 5: Copy Compiler Log Files
YAML
- task: CopyFiles@2
displayName: 'Copy X++ Compile Log Files to: $(Build.ArtifactStagingDirectory)\Logs'
inputs:
SourceFolder: '$(Build.SourcesDirectory)'
Contents: |
**\Dynamics.AX.*.xppc.*
**\Dynamics.AX.*.labelc.*
**\Dynamics.AX.*.reportsc.*
TargetFolder: '$(Build.ArtifactStagingDirectory)\Logs'
condition: succeededOrFailed()
What this does:
Copies compilation log files (errors, warnings, best practices) to the artifact staging area
condition: succeededOrFailed(): Runs even if the build fails, so you can review logs
Step 6: Install Older NuGet Version
YAML
- task: NuGetToolInstaller@0
displayName: 'Use NuGet 3.3.0'
inputs:
versionSpec: 3.3.0
What this does:
Installs NuGet 3.3.0 specifically
Why? The XppCreatePackage task requires NuGet < 3.4.0 due to legacy packaging format
Step 7: Create Deployable Package
This is the critical step that creates your F&O deployable package.
YAML
- task: XppCreatePackage@2
displayName: Create Deployable Package
inputs:
XppToolsPath: '$(NuGetsPath)\$(ToolsPackage)'
XppBinariesPath: '$(Build.BinariesDirectory)'
CreateCloudPackage: true
CloudPackagePlatVersion: '7.0.7778.29'
CloudPackageAppVersion: '10.0.2428.63'
CloudPackageOutputLocation: '$(Build.ArtifactStagingDirectory)\CloudDeployablePackage_$(Build.BuildNumber)'
CreateRegularPackage: true
DeployablePackagePath: '$(Build.ArtifactStagingDirectory)\AXDeployableRuntime_$(Build.BuildNumber).zip'
What this does:
XppCreatePackage@2: Version 2 supports both legacy (LCS) and unified (PPAC) package formats
XppToolsPath: Points to the Compiler Tools package
XppBinariesPath: Where the compiled DLLs are located
CreateCloudPackage: true: Creates the Unified Package for PPAC deployment
CloudPackagePlatVersion: Platform version (must match your environment or at least LESS the target environment)
CloudPackageAppVersion: Application version
CloudPackageOutputLocation: Output folder for the unified package
CreateRegularPackage: true: Creates the legacy LCS package (.zip file)
DeployablePackagePath: Output path for the LCS package
💡 Pro tip: You can create both package formats simultaneously. This gives you flexibility to deploy via LCS (legacy) or PPAC (modern).
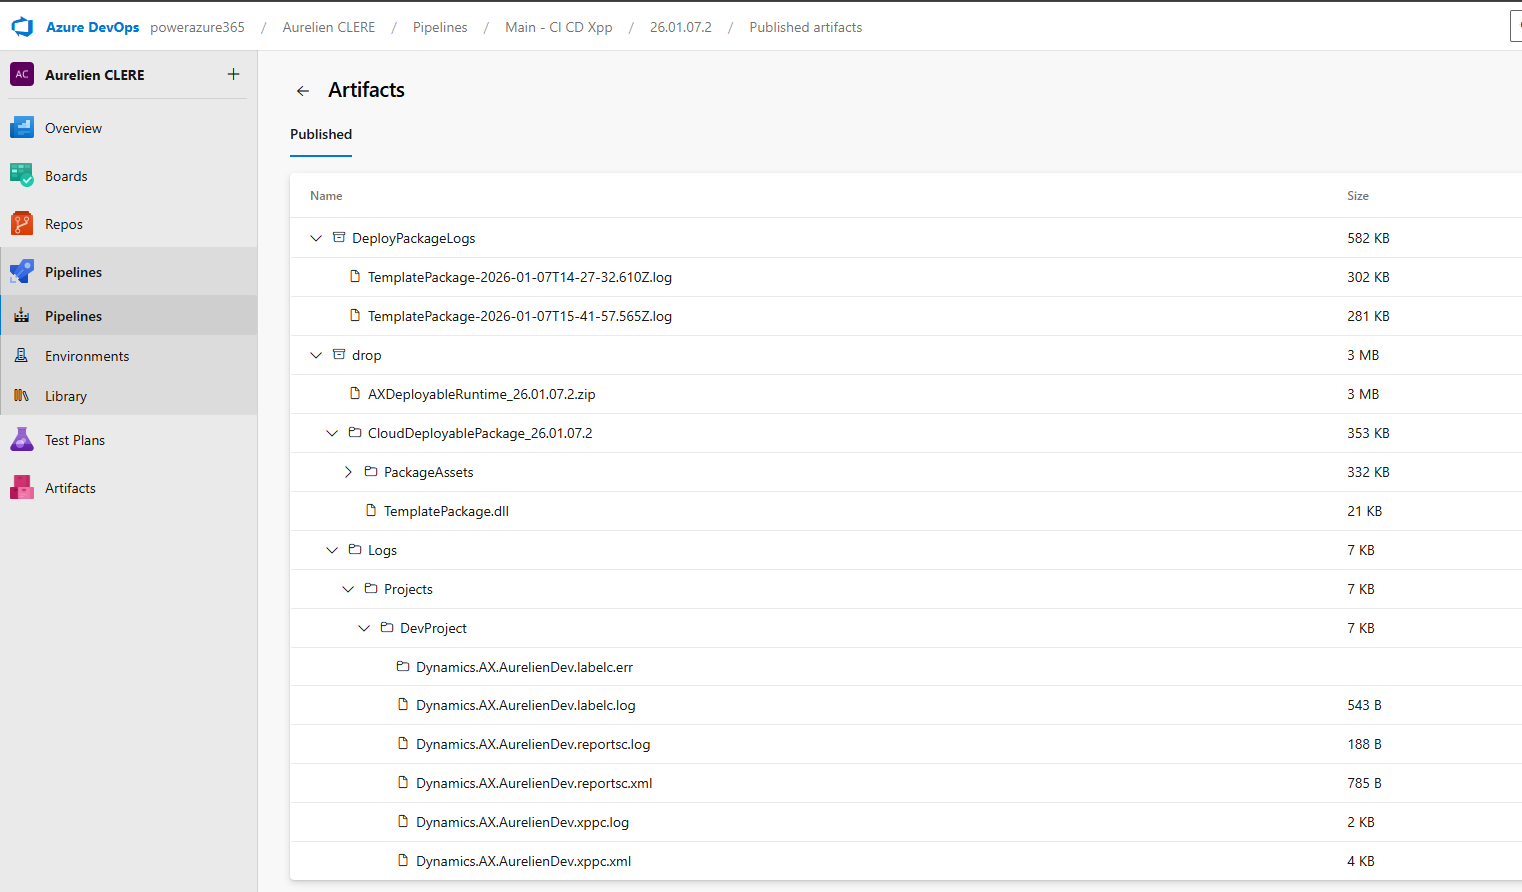
Output artifacts:
Build.ArtifactStagingDirectory/
├── CloudDeployablePackage_26.03.06.1/
│ └── TemplatePackage.dll (Unified package for PPAC)
├── AXDeployableRuntime_26.03.06.1.zip (LCS package)
└── Logs/
├── Dynamics.AX.YourModel.xppc.log
└── ...
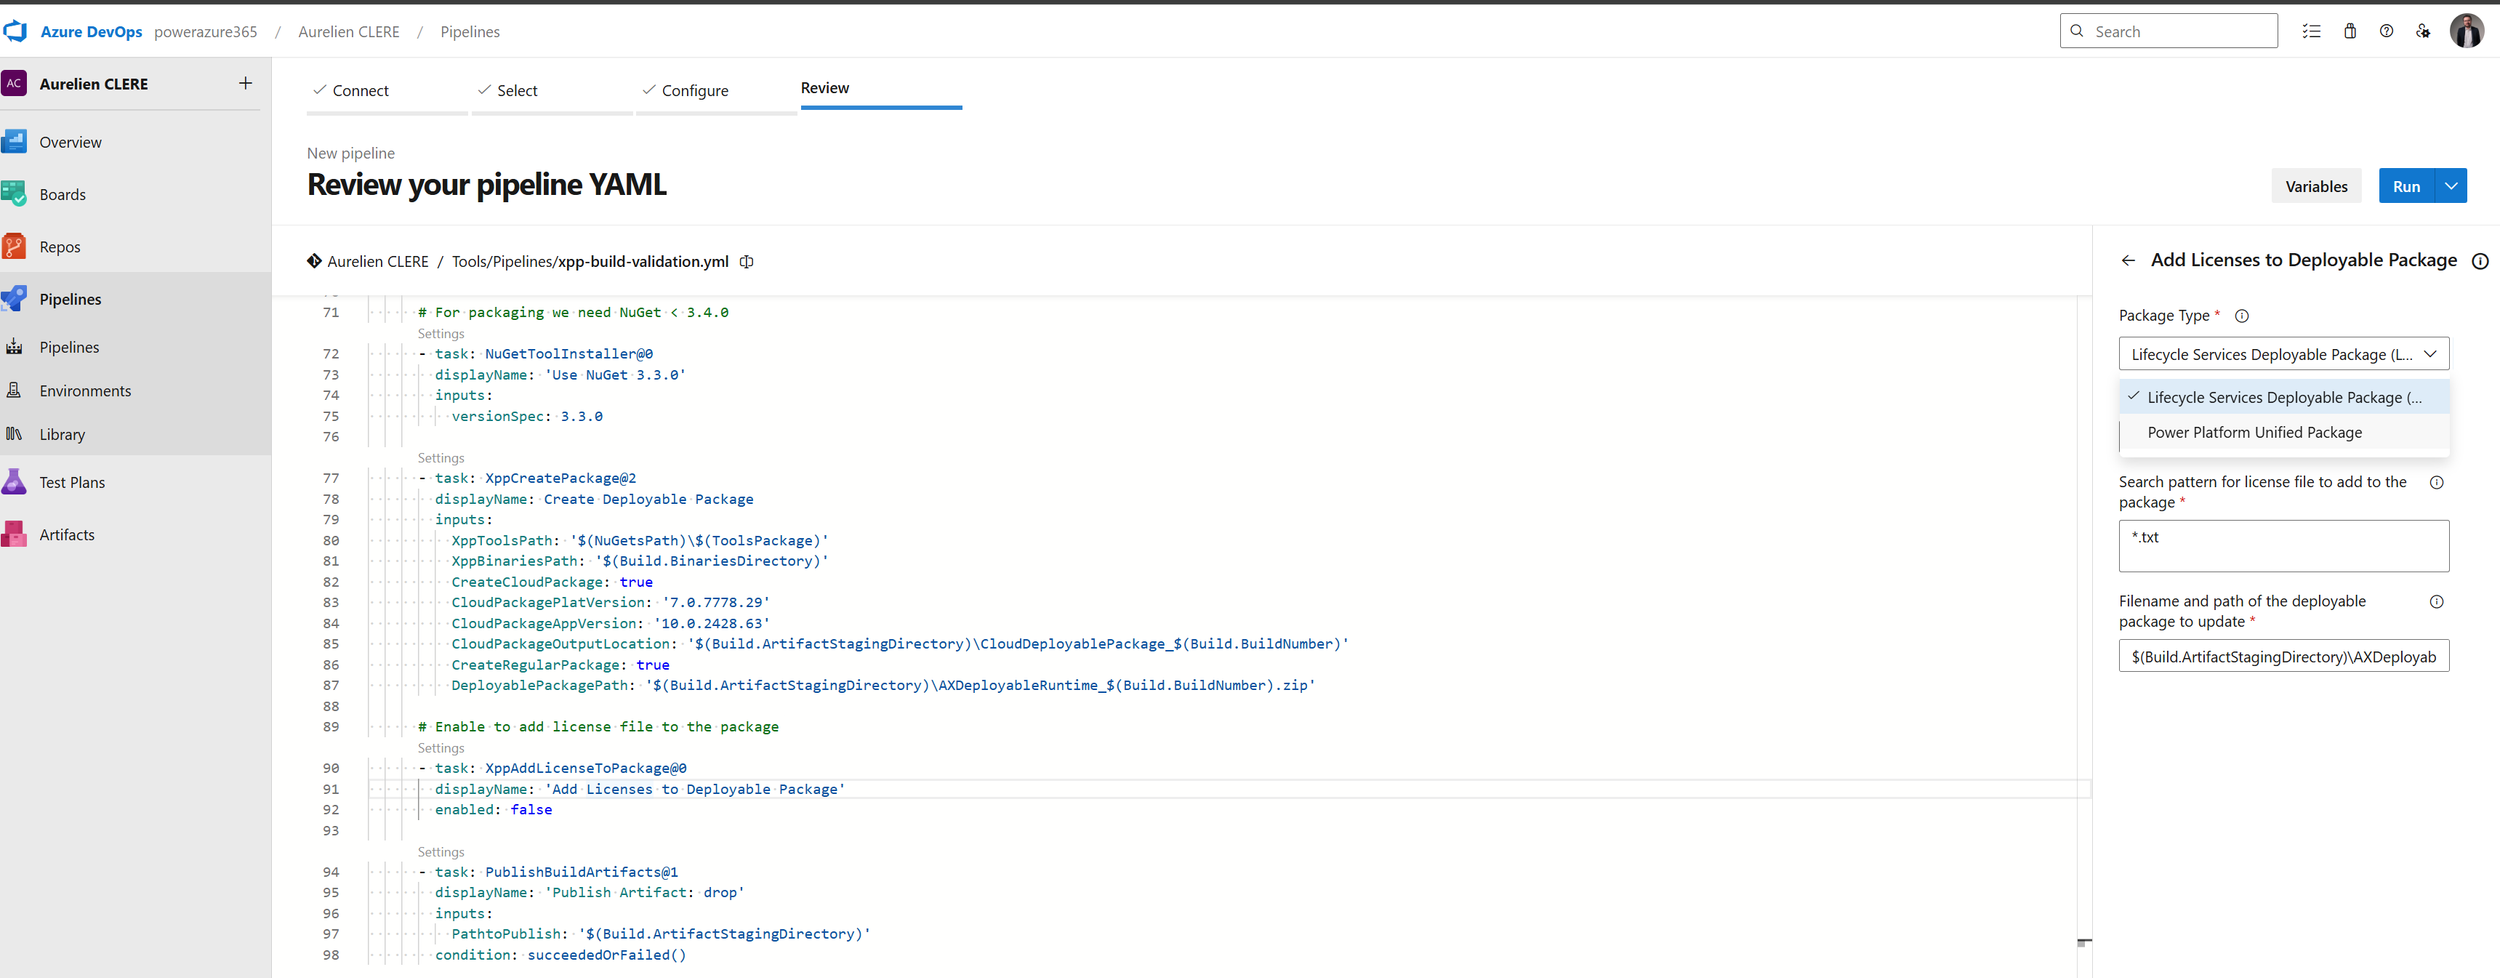
Step 8: Add License Files (Optional)
YAML
- task: XppAddLicenseToPackage@0
displayName: 'Add Licenses to Deployable Package'
enabled: false
What this does:
Adds ISV license files to the deployable package
enabled: false: Currently disabled. Set to true if you have ISV licenses to include
Some tips here, you can use the Edit button on the pipeline that can help you building your YAML files, if you don’t know or want to change.
Reminder to pay attention to indentation and use the validator step is also important, as proper formatting can prevent errors.
For ISV here if you have, depends on the package you want to change (DP or UDP) :
Step 9: Publish Artifacts
YAML
- task: PublishBuildArtifacts@1
displayName: 'Publish Artifact: drop'
inputs:
PathtoPublish: '$(Build.ArtifactStagingDirectory)'
condition: succeededOrFailed()
What this does:
Publishes everything in the staging directory as a pipeline artifact named drop
condition: succeededOrFailed(): Publishes even if the build failed (so you can see logs)
These artifacts become available to downstream deployment stages.
Stage 2: Deploy to UAT Environment
Now let's deploy our freshly built package to the UAT environment.
YAML
- stage: DeployUAT
displayName: Deploy to UAT
dependsOn: Build
condition: succeeded()
jobs:
- deployment: DeployToUAT
timeoutInMinutes: 360
pool:
vmImage: 'windows-latest'
displayName: Deploy package to UAT
environment: 'D365-UAT'
strategy:
runOnce:
deploy:
steps:
Key concepts:
stage: DeployUAT: A separate stage from Build
dependsOn: Build: This stage only runs after the Build stage completes
condition: succeeded(): Only runs if Build succeeded
deployment job: Special job type for deployments (different from regular jobs)
timeoutInMinutes: 360: 6-hour timeout (F&O deployments can take 1–3 hours)
environment: 'D365-UAT': Links to an Azure DevOps Environment (more on this below, just after don’t worry ! 😊)
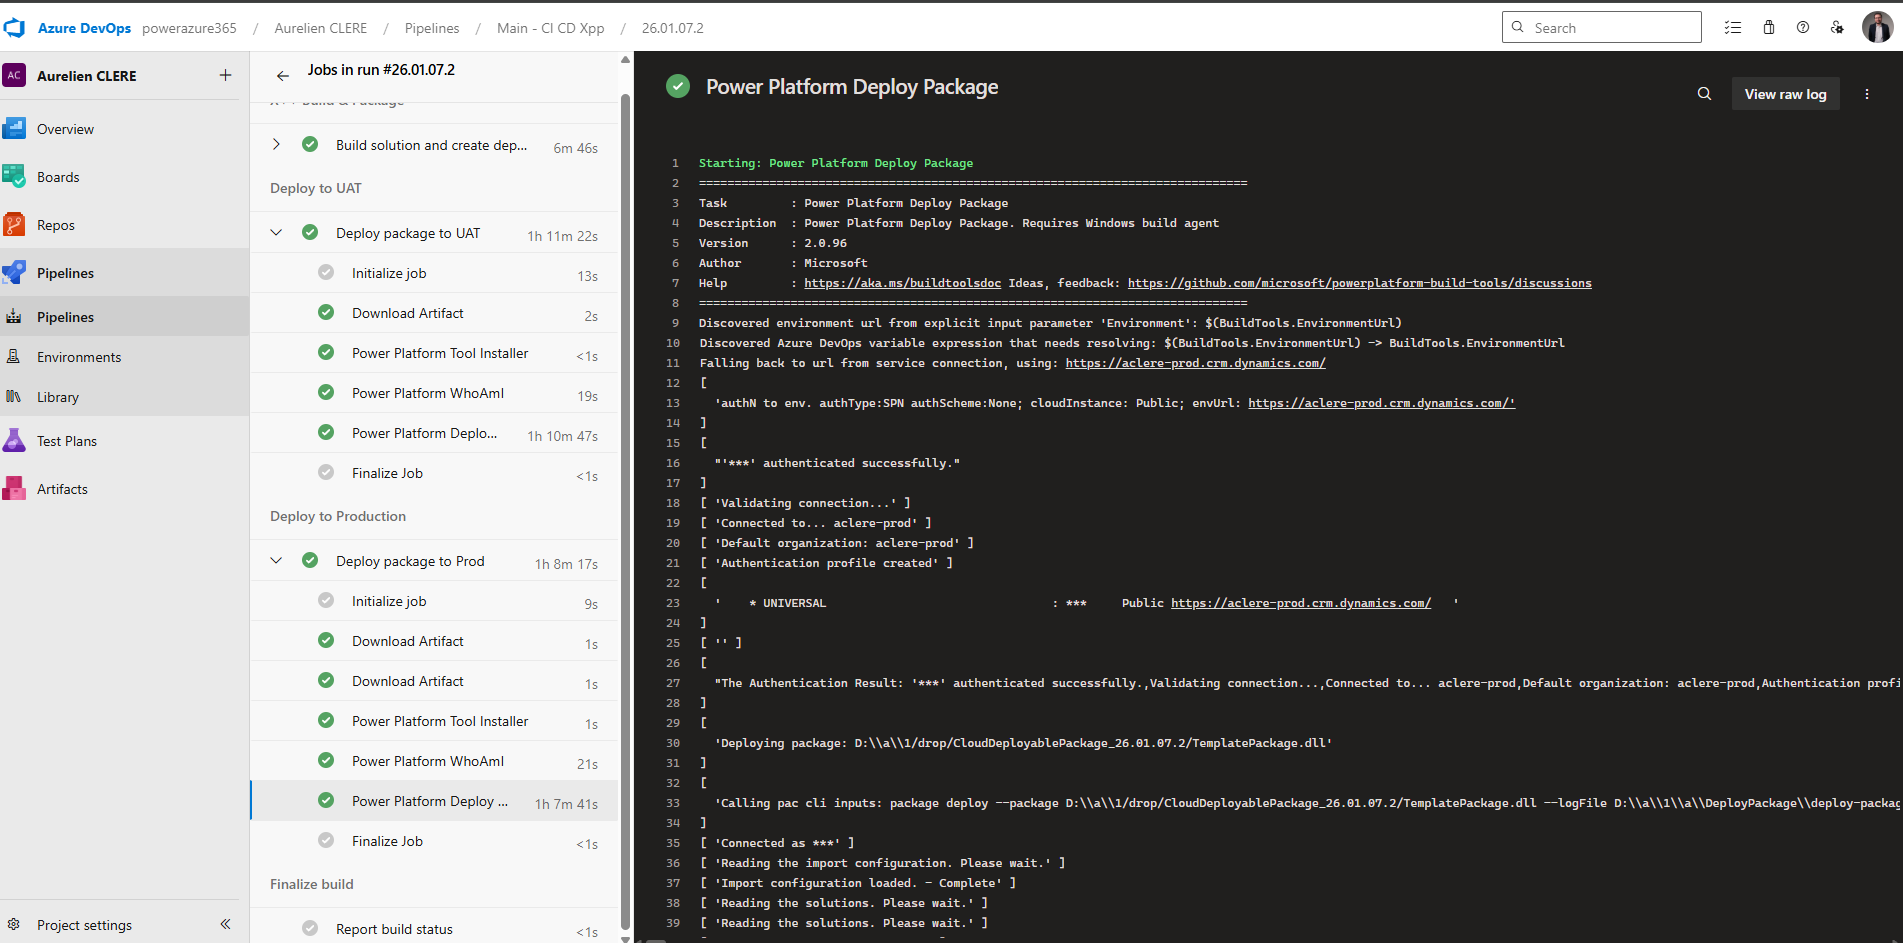
Deployment Steps: Power Platform Tasks
YAML
steps:
- task: PowerPlatformToolInstaller@2
displayName: 'Power Platform Tool Installer'
- task: PowerPlatformWhoAmI@2
displayName: 'Power Platform WhoAmI'
inputs:
authenticationType: PowerPlatformSPN
PowerPlatformSPN: 'USE'
- task: PowerPlatformDeployPackage@2
displayName: 'Power Platform Deploy Package'
inputs:
authenticationType: PowerPlatformSPN
PowerPlatformSPN: 'USE'
PackageFile: '$(Pipeline.Workspace)/drop/CloudDeployablePackage_$(Build.BuildNumber)/TemplatePackage.dll'
Step-by-step:
PowerPlatformToolInstaller@2: Installs PAC CLI on the build agent
PowerPlatformWhoAmI@2: Authenticates and verifies connection [
PowerPlatformSPN: 'USE': References the service connection named USE (UAT Service Environment) that you created earlier at the very very beginning of this article !
PowerPlatformDeployPackage@2: Deploys the unified package
PackageFile: Points to TemplatePackage.dll in the unified package folder
This is the new PPAC deployment method (no LCS involved!)
💡 Important: The service connection USE must be configured with the correct App Registration, Client Secret, and target environment URL.
Stage 3: Deploy to Production
The Production stage is nearly identical to UAT, but with a different environment and service connection.
YAML
- stage: DeployProd
displayName: Deploy to Production
dependsOn: DeployUAT
condition: succeeded()
jobs:
- deployment: DeployToProd
timeoutInMinutes: 360
pool:
vmImage: 'windows-latest'
displayName: Deploy package to Prod
environment: 'D365-Prod'
strategy:
runOnce:
deploy:
steps:
- task: PowerPlatformToolInstaller@2
displayName: 'Power Platform Tool Installer'
- task: PowerPlatformWhoAmI@2
displayName: 'Power Platform WhoAmI'
inputs:
authenticationType: 'PowerPlatformSPN'
PowerPlatformSPN: 'UPE'
- task: PowerPlatformDeployPackage@2
displayName: 'Power Platform Deploy Package'
inputs:
authenticationType: 'PowerPlatformSPN'
PowerPlatformSPN: 'UPE'
PackageFile: '$(Pipeline.Workspace)/drop/CloudDeployablePackage_$(Build.BuildNumber)/TemplatePackage.dll'
Key differences:
dependsOn: DeployUAT: Runs only after UAT deployment succeeds
environment: 'D365-Prod': Different environment (with stricter approval policies)
PowerPlatformSPN: 'UPE': Different service connection for Production
Just in case you are still in LCS way before jumping into the environments part in DevOps. Again I’ll drop them directly in my GitHub project.
Here’s the cleaned-up deployment stage from your LCS-only YAML pipeline :
# ---------- Stage 2: Deploy UAT (LCS) ----------
- stage: UploadAndDeploy
displayName: 'Upload to LCS and Deploy via LCS'
dependsOn: Build
condition: succeeded()
jobs:
- deployment: DeployToUAT
displayName: 'Upload and Deploy to UAT'
environment: 'UAT' # Replace with your Azure DevOps environment name
strategy:
runOnce:
deploy:
steps:
- task: DownloadPipelineArtifact@2
displayName: 'Download Build Artifacts'
inputs:
buildType: 'current'
artifactName: 'drop'
targetPath: '$(Pipeline.Workspace)'

- task: InstallMSALModule@1

- task: LCSAssetUpload@2
name: UploadUAT
displayName: 'Upload to LCS - UAT'
inputs:
serviceConnectionName: 'LCS' # Replace with your LCS service connection name
projectId: 'YOUR_LCS_PROJECT_ID'
assetType: '10' # 10 = Deployable Package
assetPath: '$(Pipeline.Workspace)/AXDeployableRuntime_$(Build.BuildNumber).zip'
assetName: 'UAT Branch $(Build.BuildNumber)'
assetDescription: 'Release_$(Build.BuildNumber)'

- task: LCSAssetDeploy@4
displayName: 'Deploy via LCS UAT'
inputs:
serviceConnectionName: 'LCS'
projectId: 'YOUR_LCS_PROJECT_ID'
environmentId: 'YOUR_LCS_ENVIRONMENT_ID'
fileAssetId: '$(UploadUAT.FileAssetId)'
deploymentType: 'hq'
releaseName: 'UAT Branch $(Build.BuildNumber)'
waitForCompletion: false
Environments, Approvals & Policies
Now let's talk about Environments—the secret sauce that gives you governance and control over deployments.
What Is an Environment in Azure DevOps?
An Environment is a logical target for deployment (e.g., UAT, Production). It's NOT the same as your Dynamics 365 environment—it's a DevOps construct that lets you:
Require manual approvals before deployment
Restrict which branches can deploy
Enforce business hours for deployments
Track deployment history
Define multiple approvers with voting rules
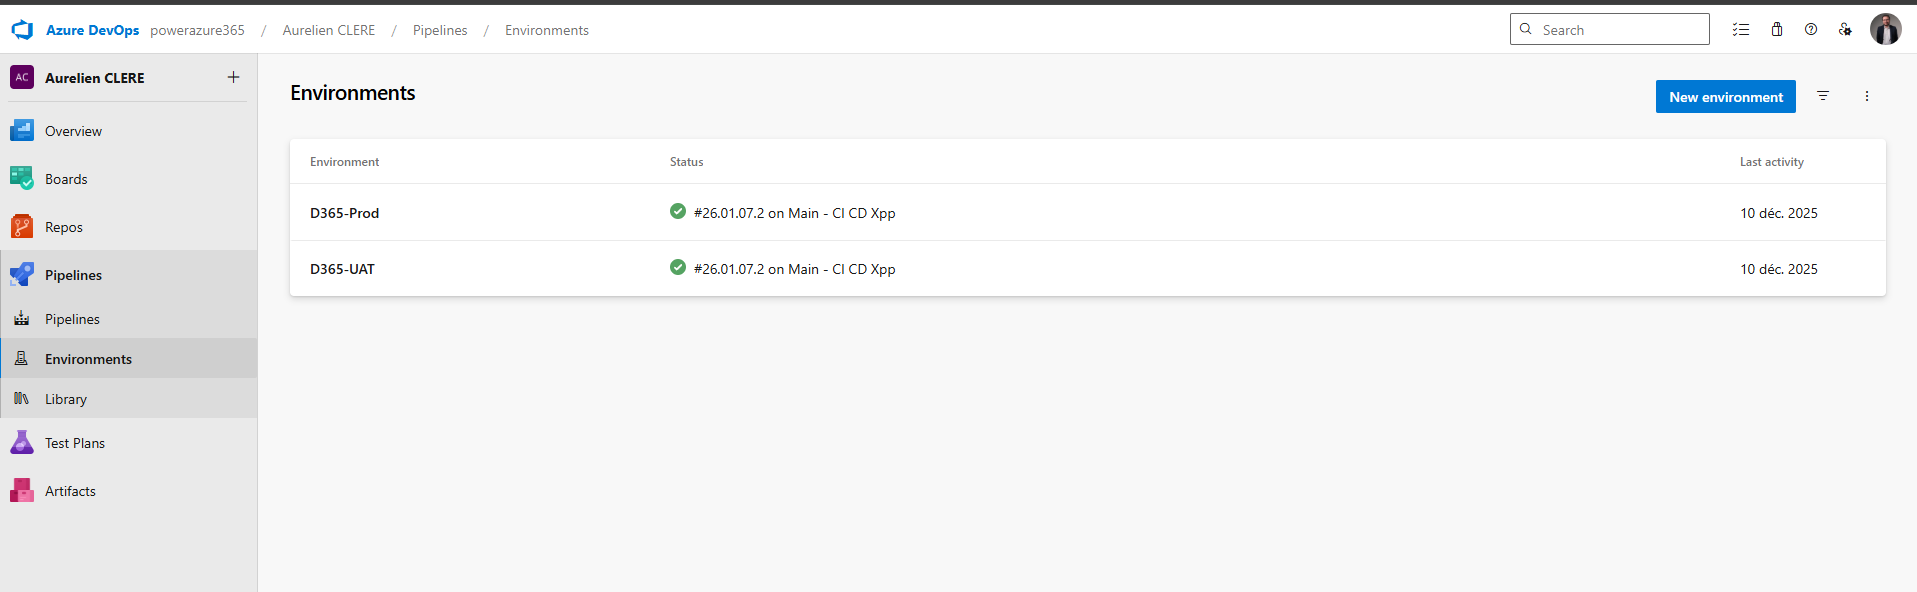
Creating an Environment
Go to Pipelines > Environments > New environment
Name it (e.g., D365-UAT, D365-Prod)
Description: "UAT Environment for Dynamics 365 F&O"
Click Create
Configuring Approval Workflows
Once your environment is created, click on it and add Approvals and checks:
1. Approvals
Click Approvals and checks > Approvals
Add approvers (e.g., Tech Lead, Product Owner, Change Manager, Release Manager etc…)
Configure:
Minimum number of approvers: At least 1 (or 2 for Production)
Allow requestors to approve: Usually No for Production
Timeout: 30 days (how long approval waits before expiring)
Instructions: Add notes for approvers (e.g., "Review deployment checklist before approving")
What happens: When the pipeline reaches the deployment stage, it pauses and sends a notification to approvers. They review and either approve or reject.
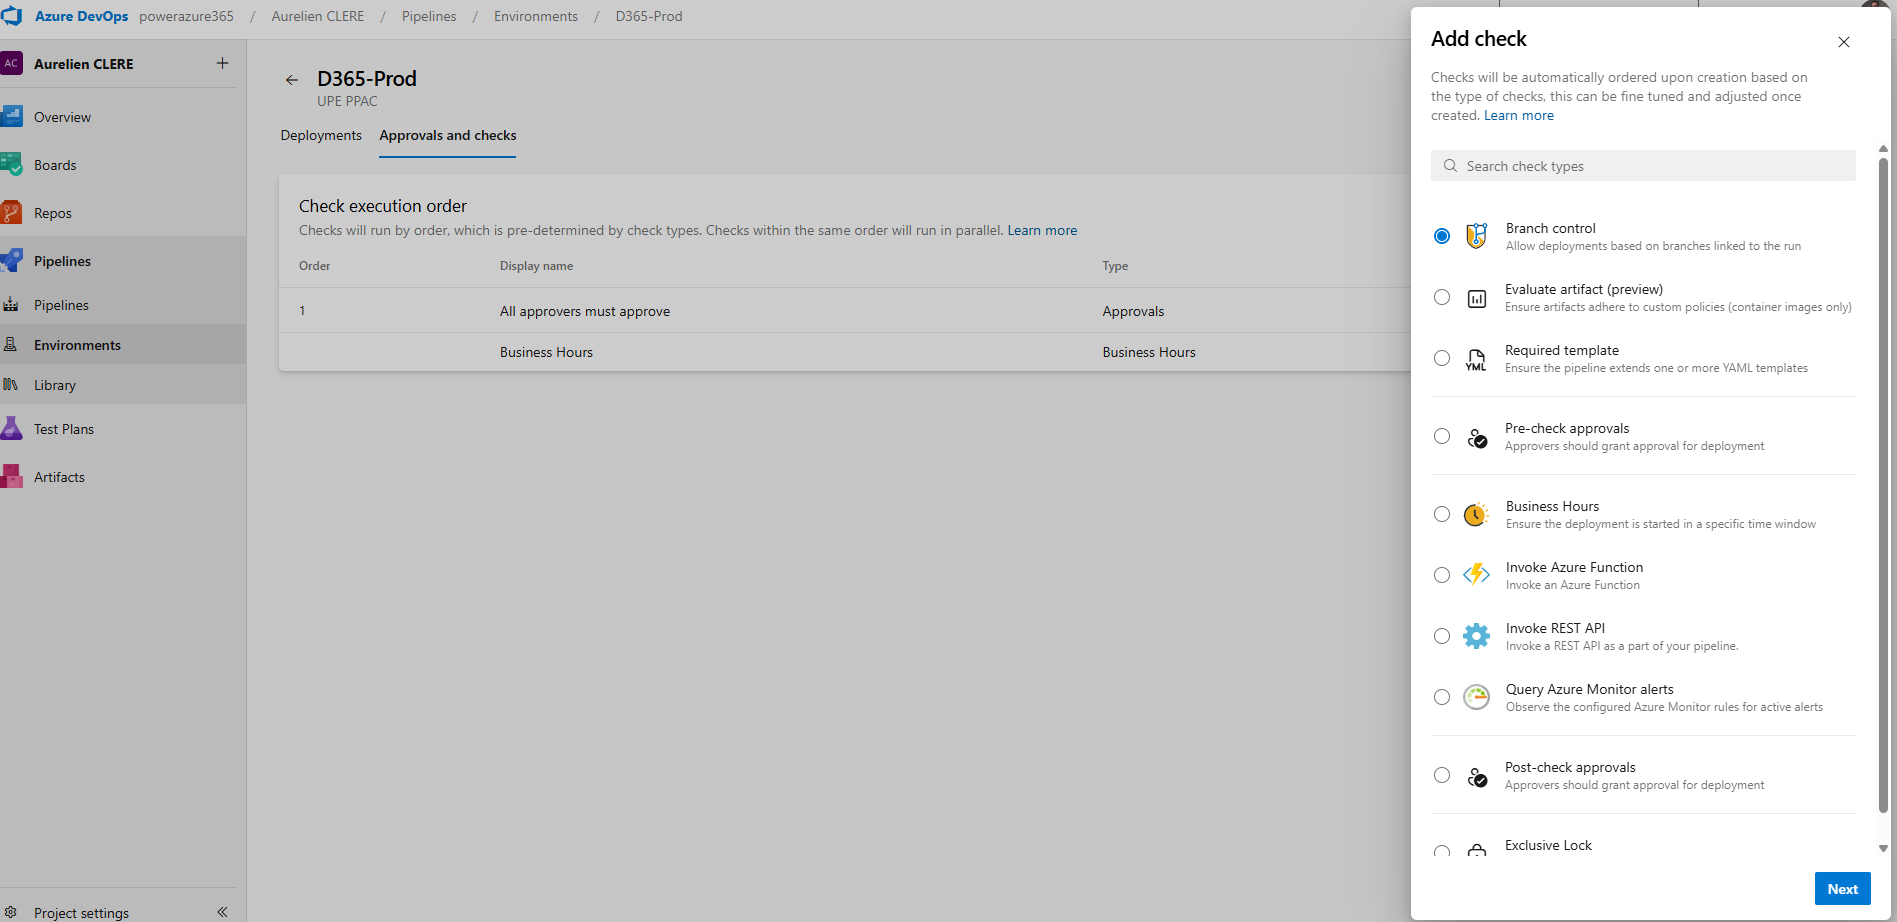
2. Branch Control
Click Approvals and checks > Branch control
Specify allowed branches (e.g., only main or release/*)
What happens: Deployments are only allowed from specific branches. Prevents accidental Production deployments from feature branches.
3. Business Hours
Click Approvals and checks > Business hours
Define deployment windows (e.g., Monday–Friday, 9 AM–5 PM, timezone-aware)
What happens: Deployments are blocked outside of business hours. Great for avoiding Friday evening Production deployments!
4. Required Template
Click Approvals and checks > Required template
Specify a YAML template that must be used for deployments
What happens: Enforces consistency across all deployments (e.g., all Production deployments must include a specific notification task).
Example Environment Setup
Scheduling Deployments
An essential aspect of deployment management is the ability for a release manager to schedule when a deployment actually occurs. Instead of triggering the deployment immediately upon approval, the release manager can choose a specific future date and time for the deployment to be executed. This is especially useful when you want to avoid deploying during peak business hours or outside of approved windows, or if you need to coordinate deployments with other teams.
How to Schedule a Deployment
Step 1: After your deployment has passed all required approvals and checks, navigate to the deployment pipeline or release page in your deployment tool (such as Azure DevOps).
Step 2: Look for an option labeled Schedule, Schedule Deployment, or a calendar/clock icon (the exact label may vary depending on the tool).
Step 3: Click the Schedule option. A scheduling dialog will appear, allowing you to select the desired date and time for the deployment to start.
Step 4: Select the preferred deployment date and time (e.g., 03/06/2026, 7:00 PM). Make sure to confirm the time zone setting to avoid confusion.
Step 5: Save or confirm your schedule. The deployment will now be queued and automatically executed at the specified time.
Step 6 (Optional): Notify relevant stakeholders about the scheduled deployment time, especially if coordination with other teams is required.
For example, after the deployment is approved, the release manager can set the deployment to begin at 3:00 AM on a Sunday, ensuring that the process starts at a low-traffic time. This scheduling capability provides flexibility, helps prevent disruptions, and supports better planning for both IT and business stakeholders.
That is how we use and change like before in LCS when it is possible to do it manually and schedule from there, or now it’s all the way from DevOps.
Best Practices for Pipeline Organization
Based on years of F&O implementations, here's what works best:
xpp-build-validation.yml , Purpose Validation PRs, Trigger for PR, Deploy to None
xpp-ci-uatonly.yml, Purpose Daily Integration, Schedule, UAT only
xpp-ci.yml, Full Release, Manual + Schedule, UAT => PrePROD => Production
Use Build Number as Version
Always use the build number format YY.MM.DD.Rev as your model version. This creates a clear audit trail.
Create Both Package Formats
Enable both CreateCloudPackage and CreateRegularPackage. This gives you flexibility during the LCS-to-PPAC transition period.
Set Realistic Timeouts
F&O deployments can take 1–3 hours. Set timeoutInMinutes: 360 (6 hours) to avoid premature failures.
Publish Logs on Failure
Use condition: succeededOrFailed() on log publishing tasks. You'll need those logs to troubleshoot build failures.
Use Service Connections per Environment
Create separate service connections for each environment (e.g., UAT-SPN, PROD-SPN). This enforces least-privilege access.
How It All Works Together: End-to-End Flow
Let me walk you through what happens when you trigger the xpp-ci.yml pipeline:
Build Stage Starts
Agent provisions (30 seconds)
NuGet packages restore from Azure Artifacts (2 minutes)
Model version updates to build number (5 seconds)
X++ compilation via MSBuild (10–15 minutes)
Deployable packages created (2 minutes)
Artifacts published (1 minute)
UAT Deployment Stage Starts
Waits for approvals (if configured)
PAC CLI installs (30 seconds)
Authenticates to UAT environment (10 seconds)
Package deployment begins (60–120 minutes)
Deployment completes, services restart
Production Deployment Stage Waits
Pipeline pauses for manual approval
Approvers receive notification
Approvers review deployment logs, UAT testing results
Approvers approve (or reject)
Production Deployment Starts
Same process as UAT
Deploys to Production environment (60–120 minutes)
Pipeline completes
Total time: Build (20 min) + UAT (90 min) + Approval (manual) + Prod (90 min) = 3.5+ hours
In the past, the process of creating a release candidate was mandatory in Lifecycle Services (LCS), which enforced certain deployment steps and checkpoints. Now, as demonstrated here, we can replicate that workflow directly in Azure DevOps pipelines. This gives teams greater flexibility and control. Importantly, while not recommended, Azure DevOps allows you to bypass traditional stages—such as approvals or UAT testing—and push builds straight to production as long as you have a valid YAML pipeline configured. This means you could trigger a deployment to production without any manual interventions or testing phases if you choose, though this approach carries significant risks and should only be considered in exceptional cases; like we used to do maybe as quick hotfix XPO in Prod in USR layer for AX 2012 right ? 😊
Let's keep building!
Automating Environment Management with YAML, PAC CLI & PowerShell
One of the most powerful capabilities of the Unified ALM approach is the ability to automate environment lifecycle operations directly from your Azure DevOps pipelines. No more manual clicks in PPAC—you can create, copy, and configure F&O environments entirely through code.
In this section, we'll cover:
Creating brand new Unified Experience environments (UDE, USE) via YAML
Copying existing environments with full or minimal transaction data
Post-copy automation scripts
Leveraging Power Platform Admin Connector V2 for advanced scenarios
Creating a New Unified Experience Environment
With PPAC, you can provision F&O environments directly from pipelines using PowerShell.
Option : PowerShell Admin Module
For more control, use the Microsoft.PowerApps.Administration.PowerShell module.
You have a good article from my colleague at Dynagile, Youssra, you can double check it here on this link : Automating the Creation of Dynamics 365 F&O Unified Developer Experience (UDE) Environments - Dynagile Consulting , you have the YAML and pipelines we have built internally in order to create UDE, and manage it also post creation (like put it to an environment group, put it as managed Dataverse, give access to the end users that requested the environment). Of course, you can adapt it in your context and even create USE and UPE like this. Same thing in general. As you checked my extensive article about Unified Experiences, you have the Powershell command that you can launch. I like this Powershell way to create F&O environments in PPAC, as it gives me more arguments and things you can do normally in the UI of PPAC. (like not possible to create UDE at first place)
Copying Environments: Full Copy vs Less Transaction Copy for F&O
Here you can check this article in the Microsoft Learn where you have the Powershell, good part is they are using more Service Principal to connect to Power Apps to init the copy. From my previous part before, I don’t think you can create (yet) the UDE or USE in YAML pipelines directly in the same type of authentication as you need to have a real human as SysAdmin or Environment Admin I would say to connect to F&O and not a SPN. But for just launching a copy in PPAC, as soon as your SPN have enough rights, afterall after the copy only the environment admin will have access to F&O, same behavior as LCS.
Tutorial: Perform a transaction-less copy between environments - Power Platform | Microsoft Learn
Again same thing you can do for backup/restore using Powershell in YAML : Tutorial: Backup and restore unified environments - Power Platform | Microsoft Learn
Supported Copy Scenarios:
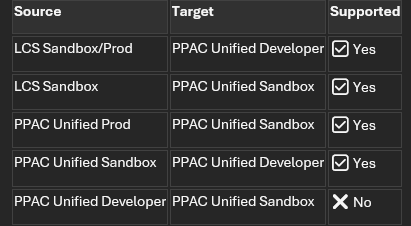
💡 Important: Always copy from higher environments (Prod/Sandbox) to lower environments (Dev). Copying from Dev to Sandbox/Prod is not supported. Change compare to LCS here as a Tier1 it was possible to do a .bacpac and reimport it to a Tier2.
Power Platform Admin Connector V2 (Advanced)
For more complex scenarios, use the Power Platform for Admins V2 connector, available in:
Power Automate (no-code/low-code)
.NET SDK (for custom C# applications) and of course into a YAML pipelines for DevOps !
Azure Logic Apps (for enterprise integrations)
Use Cases for Admin Connector V2
Approval workflows: Trigger environment copy only after Change Advisory Board (CAB) approval
Scheduled refreshes: Daily/weekly UAT refresh from Production
Monitoring: Track environment health and send alerts
Governance: Enforce naming conventions and tagging
Example: Power Automate Flow for Copy Approval
Trigger: Manual trigger or scheduled recurrence
Action: Send approval request to CAB members
Condition: If approved
Action: Use "Copy Environment" action from Power Platform for Admins V2 connector
Action: Send notification when copy completes
You can double check with samples / examples in my GitHub project where I have again put all my YAML files (like here the copy part)
Either way you can also a complete end-to-end flow where you can just create the environment, deploy the latest code and then maybe copy : all into 1 YAML.
Best Practices for Environment Automation :
Use LTC for frequent refreshes
Saves time and storage. Only use FullCopy when you need complete transaction history.Set realistic timeouts
Environment copies can take 2–6 hours depending on database size. Set timeoutInMinutes: 480 (8 hours).Implement approval gates
Use Azure DevOps Environments with approvals for production copies.Store scripts in Git
Keep all PowerShell scripts (copy, post-copy) in your /Scripts folder and version them.Notification on completion
Use Power Automate, Teams webhooks, or email notifications to alert when long-running operations complete.Monitor environment health
Use Power Platform for Admins V2 connector to track environment status and capacity.
It's crucial to ensure that the service principal (SPN) used in your YAML pipelines is properly registered ahead of time. This can be accomplished by running pac admin application register --application-id, which registers your application ID with the Power Platform admin tools. You can find detailed instructions for this process in the Microsoft Learn documentation. Taking this step guarantees that your SPN has the necessary permissions and is recognized for automation tasks in your environment. Don’t forgot to put the SPN as Power Platform Admin role too in Entra. (Including to put it as Sys Admin and S2S Apps in all related Dataverse)
I think you have seen a lot of things now, as you can use Azure DevOps could be your tower control via YAML pipelines for everything concerning your lifecycle of your environments in general, code for sure, but not until that : DataALM, copy, creation and so on ! All that without manual actions for sure and all by API first !
Let's keep building!
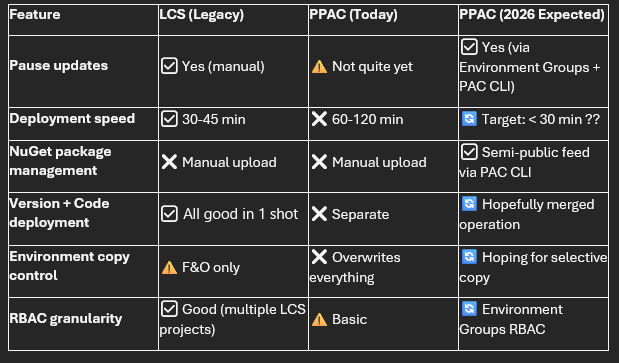
⚠️ Current Limitations & Expected Microsoft Enhancements (2026)
While the Unified ALM experience brings F&O closer to modern DevOps practices, there are still gaps compared to what we had in LCS—and even compared to what Power Platform developers enjoy today. Let me be transparent about what's missing and what Microsoft is working on. I hope I can delete this sub-chapter at some point !
1. Pause Strategy for Updates (Coming normally this March 2026)
Current Problem: In LCS, we could pause updates. Now in PPAC era world, not yet.
What's Coming: Microsoft is working on Environment Groups in PPAC for F&O specific rules, expected to roll out in March 2026. This will allow you to:
Group multiple environments logically (e.g., "Production Environments", "Dev Sandbox Environments")
Apply pause strategies at the group level rather than per environment
Manage pauses via PAC CLI and Power Platform Admin APIs
Automate pause management directly from Azure DevOps YAML pipelines
Update : At least now we have the API to handle it !
Expected YAML Example (future and just as a conception from me ! AS it will be great to manage the pause from DevOps too as soon as your Prod is now on the latest GA version and you just want to already pause the next one, like the pattern of taking only 2 versions per year and not the 4):
1 - task: PowerShell@2
2 displayName: 'Pause Updates for Environment Group'
3 inputs:
4 targetType: 'inline'
5 script: |
6 pac admin environment-group pause `
7 --group-id "production-group" `
8 --pause-duration 3 `
9 --reason "Fiscal year-end freeze"
Additional benefits:
Environment Group RBAC: More granular security roles and permissions within PPAC as in PPAC you could have multiple UPE for different geography and give access only for certain people for this group and not the other one.
Centralized governance: Apply DLP policies, compliance tags, and update windows consistently across groups
💡 My take: This is one of the most requested features from the community. API-first approach means we'll be able to script it from day one.
2. Slow Deployment Times in PPAC
Current Problem: Deployments to Unified Production Environments (UPE) via PPAC are significantly slower than they were in LCS:
PPAC today: 1–2 hours for a typical code deployment
LCS average: 30–45 minutes for the same package – as for Prod I would say. Sandbox Tier2 was also mostly 1h too.
This is a pain point for teams trying to implement rapid CI/CD cycles or needing to deploy urgent hotfixes.
Why is it slower? The unified platform architecture means deployments now touch both F&O and Dataverse layers, and Microsoft is still optimizing the deployment orchestration.
What Microsoft is working on:
Performance improvements to the deployment engine
Better parallel processing of deployment steps
Optimized database synchronization
Target: Match or beat LCS deployment times – hope beat 😊
Workaround for now:
Schedule deployments during off-peak hours (e.g., overnight)
Use timeoutInMinutes: 360 (6 hours) in your YAML to avoid premature timeout failures
Plan for longer deployment windows in your release schedules
💡 My hope: Once Microsoft optimizes this, we'll see sub-30-minute deployments consistently. That would make PPAC truly superior to LCS.
3. Semi-Public NuGet Feed for X++ Packages (Future)
Current Problem: As we covered earlier in the NuGet section, today you must:
Download X++ compiler tools and reference packages from LCS Shared Asset Library
Manually upload them to your Azure Artifacts feed
Update packages.config with exact version numbers
Manage storage limits (2 GB free tier)
This is manual, error-prone, and time-consuming.
What Microsoft is working on: A semi-public NuGet feed hosted by Microsoft that contains all F&O compiler and reference packages. This means:
No manual uploads: Just reference the Microsoft feed in your nuget.config
Version-based retrieval: Specify the F&O version (e.g., 10.0.47) and PAC CLI pulls the correct packages automatically
Multi-version builds: Easily compile the same codebase against multiple F&O versions in a single pipeline
Expected future YAML example:
1 variables:
2 FOVersion: '10.0.47' # Change this variable to target different versions
3
4 steps:
5 - task: PowerShell@2
6 displayName: 'Restore X++ Packages from Microsoft Feed'
7 inputs:
8 targetType: 'inline'
9 script: |
10 pac nuget restore `
11 --package-type FinanceOperations `
12 --version $(FOVersion) `
13 --output $(NugetsPath)
This would make multi-version testing and compatibility validation trivial—something that's nearly impossible today without maintaining multiple artifact feeds.
💡 My take: This is a game-changer for ISVs and partners who need to test against multiple F&O versions. It also aligns with the "API-first" and "automation-first" philosophy of Unified ALM.
4. No Merge Package + Version Update in One Operation
Current Major Limitation: Today in PPAC, you cannot:
Schedule an F&O platform/application version update via DevOps
Combine a version update with a code deployment in a single operation
Real-world scenario: Let's say I want to:
Update my UPE from 10.0.45 to 10.0.47
Deploy a hotfix package immediately after or even at same time, as it was done in LCS via the Release candidate option as it was deploying the custom code and version as snapshot.
What I have to do today:
Wake up at 3:00 AM (or whenever the maintenance window starts)
Manually trigger the version update via PPAC UI
Wait 1–2 hours for the update to complete
Then manually trigger my Azure DevOps pipeline to deploy the code package
Wait another 1–2 hours for deployment
This is not scalable, not automatable, and frankly, not acceptable for modern DevOps.
What's missing:
PAC CLI command like pac application update --version 10.0.47 --package mycode.zip --environment UAT
YAML task like PowerPlatformMergeAndDeploy@1 that handles both operations
Comparison to Dataverse: As you'll see in the next section, we can update recently Dynamics 365 apps (Dual Write, Customer Service, etc.) via PAC CLI without manual intervention.
💡 My hope: Microsoft will hopefully introduce a unified deployment task that merges platform updates and code packages into a single, orchestrated operation—ideally by mid-2026 or even before… 😊
Workaround for now:
Decouple version updates from code deployments
Maintain separate maintenance windows
Use Power Automate to trigger the pipeline automatically after detecting version update completion (polling-based, not ideal) or again by controlling the msprov operation history table like explained before for the notification.
5. Warning: Environment Copy Overwrites Everything
This is something that caught many teams off guard when they first started using Unified Experiences.
What happens when you copy a UPE or USE to a UDE:
Real-world disaster scenario:
Developer has been working on custom Power Apps and Flows in their UDE (unmanaged solutions)
Admin triggers a copy from Production (UPE) to refresh the dev environment
Copy completes successfully
Developer's unmanaged solutions are gone—only the managed solutions from Production remain
If the developer didn't export their solution to Git before the copy, their work is permanently lost or I would say very not easy to do or rework.
Why does this happen? Unlike LCS (which only touched F&O), PPAC environment copies are Dataverse-native operations. The entire Dataverse database is restored from the source, including solution layers.
Best Practices to Avoid Data Loss:
Always export unmanaged solutions before a copy operation:
Store all F&O code in Git including all your Power Platform custom components from solution (never rely on code only in the environment)
Automate post-copy redeployment:
Communicate clearly with the team before triggering copy operations
Use naming conventions to distinguish dev work from production code
This affects CRM projects too: This is the same challenge faced by pure Dynamics 365 CE/CRM projects. The Power Platform community has been dealing with this for years. Some strategies they use:
Solution segmentation: Keep development work in separate solutions that aren't part of production
Git-first development: Export to Git after every significant change
Scheduled backups: Automated nightly exports of unmanaged solutions
Communication protocols: Slack/Teams notifications before environment operations
💡 My call to Microsoft: We need a "selective copy" option—e.g., "Copy F&O data but preserve target Dataverse solutions" or "Copy database but not solution layers". This would solve a huge pain point.
Summary: What's Working vs. What's Missing
My Recommendations
For teams migrating to PPAC today:
✅ Accept that deployments will be slower—plan your release windows accordingly
✅ Over-communicate environment copy operations to your team
✅ Implement automated solution backups before any environment operation
✅ Keep everything in Git—never trust the environment as the source of truth
✅ Monitor Microsoft's roadmap closely and test preview features early
For Microsoft Product Group (if you're reading this 😊):
🙏 Prioritize deployment performance
🙏 Give us a PAC CLI command to update F&O versions programmatically
🙏 Consider "selective copy" options to protect development work
🙏 Deliver the semi-public NuGet feed ASAP—this will eliminate so much friction
🙏 Keep the "API-first" philosophy—everything in the UI should be scriptable via PAC CLI
Despite these limitations, the trajectory is clear: Microsoft is moving toward a fully unified, API-first, automation-ready ALM platform. The PPAC experience will eventually surpass what LCS offered—we're just in the awkward transition phase right now.
In the next section, we'll look at the bright side: how to automate Dynamics 365 app deployments (Dual Write, Customer Service, Field Service) via PAC CLI—something that was impossible in the LCS world.
Let's keep pushing forward! 💪
Automating Dynamics 365 App Updates with PAC CLI
The Journey from "Not Possible" to "Fully Automated"
In earlier versions of this article, I stated that automating Dynamics 365 application updates using PAC CLI was not yet possible—particularly in EMEA regions. I'm excited to share that I've since developed a working solution that enables full automation of Dynamics 365 app installations and updates across all your Power Platform environments using YAML pipelines, Service Principal authentication, and the Power Platform API. Once again the script will be in the GitHub project link at the very beginning of the article in which I will upload all the samples I have made for you !
This breakthrough represents a major advancement in the Unified ALM experience for Dynamics 365 Finance & Operations and Power Platform. While PAC CLI support for application management is still evolving, direct API integration provides a robust, production-ready alternative that works today.
What Changed: From Manual Clicks to Full Automation
The Old Reality (LCS Era)
In the traditional LCS-dominated world, updating Dynamics 365 applications was a purely manual process:
Manually log into the Dynamics 365 Admin Center or PPAC
Navigate to each environment's Applications tab
Click "Install" or "Update" for each package individually
Wait and refresh the page repeatedly to monitor progress
No source control, no audit trail, no automation
High risk of human error and inconsistency across environments
The New Reality (API-First Automation)
With the Power Platform API and proper Service Principal configuration, we can now:
Automatically detect all installed applications across multiple environments
Identify available updates by comparing installed vs. available versions
Trigger installations or updates programmatically via REST API calls
Monitor operation status and handle errors gracefully
Run on schedule (e.g., nightly) or trigger manually from Azure DevOps/GitHub
Maintain full traceability through pipeline logs and source control
Architecture Overview: How the Solution Works
Key Components
The automation solution consists of several integrated components:
Azure AD Enterprise Application registered in Entra ID (PPAC)
Service Principal with appropriate Power Platform API permissions
Two specialized YAML pipelines for different automation scenarios
Power Platform API endpoints for listing, installing, and monitoring applications
Secure variable groups in Azure DevOps for credential management
Prerequisites: Setting Up Enterprise Application in Entra (PPAC)
Before you can automate app updates, you must register an Enterprise Application in Azure AD (Entra ID) and configure it with the necessary permissions for Power Platform.
Step 1: Create the App Registration
Navigate to the Azure Portal and create a new app registration:
Go to Azure Portal → Azure Active Directory → App Registrations
Click New registration
Provide a name (e.g., PowerPlatform-AppManagement-SPN)
Set Supported account types to "Accounts in this organizational directory only"
Leave Redirect URI blank (not needed for service principal flows)
Click Register
Step 2: Generate a Client Secret
After registration, you need to create a client secret:4
In your App Registration, go to Certificates & secrets
Click New client secret
Add a description (e.g., "DevOps Pipeline Secret")
Set expiration (recommend 24 months for production environments)
Click Add
Important: Copy the secret value immediately—you won't be able to retrieve it later
Step 3: Assign API Permissions
This is the critical step that enables your Service Principal to interact with Power Platform:
In your App Registration, navigate to API permissions
Click Add a permission → APIs my organization uses
Search for and select PowerApps Service or Dynamics CRM
Add the following Application permissions (not Delegated):
https://api.powerplatform.com/.default - For Power Platform API access6
Or specifically: user_impersonation scope for Dataverse environments
Click Grant admin consent for [Your Tenant]
This requires Power Platform Admin Administrator role
Step 4: Configure Application User in PPAC
The Service Principal must be registered as an Application User in each target environment:
Go to Power Platform Admin Center (https://admin.powerplatform.microsoft.com)
Select your target environment
Navigate to Settings → Users + permissions → Application users
Click New app user
Select your App Registration (created above)
Assign an appropriate Business Unit
Assign a Security Role with sufficient privileges:
System Administrator (for full automation capabilities)
Or a custom role with permissions for:
Read/Write access to msprov_operationhistory table
Application package management operations
Environment metadata access
Click Create
Repeat this step for each environment you want to automate.
Understanding the Two YAML Pipelines
I've developed two complementary pipelines that address different automation scenarios:
Pipeline 1: BPA Application Listing and Installation - This part is just an example for sure, so you can do the same for other D365 apps (BPP, Demand Planning, Planning Optimization and so on!)
File: bpa-apps-dataverse.yml
Purpose: List all applications and optionally install BPA-related packages
This pipeline demonstrates how to:
Authenticate using Service Principal (SPN) credentials
Call the Power Platform API to retrieve all application packages
Differentiate between installed vs. available applications
Identify BPA-specific applications (e.g., msdyn_BpaAnchor)
Trigger installation with safe polling logic
Pipeline 2: Force Update All Installed Applications
File: process-update-dataverse.yml
Purpose: Automatically update all installed Dataverse applications across environments (again here I parse all environments, you can change it from what you want !)
This pipeline provides:
Multi-environment processing in a single run
Intelligent filtering to exclude system application
Force install/update strategy for all custom applications
Robust error handling for HTTP 400 responses (indicating already up-to-date apps)
Deep Dive: How the YAML Pipelines Work
Let me walk you through the key logic and steps in each pipeline.
Authentication Flow (Common to Both Pipelines)
Both pipelines start with Service Principal authentication to obtain an OAuth2 access token:
1 - task: PowerShell@2
2 displayName: "SPN Authentication (Get API Token)"
3 inputs:
4 targetType: 'inline'
5 script: |
6 Write-Host "🔐 Acquiring API access token via service principal..."
7
8 # Prepare OAuth2 token request
9 $body = @{
10 client_id = "$(ClientId)"
11 client_secret = "$(ClientSecret)"
12 grant_type = "client_credentials"
13 scope = "$(PowerPlatformScope)" # https://api.powerplatform.com/.default
14 }
15
16 # Request token from Azure AD
17 $response = Invoke-RestMethod -Method Post `
18 -Uri "https://login.microsoftonline.com/$(TenantId)/oauth2/v2.0/token" `
19 -Body $body
20
21 $token = $response.access_token
22
23 if (-not $token) {
24 Write-Error "❌ Failed to obtain access token"
25 exit 1
26 }
27
28 # Store token securely as pipeline variable
29 Write-Host "##vso[task.setvariable variable=PowerPlatformToken;issecret=true]$token"
30 Write-Host "✅ Access token acquired"
Key Points:
Uses client credentials flow (no user interaction required)
Token is stored as a secret pipeline variable for security
Scope must be https://api.powerplatform.com/.default
Pipeline 1 Logic: Listing and Installing BPA Apps
Step 1: List All Applications
The pipeline calls the Power Platform API to retrieve all application packages:
1 - task: PowerShell@2
2 displayName: "List installed and available applications"
3 env:
4 PowerPlatformToken: $(PowerPlatformToken)
5 inputs:
6 targetType: 'inline'
7 script: |
8 Write-Host "🔎 Fetching applications via Power Platform API..."
9
10 $headers = @{ Authorization = "Bearer $env:PowerPlatformToken" }
11 $url = "$(TenantApiBase)/appmanagement/environments/$(EnvironmentId)/applicationPackages?api-version=2022-03-01-preview&lcid=1033"
12
13 try {
14 $response = Invoke-RestMethod -Method GET -Uri $url -Headers $headers -ErrorAction Stop
15 } catch {
16 Write-Error "❌ API call failed: $_"
17 exit 1
18 }
19
20 $packages = $response.value
API Endpoint Details:
URL: https://api.powerplatform.com/appmanagement/environments/{environmentId}/applicationPackages
Method: GET
API Version: 2022-03-01-preview
Response: Returns all application packages with state, version, and metadata
Step 2: Categorize Applications
The script separates applications into logical groups:
1 # Separate installed vs. not installed
2 $installedApps = $packages | Where-Object { $_.state -eq "Installed" }
3 $notInstalledApps = $packages | Where-Object { $_.state -ne "Installed" }
4
5 # Identify BPA-related applications
6 $bpaCandidates = $packages | Where-Object {
7 $_.uniqueName -match "Analytics|Performance|ProcessMining" -or
8 $_.applicationName -match "Analytics|Performance|Process Mining" -or
9 $_.localizedName -match "Analytics|Performance|Process Mining" -or
10 $_.publisherName -match "Microsoft Dynamics 365"
11 }
Step 3: Detect Available Updates
One of the most powerful features is automatic update detection:
1 # Group by uniqueName to find duplicates (multiple versions)
2 $groups = $packages | Group-Object uniqueName
3 $duplicates = $groups | Where-Object { $_.Count -gt 1 }
4
5 if ($duplicates.Count -gt 0) {
6 Write-Host "`n=== 🔄 Available Updates ($($duplicates.Count)) ==="
7
8 foreach ($dup in $duplicates) {
9 $allVersions = $dup.Group | Sort-Object {[Version]$_.version} -Descending
10 $latest = $allVersions[0]
11 $oldest = $allVersions[-1]
12
13 if ($oldest.state -eq "Installed" -and $latest.state -ne "Installed") {
14 Write-Host "⚠️ Update available for **$($latest.localizedName)**: installed v$($oldest.version) → available v$($latest.version)"
15 }
16 }
17 }
This logic compares installed versions against available versions and alerts you to updates.
Step 4: Install BPA Package (Example)
The pipeline includes safe installation logic with polling:
1 - task: PowerShell@2
2 displayName: "Install BPA Package (msdyn_BpaAnchor) [Example]"
3 env:
4 PowerPlatformToken: $(PowerPlatformToken)
5 BpaPackageJson: $(BpaPackageJson)
6 inputs:
7 targetType: 'inline'
8 script: |
9 # Skip if already installed
10 if ($bpaPackage.state -eq "Installed") {
11 Write-Host "ℹ️ BPA is already installed. No action needed."
12 exit 0
13 }
14
15 # Trigger installation
16 $headers = @{
17 Authorization = "Bearer $env:PowerPlatformToken"
18 'Content-Type' = 'application/json'
19 }
20 $installUrl = "$(TenantApiBase)/appmanagement/environments/$(EnvironmentId)/applicationPackages/msdyn_BpaAnchor/install?api-version=2022-03-01-preview"
21
22 $installResponse = Invoke-RestMethod -Method POST -Uri $installUrl -Headers $headers -Body $bpaPayload
23
24 Write-Host "✅ Installation request submitted"
API Endpoint for Installation:
URL: https://api.powerplatform.com/appmanagement/environments/{environmentId}/applicationPackages/{uniqueName}/install
Method: POST
Request Body: JSON payload containing package metadata
Response: 200 OK or 202 Accepted (async operation)
Step 5: Poll for Installation Status
Since installations are asynchronous, the pipeline monitors progress:
1 # Safe polling with timeout
2 $operationId = $installResponse.lastOperation.operationId
3
4 if ($operationId) {
5 Write-Host "⏳ Monitoring installation (Operation ID = $operationId)..."
6 $maxMinutes = 60
7 $minutes = 0
8
9 while ($minutes -lt $maxMinutes) {
10 Start-Sleep -Seconds 60
11 $minutes += 1
12
13 try {
14 $statusUrl = "$(TenantApiBase)/appmanagement/environments/$(EnvironmentId)/operations/$operationId?api-version=2022-03-01-preview"
15 $statusResponse = Invoke-RestMethod -Method GET -Uri $statusUrl -Headers $headers
16 } catch {
17 # Handle 400 Bad Request (operation may have completed)
18 if ($_ -match "400") {
19 Write-Host "⚠️ Status polling returned 400. Check status manually in PPAC."
20 exit 0
21 }
22 continue
23 }
24
25 $state = $statusResponse.state
26
27 if ($state -eq "Installed") {
28 Write-Host "✅ Installation completed successfully"
29 exit 0
30 }
31
32 if ($state -match "Failed") {
33 Write-Error "❌ Installation failed: $($statusResponse.error.message)"
34 exit 1
35 }
36
37 Write-Host "📋 [After $minutes min] Status = $state"
38 }
39 }
Important: The polling logic handles HTTP 400 errors gracefully—these often indicate the operation completed before polling could begin.
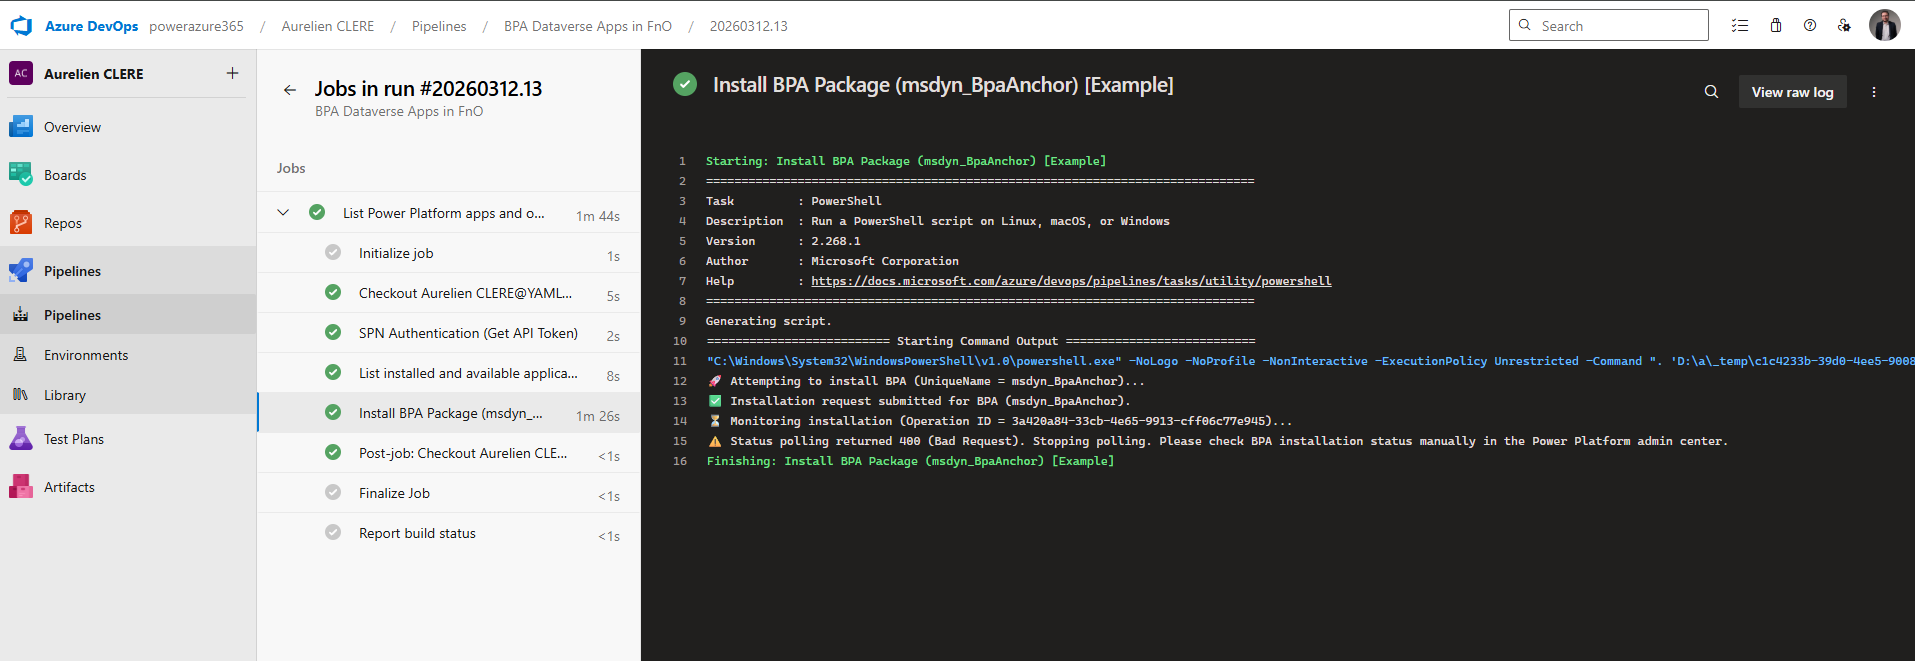
Pipeline 2 Logic: Force Update All Installed Applications
This pipeline takes a more aggressive approach: force-update every installed application across all environments.
Step 1: Authenticate and List Environments
First, it retrieves all Power Platform environments:
1 - task: PowerShell@2
2 displayName: "Authenticate and List Environments"
3 inputs:
4 targetType: 'inline'
5 script: |
6 Write-Host "🔐 Authenticating to Power Platform with Service Principal..."
7
8 Add-PowerAppsAccount -TenantId "$(TenantId)" `
9 -ApplicationId "$(ClientId)" `
10 -ClientSecret "$(ClientSecret)" `
11 -Endpoint Prod
12
13 Write-Host "📋 Retrieving environments..."
14 $envs = Get-AdminPowerAppEnvironment
15
16 if (-not $envs) {
17 Write-Error "❌ No environments returned"
18 exit 1
19 }
20
21 Write-Host "✅ Found $($envs.Count) environment(s)"
22
23 # Save to artifact for next step
24 $envs | Select-Object DisplayName, EnvironmentName, Region |
25 ConvertTo-Json -Depth 5 |
26 Out-File "$(Build.ArtifactStagingDirectory)/environments.json"
This uses the PowerApps PowerShell modules to enumerate environments and saves the list as a pipeline artifact.
Step 2: Process Each Environment
For each environment, the pipeline fetches installed applications:
1 foreach ($envInfo in $envList) {
2 $envId = $envInfo.EnvironmentName
3 $envName = $envInfo.DisplayName
4
5 Write-Host "=== 🌍 Environment: $envName (ID = $envId) ==="
6
7 # Get all application packages
8 $pkgUrl = "https://api.powerplatform.com/appmanagement/environments/$envId/applicationPackages?appInstallState=All&api-version=2022-03-01-preview&lcid=1033"
9 $pkgResponse = Invoke-RestMethod -Method GET -Uri $pkgUrl -Headers $headers
10
11 $allPackages = $pkgResponse.value
12
13 # Filter to installed applications only (exclude system apps)
14 $installedPackages = $allPackages | Where-Object {
15 $_.state -eq "Installed" -and
16 $_.uniqueName -notmatch "^System" -and
17 $_.uniqueName -notmatch "^msdynce_"
18 }
19
20 Write-Host "📦 Processing $($installedPackages.Count) installed application(s)..."
21 }
Filtering Logic:
Only processes apps with state = "Installed"
Excludes system applications (starting with System or msdynce_)
Focuses on custom and first-party Dynamics 365 apps
Step 3: Trigger Force Update
For each installed application, the pipeline sends an install request:
1 foreach ($installedPkg in $installedPackages) {
2 $appName = $installedPkg.localizedName
3 $uniqueName = $installedPkg.uniqueName
4 $installedVersion = $installedPkg.version
5
6 Write-Host "🔄 Attempting install/update for '$appName' (v$installedVersion)..."
7
8 try {
9 $installUrl = "https://api.powerplatform.com/appmanagement/environments/$envId/applicationPackages/$uniqueName/install?api-version=2022-03-01-preview"
10 $installPayload = $installedPkg | ConvertTo-Json -Depth 10 -Compress
11
12 $installResponse = Invoke-RestMethod -Method POST `
13 -Uri $installUrl `
14 -Headers $headers `
15 -Body $installPayload
16
17 # Check operation status
18 $operationId = $installResponse.lastOperation.operationId
19
20 if ($operationId) {
21 $statusUrl = "https://api.powerplatform.com/appmanagement/environments/$envId/operations/$operationId?api-version=2022-03-01-preview"
22 $statusResponse = Invoke-RestMethod -Method GET -Uri $statusUrl -Headers $headers
23
24 $state = $statusResponse.state
25
26 if ($state -eq "Installed") {
27 Write-Host "✔️ '$appName' updated successfully"
28 } elseif ($state -match "Failed") {
29 Write-Host "❌ Update failed: $($statusResponse.error.message)"
30 }
31 } else {
32 Write-Host "✔️ '$appName' is already up-to-date"
33 }
34
35 } catch {
36 if ($_ -match "400") {
37 Write-Host "ℹ️ '$appName' returned 400 - likely already up-to-date"
38 } else {
39 Write-Host "❌ Failed to trigger update for '$appName': $_"
40 }
41 }
42 }
Key Strategy: The "force install" approach sends an install request even if the app is already installed. The API will:
Return HTTP 400 if no update is available (handled gracefully)
Return HTTP 200/202 if an update is available and triggers the operation
Provide an operation ID for status polling
Setting Up the Pipelines in Azure DevOps
Step 1: Create a Variable Group for Secrets
Store your Service Principal credentials securely:
Navigate to Azure DevOps → Pipelines → Library
Click + Variable group
Name it MySecureVariables (or match the name in your YAML)
Add the following variables:

Security Tip: Always mark ClientSecret as a secret variable by clicking the lock icon.
Step 2: Create the Pipeline Files
In your Azure DevOps repository, create a folder /Pipelines/ (or similar)
Add two files:
bpa-apps-dataverse.yml (copy content from your first YAML file)
process-update-dataverse.yml (copy content from your second YAML file)
Commit and push to your repository
Step 3: Create the Pipelines
For each YAML file:
Go to Pipelines → New pipeline
Select Azure Repos Git (or your source control)
Select your repository
Choose Existing Azure Pipelines YAML file
Browse to /Pipelines/bpa-apps-dataverse.yml (or the other file)
Click Continue → Save
Rename the pipeline to something descriptive (e.g., "Dataverse - BPA App Installation")
Step 4: Configure Triggers
Both pipelines are set to trigger: none by default, meaning they run manually or on schedule.
To add a schedule (e.g., nightly updates):
Add this to your YAML:
1 schedules:
2 - cron: "0 2 * * *" # 2:00 AM UTC daily
3 displayName: "Daily App Update Check"
4 branches:
5 include:
6 - main
7 always: false # Only run if there are changes
Running the Pipelines: A Walkthrough
Running Pipeline 1: BPA App Listing and Installation
Navigate to Pipelines → Select "Dataverse - BPA App Installation"
Click Run pipeline
Confirm the branch (e.g., main)
Click Run
Expected Output:
1 🔐 Acquiring API access token via service principal...
2 ✅ Access token acquired (length 1247 characters)
3
4 🔎 Fetching applications via Power Platform API...
5 ✅ Found 42 application packages
6
7 === 📂 Installed Applications (15) ===
8 - Dynamics 365 Customer Service (UniqueName=msdyn_CustomerService) v9.2.24011.00154 **Installed**
9 - BPA Anchor Solution (UniqueName=msdyn_BpaAnchor) v3.0.0.12 **Installed** [BPA]
10 - Dual Write Core (UniqueName=DualWriteCore) v2.3.0.0 **Installed**
11 ...
12
13 === 📦 Available (Not Installed) Applications (27) ===
14 - Dynamics 365 Field Service (UniqueName=msdyn_FieldService) v8.8.105.12 **Not Installed**
15 ...
16
17 === 🔄 Available Updates (3) ===
18 ⚠️ Update available for **Dual Write Application Orchestration**: installed v2.3.0 → available v2.4.1
19 ⚠️ Update available for **BPA Anchor Solution**: installed v3.0.0.12 → available v3.1.0.5
20 ...
21
22 🚀 Attempting to install BPA (UniqueName = msdyn_BpaAnchor)...
23 ℹ️ BPA is already installed (current version 3.0.0.12). No installation needed.
Running Pipeline 2: Force Update All Applications
Navigate to Pipelines → Select "Dataverse - Force Update All Apps"
Click Run pipeline
Confirm the branch
Click Run
Expected Output:
1 📦 Installing Power Platform PowerShell modules...
2 ✅ Modules installed successfully
3
4 🔐 Authenticating to Power Platform with Service Principal...
5 ✅ Found 5 environment(s)
6
7 === 🌍 Environment: Production (ID = 12a34567-89bc-...) ===
8 📂 Total packages: 38
9 📦 Processing 12 installed application(s)...
10
11 🔄 Attempting install/update for 'Dual Write Core' (v2.3.0.0)...
12 📋 Status = Installed
13 ✔️ 'Dual Write Core' updated successfully
14
15 🔄 Attempting install/update for 'Customer Service' (v9.2.24011.00154)...
16 ℹ️ 'Customer Service' returned 400 - likely already up-to-date
17
18 ...
19
20 === 🌍 Environment: UAT (ID = 98f76543-21ba-...) ===
21 ...
22
23 ✅ All environments processed successfully
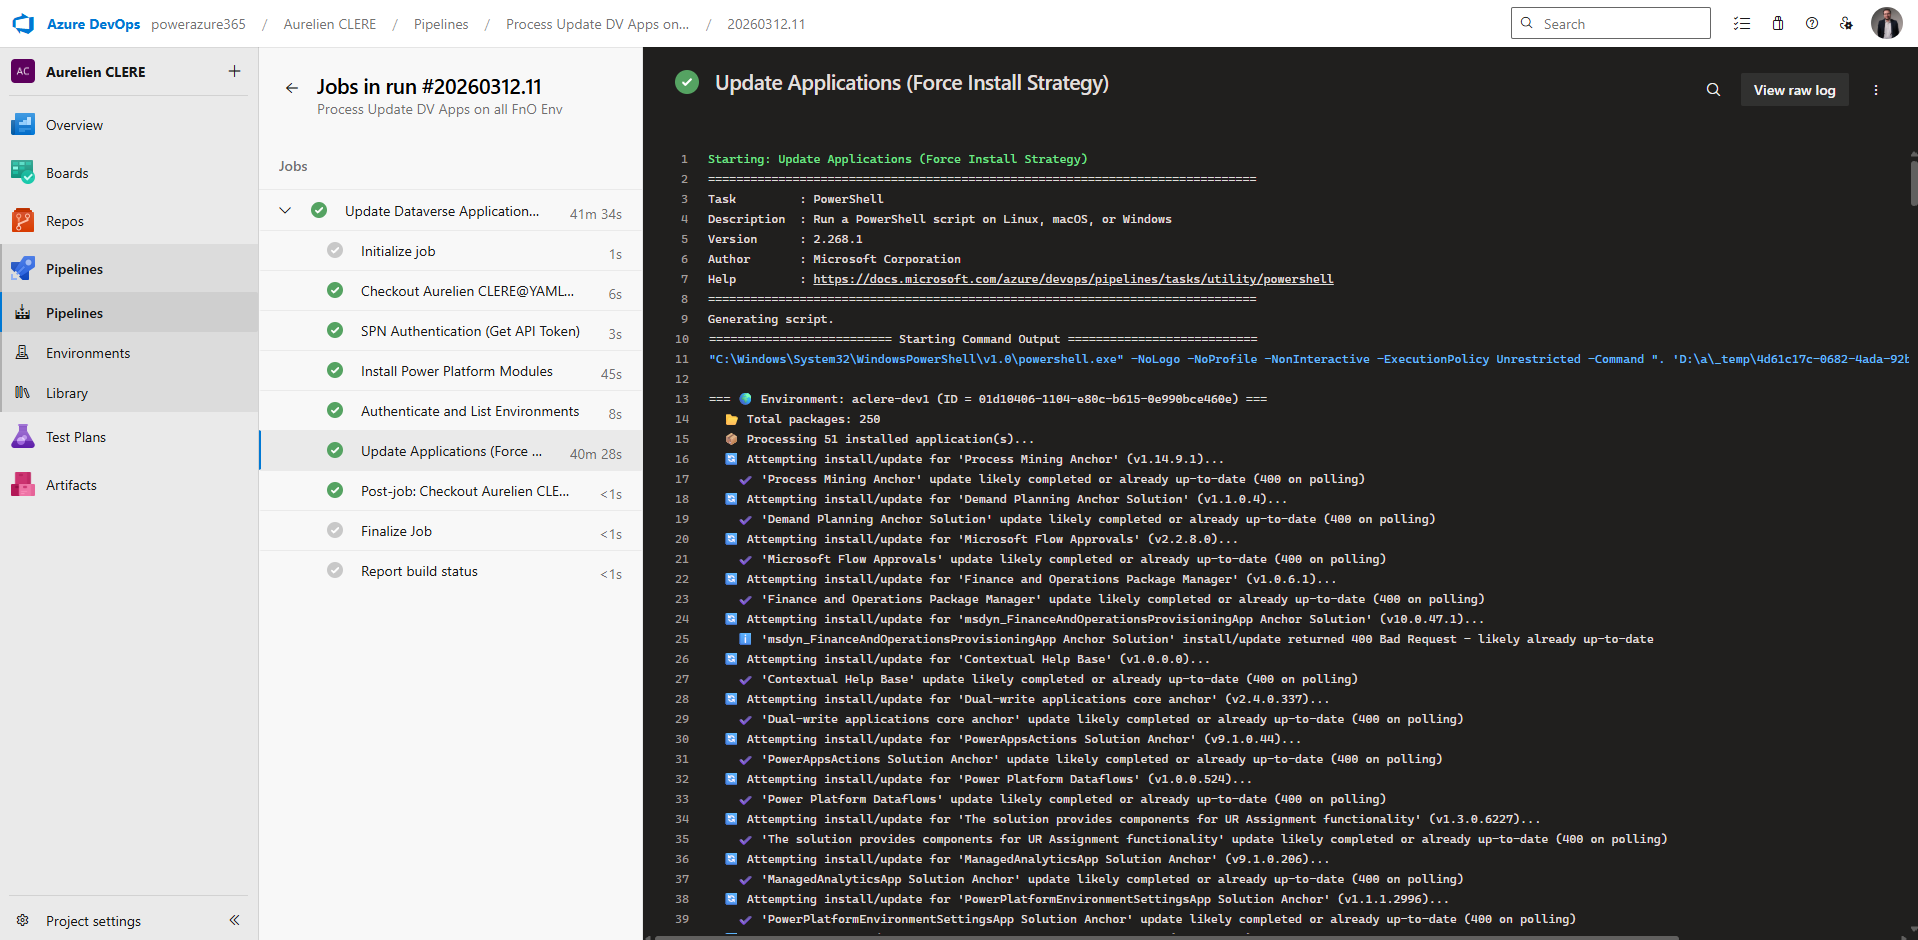
Best Practices for Production Use
Recommended Workflow
Here's how I recommend structuring your automation strategy:
Weekly Scheduled Scan (Pipeline 1)
Run every Monday at 2 AM
Lists all applications across environments
Identifies available updates
Sends summary report via email (add Power Automate integration)
Does not auto-install (manual approval required)
Monthly Update Cycle (Pipeline 2)
Scheduled for first Saturday of each month
Targets Dev environment first (auto-approve)
Targets UAT environment second (auto-approve)
Targets Production last (requires manual approval)
Each stage waits 24-48 hours for validation
On-Demand Emergency Updates
Manual trigger when critical security patches are released
Uses Pipeline 2 with custom environment filtering
Still requires approval gates for Production
Real-World Use Cases
Use Case 1: Post-Platform Update Application Sync
Scenario: You've just upgraded your F&O environment to Platform Update 10.0.47 using PPAC.
Solution: Run Pipeline 2 immediately after the platform update to ensure all integrated applications (Dual Write, Field Service, Customer Service) are updated to versions compatible with 10.0.47.
Benefit: Prevents version mismatch issues and ensures all components are on supported builds.
Use Case 2: Environment Refresh Automation
Scenario: You perform a database copy from Production to UAT (database refresh).
Challenge: UAT now has Production's app versions, which may be outdated for testing purposes.
Solution:
Configure a pipeline trigger that detects environment refresh events
Automatically runs Pipeline 2 on the refreshed environment
Updates all applications to latest available versions
Sends notification when complete
Benefit: UAT is immediately ready for testing with current app versions.
Use Case 3: New Environment Provisioning
Scenario: Your team needs to spin up a new sandbox environment for a proof-of-concept.
Solution:
Create environment via PPAC or PowerShell
Trigger Pipeline 1 with a predefined "starter pack" of applications
Install BPA, Dual Write, and other required apps automatically
Environment is fully configured without manual clicks
Benefit: Reduces provisioning time from hours to minutes.
Use Case 4: Compliance-Driven Update Schedule
Scenario: Your organization has a policy requiring all applications to be on the latest version within 30 days of release for security compliance.
Solution:
Schedule Pipeline 1 to run weekly and log update availability
Configure Power Automate to create Azure DevOps work items when updates are detected
Schedule Pipeline 2 monthly to apply all pending updates
Maintain audit trail via pipeline logs
Benefit: Automated compliance reporting and enforcement.
Understanding the Power Platform API Endpoints
For those interested in the technical details, here's a breakdown of the key API endpoints used:
Endpoint 1: List Application Packages
URL:
1 GET https://api.powerplatform.com/appmanagement/environments/{environmentId}/applicationPackages
2 ?api-version=2022-03-01-preview
3 &lcid=1033
4 &appInstallState=All
Purpose: Retrieves all application packages (both installed and available) for an environment
Response Structure:
1 {
2 "value": [
3 {
4 "uniqueName": "msdyn_BpaAnchor",
5 "localizedName": "BPA Anchor Solution",
6 "version": "3.1.0.5",
7 "state": "Installed",
8 "publisherName": "Microsoft Dynamics 365",
9 "applicationId": "12a34567-89bc-...",
10 "lastOperation": {
11 "operationId": "98f76543-21ba-...",
12 "state": "Installed"
13 }
14 }
15 ]
16 }
Endpoint 2: Install Application Package
URL:
1 POST https://api.powerplatform.com/appmanagement/environments/{environmentId}/applicationPackages/{uniqueName}/install
2 ?api-version=2022-03-01-preview
Purpose: Triggers installation or update of an application package
Request Body: JSON payload containing the package metadata (from the list response)
Response: Returns operation details or HTTP 200/202 if successfull
Endpoint 3: Get Operation Status
URL:
1 GET https://api.powerplatform.com/appmanagement/environments/{environmentId}/operations/{operationId}
2 ?api-version=2022-03-01-preview
Purpose: Polls the status of an asynchronous installation operation
Response Structure:
1 {
2 "operationId": "98f76543-21ba-...",
3 "state": "Installed", // or "InProgress", "Failed"
4 "error": {
5 "message": "Error details if failed"
6 }
7 }
The Paradigm Shift
This solution represents a fundamental shift from the LCS era:48
From manual to automated: No more clicking through PPAC for every update
From reactive to proactive: Scheduled scans detect updates before they become urgent
From inconsistent to standardized: Same pipeline logic applies to all environments
From opaque to transparent: Full pipeline logs and source control history
"You're now operating at a DevOps maturity level that was simply impossible in the LCS-only era. Everything is code, everything is automated, everything is traceable."
Additional Resources
Microsoft Official Documentation: Tutorial: Install an application to a target environment
Power Platform API Reference: Applications - Install Application Package
Service Principal Setup Guide: Creating a service principal application using API
My Previous Article: Unified Developer Experience for Dynamics 365 F&O
🛠️ Community Power: d365bap.tools for Advanced ALM Automation
ℹ️ Update: As of early 2026, d365bap.tools supports Service Principal (non-interactive) authentication for at least some of its cmdlets, meaning you can use it in headless DevOps pipelines for certain tasks. For example, I found (with the good help of Mötz, thanks again !) that running Get-BapEnvironments with an Azure AD app registration (client ID and secret) works without any interactive login. I haven’t tested every command in the library yet, so some operations may still require a user login, but this is a huge step forward. I’ve updated the https://github.com/AurelienClere-365/Unifield-ALM-NewGeneration-D365FnO/blob/main/d365bap-tools.yml to demonstrate this new capability. The discussion below has been adjusted to account for these developments while still highlighting the tool’s value.
While Microsoft provides PAC CLI and Power Platform Build Tools for many ALM tasks, the community has stepped up to fill critical gaps. One of the most powerful (and exciting) community-driven solutions is d365bap.tools – an open-source PowerShell module specifically built for the Business Application Platform (BAP) that spans Dynamics 365 F&O and Dataverse.
d365bap.tools is maintained by the same d365collaborative community behind the popular d365fo.tools module (spearheaded by Mötz Jensen, aka @Splaxi). It offers 60+ cmdlets that let you query and manage your PPAC environments, Dynamics 365 apps, and even F&O user accounts in ways that Microsoft’s official tools don’t yet support. In short, it’s a Swiss-army knife for advanced ALM automation and environment management.
Key Facts:
License: MIT (fully open-source and free to use)
Source: GitHub – d365collaborative/d365bap.tools
Installation: Available on PowerShell Gallery (Install-Module d365bap.tools)
Community Driven: Regular updates, ~30+ GitHub stars (and growing), open to contributions
What Can d365bap.tools Do? (Manual Power Today)
Even though until recently you had to run it in an interactive context (and many commands still require a user login), d365bap.tools already delivers a ton of value for one-off scripts and admin tasks. Here are some of the notable cmdlets and their capabilities that you can leverage today on your machine:
Environment Inventory & Details:
Get-BapEnvironment – List all Power Platform environments in your tenant (with filters to show only F&O-enabled environments). Great for getting an inventory of instances and their org URLs, regions, versions, etc.
Get-BapEnvironmentD365App – For a given environment, retrieve all installed Dynamics 365 first-party apps (like Sales, Dual Write, Field Service) and their version numbers. This is incredibly useful to see what versions of each app are currently installed in an environment, something that otherwise requires clicking through the PPAC UI.
Application Management & Comparison:
Invoke-BapEnvironmentInstallD365App – Programmatically install or update a Dynamics 365 app in an environment. Essentially a PowerShell alternative to using the PPAC “Install Application” GUI (similar in intent to PAC CLI’s app install, though as noted earlier, this currently needs a user login).
Compare-BapEnvironmentD365App – Compare the installed apps between two environments. For example, you can quickly spot if your UAT has a newer version of an app than Prod, or if an app is missing in one environment. This helps identify drift and inconsistencies across environments.
User Management & Security:
Get-FscmUser – Extract a list of F&O users in an environment, including their roles. Useful for auditing who has access or for documenting security setup.
Add-FscmSecurityRoleMember – Automate user provisioning by adding users to F&O security roles via script. Think of scenarios like post-go-live user setups or adding a batch of test accounts to a role in one go (much faster than clicking in the UI).
Environment Operations & Health:
Get-BapEnvironmentOperation – Check on long-running operations in an environment (like package deployments, environment copy/restores, installs). This can tell you if a certain operation is still running or has succeeded/failed, which is handy to monitor processes via script.
Confirm-BapEnvironmentIntegration – Verify the status of Dual Write or other integration features for an environment. This could tell you at a glance if, say, Dual Write is active and healthy, or if an environment’s link to a Dataverse org is in place.
Platform Updates & Version Checks:
Get-PpacD365PlatformUpdate – Check what platform updates are available for a given F&O environment. This surfaces the information you’d see in the PPAC for “Update available: 10.0.xx”. With a script, you could quickly query whether there’s a newer platform version your environment could be updated to.
Reporting & Export:
Many Get- cmdlets in d365bap.tools support outputting results to formats like CSV or even Excel. For instance, Get-BapEnvironment -AsExcelFile can produce an Excel spreadsheet of all your environments and key settings. This is gold for documentation or sharing a summary of your environments with stakeholders, done in seconds via script.
All these commands work today if you run them from a PowerShell prompt on your PC (after logging in with Login-AzAccount or a similar auth cmdlet provided by the module). They empower you to script advanced queries and actions that are otherwise tedious or not possible through Microsoft’s official CLI or GUI alone.
However – and this is crucial – historically all of these required an interactive context to authenticate. The typical usage pattern is running Login-AzAccount (or a similar login command) which pops up a browser or uses your current user context to authenticate you to the Power Platform. In a non-interactive environment like a pipeline agent, that approach breaks down. As noted earlier, service principal support is now available for some operations, but some d365bap.tools cmdlets still rely on a user context for authentication.
In short: Today, d365bap.tools is best utilized for manual and one-off automation tasks (with emerging support for some pipeline scenarios via service principals). It’s fantastic for a DevOps engineer or admin to run on their own machine, or even on a jump box/automation VM where you can log in. Many teams use it to generate environment reports, bulk-add users, or script out the installation of an app during a rollout – all manually initiated steps for now.
Why Pipeline Support Was Limited – and How It’s Changing
The limitation has always come down to authentication. Initially, the Power Platform Admin Center’s APIs – which d365bap.tools calls under the hood – did not fully support service principal (app-only) authentication for environment management operations. In other words, d365bap.tools had no way to accept an application ID and secret to log in; it expected a user context (an interactive OAuth login from a user account). This was a showstopper for using it in CI/CD pipelines, since no user is present to provide credentials.
The good news is that Microsoft has been evolving these APIs. We’re now seeing signs of app-only support for certain calls. For example, as mentioned above, retrieving environment info via Get-BapEnvironment works with a service principal today. There still isn’t a dedicated “service principal login” cmdlet within d365bap.tools, but you can authenticate by other means (for instance, using Azure PowerShell’s Connect-AzAccount with a client ID/secret, or using the Power Platform CLI to sign in as an app) and then run the d365bap.tools cmdlets under that non-interactive session. In my case, I leveraged an Azure AD app registration and was able to execute several read-only operations without any user prompt.
We anticipate that as Microsoft expands support and/or the d365bap.tools maintainers update the module to handle app credentials more directly, more operations will work headlessly. PAC CLI, for instance, is pipeline-friendly because Microsoft provided a mechanism (via the pac auth create --client-secret command) to let a service log in. For some of the specific admin actions d365bap.tools performs (like installing an app or managing users), official app-only token flows have been missing until now. So up until this point, d365bap.tools was effectively “user-mode only.” That’s beginning to change with these new authentication capabilities.
Forward-Looking: Imagine d365bap.tools in Your CI/CD:
Why am I (and many in the community) excited about d365bap.tools and including it in a forward-looking ALM discussion? Because as non-interactive auth becomes a reality (already starting to happen), this tool unlocks next-level automation scenarios that even Microsoft’s current tooling can’t do yet. For example:
Automated Environment Consistency Checks: As part of a release pipeline, you could have a step that runs Compare-BapEnvironmentD365App between your staging (UAT) and production environments. In seconds, the script could fail the deployment if it finds that, say, Prod is missing the “Latest Dual Write Orchestration” app that UAT has. This prevents those “works in UAT, fails in Prod” surprises by ensuring the target environment is in sync from an app perspective before you deploy code.
Nightly Environment Snapshot & Drift Reporting: Imagine a scheduled pipeline (or Azure Function) that uses d365bap.tools cmdlets to gather data on all your environments – number of users, installed app versions, integration status, storage consumption, etc. – and then emails a report or posts to Teams. This community tool can fetch a lot of that info. Today you might run that script manually each month; in the future, it could run automatically every night because no human login is needed.
Automated User Provisioning/De-provisioning: If a new team member joins, you could someday trigger a pipeline that calls Add-FscmSecurityRoleMember to add them to the right F&O roles across environments. Or after a refresh of a UAT from Prod, a script could remove or obfuscate certain user accounts, or add test users back in. These kinds of user-management tasks are scriptable with d365bap.tools. Once we can run them in pipelines, they can be tied into your DevOps processes (for example, an Azure DevOps pipeline that runs post-refresh to clean up users, or a GitHub Action that runs on a schedule to sync roles).
Environment Copy Orchestrations: Microsoft will eventually let us initiate environment copies via an API. If d365bap.tools extends to that (some of its operations monitoring hints at this area), you could have a pipeline that not only triggers a copy from Prod to UAT, but also waits for it to finish (Get-BapEnvironmentOperation), and then performs follow-up steps (like re-enabling integrations or running data-fix scripts). This would be a fully automated environment refresh workflow – a task that currently still involves a lot of manual babysitting.
Enhanced Health Checks: Incorporating Confirm-BapEnvironmentIntegration into a pipeline means you could automatically verify that Dual Write, Business Events, or other connectors are in place after a deployment. For example, after deploying a new build to an environment, run this cmdlet to ensure no integration was broken or disabled – if something’s off, alert the team or even roll back the deployment.
In summary, d365bap.tools has enormous potential to augment ALM pipelines once the authentication hurdle is fully cleared (and we’re already seeing progress on that front). It’s filling gaps that Microsoft’s tools haven’t addressed yet, particularly for F&O-specific needs like user security management and environment comparison.
Using d365bap.tools Today: Best Practices
Even with its current limitations, you should consider adding d365bap.tools to your toolbox for manual operations and exploratory automation:
Start in a Dev/Test Tenant: Because it can make changes (like installing apps or adding users), first play with d365bap.tools in a sandbox environment or a trial tenant. This lets you safely discover what each cmdlet does. The GitHub repo’s readme and wiki have documentation for each command.
Combine with Other Tools: You can mix d365bap.tools with PAC CLI and the Power Platform CLI in the same script. For example, you might use PAC CLI to export a solution, then use d365bap.tools to do an environment comparison and perhaps use the Dataverse REST APIs (via PowerShell) for something else (including Power Platform SDK v2). PowerShell makes it relatively easy to call REST endpoints too, so d365bap.tools can be one piece of a larger automation script.
Community Support: If you run into issues or need a new feature, raise it on the GitHub repo. The module is under active development by community experts. Given it’s open source, you can even fork it and modify or extend cmdlets for your own needs (and ideally contribute back your enhancements).
Security Reminder: Because you might still need to log in interactively for certain operations, ensure that you do not embed plaintext credentials in any scripts. Leverage secure credential prompts or Windows Credential Manager if you’re automating on a local machine. And always test scripts carefully – some cmdlets perform changes (like app installation) that are not easily reversible except by manual cleanup.
d365bap.tools vs. PAC CLI – A Complement, Not a Replacement
It’s worth clarifying how d365bap.tools fits alongside Microsoft’s official tools:
PAC CLI & Power Platform Build Tools (Microsoft-official): Fully supported in pipelines today, great for standard ALM tasks (deploying packages, importing/exporting solutions, installing apps in regions where supported, etc.). These operate with Microsoft’s blessing and typically use officially documented APIs under the hood.
d365bap.tools (Community): Adds a bunch of extra capabilities on top. It was built by reverse-engineering and leveraging internal APIs that Microsoft’s own tools don’t expose yet. For instance, comparing environments or retrieving user info are things PAC CLI can’t do right now. Think of d365bap.tools as an advanced toolkit for power users.
My recommendation is to use both where appropriate: Rely on PAC CLI for core deployment steps (since it’s pipeline-ready and supported), and use d365bap.tools for the value-add tasks especially during development and management. Over time, as d365bap.tools becomes pipeline-capable (the first hints of which are appearing now), you can start folding those advanced tasks into your YAML or GitHub workflows to further automate your processes.
Celebrating Community Innovation
A final note: The emergence of d365bap.tools underscores the strength of the Dynamics 365 community. Just as the old d365fo.tools module helped F&O developers automate things on dev machines (like creating VMs, managing assets, etc.), this new bap module is addressing the PPAC era needs. It’s a reminder that when Microsoft hasn’t delivered something yet, the community often finds a way to build it and share it.
If you find d365bap.tools useful, consider giving back: report bugs, suggest improvements, or even contribute code. Even simply starring the repository or thanking the maintainers goes a long way. These community tools thrive on real-world usage and feedback.
In summary, d365bap.tools is a powerful ally for Dynamics 365 F&O ALM that you can use today for manual tasks, and now even start integrating into automated pipelines (using service principal auth) – with the expectation that soon it will be fully pipeline-ready for all operations. It fills gaps in environment management, offers richer reporting, and exemplifies the forward-looking, API-first approach that we’re moving towards. Keep an eye on it – and on Microsoft’s updates to admin APIs – because now that it is becoming non-interactive-friendly, you’ll want to integrate this tool into your DevOps pipeline and take your automation to the next level. For now, don’t hesitate to leverage it in your day-to-day admin work to save time and catch issues that otherwise might go unnoticed. Together with PAC CLI and other tools, d365bap.tools ensure that no part of your ALM process remains un-automatable for long.
🚀 GitHub-Only Mode: Unified ALM for Dynamics 365 F&O
After covering the Azure DevOps approach in depth, it's time to explore how to implement a pure GitHub workflow for your Dynamics 365 Finance & Operations projects. This section will show you how to leverage GitHub Actions, GitHub Secrets, and community-driven solutions to achieve the same level of automation and governance—without relying on Azure DevOps1.
GitHub has become the de facto standard for open-source collaboration and is increasingly adopted by enterprise teams for its:
Native CI/CD with GitHub Actions: Built-in workflow automation without separate pipeline tools
Superior developer experience: Pull Requests, Code Review, Copilot integration, Discussions
Unified platform: Source control, project management, and automation in one place
Open ecosystem: Vast marketplace of actions and community contributions
Cost efficiency: 2,000 free Action minutes/month for private repos, unlimited for public
Of course, there’s a lot of content to discuss when comparing DevOps and GitHub, but in this section, I’ll focus primarily on the Dynamics 365 ERP (Finance & Operations) perspective.
Your GitHub repository structure should follow the same principles as Azure DevOps, but with GitHub-specific additions:
1 /
2 ├── .github/
3 │ ├── workflows/
4 │ │ ├── ci-build-validation.yml
5 │ │ ├── ci-deploy-uat.yml
6 │ │ ├── ci-deploy-prod.yml
7 │ │ └── update-fsc-ps.yml
8 │ ├── CODEOWNERS
9 │ ├── PULL_REQUEST_TEMPLATE.md
10 │ └── ISSUE_TEMPLATE/
11 │ ├── bug_report.md
12 │ └── feature_request.md
13 ├── Metadata/
14 │ ├── YourCustomModel1/
15 │ └── YourCustomModel2/
16 ├── Projects/
17 │ ├── AzureBuild/
18 │ │ ├── YourCustomModel1.rnrproj
19 │ │ ├── YourCustomModel2.rnrproj
20 │ │ ├── AzureBuild.sln
21 │ │ ├── nuget.config
22 │ │ └── packages.config
23 ├── Scripts/
24 │ ├── Build/
25 │ └── Deploy/
26 ├── .gitignore
27 └── README.md
Key differences from Azure DevOps:
.github/workflows/: Replaces Azure Pipelines YAML files stored in /Tools/Pipelines
CODEOWNERS: Automatically requests reviews from designated team members on PRs
PR and Issue templates: Standardizes contribution workflows
README.md: Critical for GitHub projects—serves as the landing page
Service Connections: GitHub Secrets & Environments
Instead of Azure DevOps service connections, GitHub uses Secrets and Environment Secrets for secure credential management.
1. Create App Registration (Same as Azure DevOps)
The process is identical to what we covered earlier:
Go to Azure Portal > Azure AD > App Registrations
Create new registration (e.g., GitHub-PowerPlatform-SP)
Generate Client Secret (copy immediately—you can't retrieve it later)
Assign API permissions:
Dynamics CRM: user_impersonation
PowerApps Service: Environment.Read.All, Environment.Write.All
Grant admin consent
2. Create GitHub Secrets
Navigate to your GitHub repository > Settings > Secrets and variables > Actions:
Create the following Repository Secrets:
AZURE_TENANT_ID
Your Azure AD Tenant ID
Authentication
AZURE_CLIENT_ID
App Registration Client ID
Service Principal
AZURE_CLIENT_SECRET
App Registration Secret
Authentication
UAT_ENVIRONMENT_URL
https://uat-org.crm4.dynamics.com
UAT Dataverse URL
PROD_ENVIRONMENT_URL
https://prod-org.crm4.dynamics.com
Production Dataverse URL
NUGET_PAT
Azure DevOps PAT (if using hybrid option that you will see just after)
NuGet feed access
3. Create GitHub Environments
GitHub Environments provide the same governance capabilities as Azure DevOps Environments:
Go to Settings > Environments > New environment
Create UAT and Production environments
For Production, configure:
Required reviewers: Add approvers (minimum 1-2)
Wait timer: Optional delay before deployment (e.g., 5 minutes)
Deployment branches: Restrict to main or release/* only
Environment secrets: Production-specific secrets
Approach 1: FSC-PS for GitHub (Community Solution)
FSC-PS (Finance & Supply Chain - PowerShell) is a community-driven open-source project that enables GitHub Actions-based CI/CD for D365 F&O without requiring Azure DevOps Artifacts
FSC-PS provides:
GitHub Actions specifically designed for D365 F&O/Commerce/ECommerce
Template repositories to get started quickly
PowerShell-based build tools (fscps.tools) that handle NuGet packages differently
Full CI/CD workflows without dependency on Microsoft's official NuGet feed
Repository: https://github.com/fscpscollaborative/fscps (original)
Getting Started with FSC-PS
Step 1: Use the FSC-PS Template
Navigate to https://github.com/fscpscollaborative/fscps.fsctpl
Click "Use this template" > "Create a new repository"
Name your repository (e.g., ContosoD365FO)
Clone to your local machine
Step 2: Import Your Source Code
The FSC-PS template includes an (IMPORT) workflow:
Package your existing X++ source code as a .7z archive
Upload to a publicly accessible location (or GitHub Release)
Go to Actions > (IMPORT) workflow > Run workflow
Paste the direct download URL
Wait for completion—your metadata will be imported into /Metadata
Step 3: Configure Repository Secrets
FSC-PS requires these secrets14:
1 REPO_TOKEN # GitHub PAT with repo, admin:public_key, notifications, user, project permissions
2 AZURE_TENANT_ID # Your Azure AD Tenant ID
3 AZURE_CLIENT_ID # Service Principal Client ID
4 AZURE_CLIENT_SECRET # Service Principal Secret
Step 4: Configure FSC-PS Settings
FSC-PS uses a .FSC-PS/settings.json file in your repository to configure build behavior. Example:
1 {
2 "type": "FSC",
3 "buildVersion": "latest",
4 "models": "ContosoModel1,ContosoModel2",
5 "buildPath": "Projects/AzureBuild",
6 "testModel": "",
7 "deploymentType": "cloud"
8 }
Key parameters:
type: FSC (Finance & Operations) or Commerce
buildVersion: D365 version (e.g., 10.0.46) or latest
models: Comma-separated list of models to build
deploymentType: cloud for PPAC environments
FSC-PS Workflow Examples
CI Build Validation (Pull Request)
1 name: CI Build Validation
2
3 on:
4 pull_request:
5 branches: [ main, develop ]
6 paths:
7 - 'Metadata/**'
8 - 'Projects/**'
9
10 jobs:
11 build:
12 runs-on: windows-latest
13 name: Build and Validate
14
15 steps:
16 - name: Checkout
17 uses: actions/checkout@v3
18
19 - name: Read settings
20 uses: fscpscollaborative/fscps.gh/ReadSettings@v1
21
22 - name: Build FSC Solution
23 uses: fscpscollaborative/fscps.gh/BuildFSC@v1
24 with:
25 settingsJson: ${{ env.Settings }}
26 buildVersion: ${{ env.buildVersion }}
27
28 - name: Publish Build Artifacts
29 uses: actions/upload-artifact@v3
30 with:
31 name: packages
32 path: output/
What this does:
Triggers on PRs to main or develop that modify code
ReadSettings: Loads configuration from .FSC-PS/settings.json
BuildFSC: Compiles X++ using FSC-PS tools (downloads NuGet packages internally)
Publishes artifacts: Makes deployable package available for review15
CI Deploy to UAT
1 name: Deploy to UAT
2
3 on:
4 push:
5 branches: [ develop ]
6 workflow_dispatch:
7
8 jobs:
9 build:
10 runs-on: windows-latest
11 name: Build Solution
12
13 steps:
14 - name: Checkout
15 uses: actions/checkout@v3
16
17 - name: Read settings
18 uses: fscpscollaborative/fscps.gh/ReadSettings@v1
19
20 - name: Build FSC Solution
21 uses: fscpscollaborative/fscps.gh/BuildFSC@v1
22 with:
23 settingsJson: ${{ env.Settings }}
24 buildVersion: '10.0.46'
25
26 - name: Upload Build Artifact
27 uses: actions/upload-artifact@v3
28 with:
29 name: CloudPackage
30 path: output/CloudDeployablePackage_*
31
32 deploy:
33 runs-on: windows-latest
34 needs: build
35 environment: UAT
36 name: Deploy to UAT Environment
37
38 steps:
39 - name: Download Artifact
40 uses: actions/download-artifact@v3
41 with:
42 name: CloudPackage
43 path: ./package
44
45 - name: Install Power Platform Tools
46 uses: microsoft/powerplatform-actions/actions-install@v1
47
48 - name: Authenticate to Power Platform
49 uses: microsoft/powerplatform-actions/who-am-i@v1
50 with:
51 environment-url: ${{ secrets.UAT_ENVIRONMENT_URL }}
52 tenant-id: ${{ secrets.AZURE_TENANT_ID }}
53 app-id: ${{ secrets.AZURE_CLIENT_ID }}
54 client-secret: ${{ secrets.AZURE_CLIENT_SECRET }}
55
56 - name: Deploy Package
57 uses: microsoft/powerplatform-actions/deploy-package@v1
58 with:
59 environment-url: ${{ secrets.UAT_ENVIRONMENT_URL }}
60 package-file: './package/TemplatePackage.dll'
Key features:
Separated jobs: Build runs first, then deployment (cleaner logs)
Environment protection: environment: UAT links to GitHub Environment with optional approvals
Microsoft official actions: Uses microsoft/powerplatform-actions for deployment
CD Deploy to Production (with Approval)
1 name: Deploy to Production
2
3 on:
4 workflow_dispatch:
5 schedule:
6 - cron: '0 2 * * 0' # Sunday 2 AM
7
8 jobs:
9 build:
10 runs-on: windows-latest
11 name: Build Release Package
12
13 steps:
14 - name: Checkout
15 uses: actions/checkout@v3
16 with:
17 ref: main
18
19 - name: Read settings
20 uses: fscpscollaborative/fscps.gh/ReadSettings@v1
21
22 - name: Build FSC Solution
23 uses: fscpscollaborative/fscps.gh/BuildFSC@v1
24 with:
25 settingsJson: ${{ env.Settings }}
26 buildVersion: '10.0.46'
27
28 - name: Upload Build Artifact
29 uses: actions/upload-artifact@v3
30 with:
31 name: ProductionPackage
32 path: output/
33
34 deploy-uat:
35 runs-on: windows-latest
36 needs: build
37 environment: UAT
38 name: Deploy to UAT First
39
40 steps:
41 - name: Download Artifact
42 uses: actions/download-artifact@v3
43 with:
44 name: ProductionPackage
45
46 - name: Install Power Platform Tools
47 uses: microsoft/powerplatform-actions/actions-install@v1
48
49 - name: Deploy to UAT
50 uses: microsoft/powerplatform-actions/deploy-package@v1
51 with:
52 environment-url: ${{ secrets.UAT_ENVIRONMENT_URL }}
53 tenant-id: ${{ secrets.AZURE_TENANT_ID }}
54 app-id: ${{ secrets.AZURE_CLIENT_ID }}
55 client-secret: ${{ secrets.AZURE_CLIENT_SECRET }}
56 package-file: './CloudDeployablePackage_*/TemplatePackage.dll'
57
58 deploy-production:
59 runs-on: windows-latest
60 needs: deploy-uat
61 environment: Production # This environment requires manual approval
62 name: Deploy to Production
63
64 steps:
65 - name: Download Artifact
66 uses: actions/download-artifact@v3
67 with:
68 name: ProductionPackage
69
70 - name: Install Power Platform Tools
71 uses: microsoft/powerplatform-actions/actions-install@v1
72
73 - name: Deploy to Production
74 uses: microsoft/powerplatform-actions/deploy-package@v1
75 with:
76 environment-url: ${{ secrets.PROD_ENVIRONMENT_URL }}
77 tenant-id: ${{ secrets.AZURE_TENANT_ID }}
78 app-id: ${{ secrets.AZURE_CLIENT_ID }}
79 client-secret: ${{ secrets.AZURE_CLIENT_SECRET }}
80 package-file: './CloudDeployablePackage_*/TemplatePackage.dll'
81
82 - name: Notify Teams Channel
83 if: always()
84 run: |
85 $status = "${{ job.status }}"
86 $webhookUrl = "${{ secrets.TEAMS_WEBHOOK_URL }}"
87 $body = @{
88 text = "Production deployment completed with status: $status"
89 } | ConvertTo-Json
90 Invoke-RestMethod -Uri $webhookUrl -Method Post -Body $body -ContentType 'application/json'
Deployment flow:
Build → Create deployable package
Deploy to UAT → Test in UAT environment
Wait for approval → GitHub pauses at environment: Production
Deploy to Production → After approval
Notification → Sends status to Teams channel
Approach 2: Hybrid Mode (GitHub Actions + Azure DevOps Artifacts)
Until Microsoft releases the semi-public NuGet feed via PAC CLI – same way I have talked just before also in the Azure DevOps section, you can use a hybrid approach: GitHub Actions for CI/CD while still leveraging Azure DevOps Artifacts for NuGet package hosting.
Why Hybrid?
Maintain existing Azure Artifacts feed: No need to migrate packages
Use GitHub for everything else: Source control, CI/CD, project management
Best of both worlds: Azure's enterprise artifact management + GitHub's developer experience including maybe GitHub Copilot with the X++ MCP to help you build code faster and quite reliable. (that we will see just after)
Setup Steps
Step 1: Configure Azure Artifacts Access from GitHub
You need to authenticate GitHub Actions to your Azure DevOps Artifacts feed.
Option A: Personal Access Token (PAT)
In Azure DevOps, create a PAT with Packaging (Read) scope
Add as GitHub Secret: AZURE_DEVOPS_PAT
Option B: Service Principal (Recommended for Production)
Use the same App Registration from earlier
In Azure DevOps: Project Settings > Service Connections > Grant access to Artifacts feed
Use AZURE_CLIENT_ID and AZURE_CLIENT_SECRET from GitHub Secrets
Step 2: Modify nuget.config for GitHub Actions
Your nuget.config needs to reference the Azure Artifacts feed:
1 <?xml version="1.0" encoding="utf-8"?>
2 <configuration>
3 <packageSources>
4 <clear />
5 <add key="Dynamics365FO"
6 value="https://pkgs.dev.azure.com/YourOrg/YourProject/_packaging/Dynamics365FO/nuget/v3/index.json"
7 protocolVersion="3" />
8 </packageSources>
9 <packageSourceCredentials>
10 <Dynamics365FO>
11 <add key="Username" value="az" />
12 <add key="ClearTextPassword" value="%AZURE_DEVOPS_PAT%" />
13 </Dynamics365FO>
14 </packageSourceCredentials>
15 </configuration>
Note: The %AZURE_DEVOPS_PAT% will be replaced at runtime by the GitHub Action.
Step 3: GitHub Actions Workflow with Azure Artifacts
1 name: Build with Azure Artifacts
2
3 on:
4 push:
5 branches: [ develop ]
6 pull_request:
7 branches: [ main, develop ]
8
9 jobs:
10 build:
11 runs-on: windows-latest
12 name: Build F&O Solution
13
14 steps:
15 - name: Checkout Code
16 uses: actions/checkout@v3
17
18 - name: Setup NuGet
19 uses: nuget/setup-nuget@v1
20 with:
21 nuget-version: '5.x'
22
23 - name: Configure NuGet Source with PAT
24 run: |
25 # Replace placeholder with actual PAT
26 $nugetConfig = Get-Content "Projects/AzureBuild/nuget.config" -Raw
27 $nugetConfig = $nugetConfig -replace '%AZURE_DEVOPS_PAT%', '${{ secrets.AZURE_DEVOPS_PAT }}'
28 Set-Content "Projects/AzureBuild/nuget.config" -Value $nugetConfig
29 shell: pwsh
30
31 - name: Restore NuGet Packages
32 run: |
33 nuget restore Projects/AzureBuild/packages.config `
34 -ConfigFile Projects/AzureBuild/nuget.config `
35 -PackagesDirectory ./NuGets `
36 -NonInteractive `
37 -Verbosity detailed
38 shell: pwsh
39
40 - name: Setup MSBuild
41 uses: microsoft/setup-msbuild@v1.1
42 with:
43 vs-version: '[17.0,18.0)'
44
45 - name: Build Solution
46 run: |
47 msbuild Projects/AzureBuild/AzureBuild.sln `
48 /p:Configuration=Release `
49 /p:Platform="Any CPU" `
50 /p:BuildTasksDirectory="./NuGets/Microsoft.Dynamics.AX.Platform.CompilerPackage/DevAlm" `
51 /p:MetadataDirectory="./Metadata" `
52 /p:FrameworkDirectory="./NuGets/Microsoft.Dynamics.AX.Platform.CompilerPackage" `
53 /p:ReferenceFolder="./NuGets/Microsoft.Dynamics.AX.Platform.DevALM.BuildXpp/ref/net40;./NuGets/Microsoft.Dynamics.AX.Application1.DevALM.BuildXpp/ref/net40;./NuGets/Microsoft.Dynamics.AX.Application2.DevALM.BuildXpp/ref/net40;./NuGets/Microsoft.Dynamics.AX.ApplicationSuite.DevALM.BuildXpp/ref/net40;./Metadata;./Binaries" `
54 /p:ReferencePath="./NuGets/Microsoft.Dynamics.AX.Platform.CompilerPackage" `
55 /p:OutputDirectory="./Binaries"
56 shell: pwsh
57
58 - name: Install Azure Artifacts Credential Provider
59 run: |
60 iex "& { $(irm https://aka.ms/install-artifacts-credprovider.ps1) } -AddNetfx"
61 shell: pwsh
62
63 - name: Create Deployable Package
64 run: |
65 # Use Microsoft's packaging tools from NuGet
66 $packagingToolsPath = "./NuGets/Microsoft.Dynamics.AX.Platform.CompilerPackage/DevAlm"
67
68 & "$packagingToolsPath/AXUpdateInstaller.exe" generate `
69 -packagename="ContosoPackage" `
70 -metadatadir="./Metadata" `
71 -bindir="./Binaries" `
72 -outputpath="./Output/CloudDeployablePackage"
73 shell: pwsh
74
75 - name: Publish Artifacts
76 uses: actions/upload-artifact@v3
77 with:
78 name: CloudPackage
79 path: ./Output/CloudDeployablePackage/
Key points:
PAT injection: Replaces placeholder in nuget.config with actual secret at runtime
NuGet restore: Pulls packages from Azure Artifacts using authentication
Standard MSBuild: Same build arguments as Azure DevOps pipelines
Artifact publishing: Uploads package for deployment stages
Step 4: Deployment Stage (Same as FSC-PS Approach)
The deployment steps remain identical to the FSC-PS examples above—you're still using Power Platform Actions to deploy the package to PPAC.
Branching Strategy & Pull Requests in GitHub
The branching strategy remains the same as Azure DevOps, but GitHub offers enhanced PR features:
Branch Protection Rules
Navigate to Settings > Branches > Add rule for main and develop:
Recommended Settings:
✅ Require a pull request before merging
Require approvals: 2 (for main), 1 (for develop)
Dismiss stale approvals when new commits are pushed
Require review from Code Owners (if using CODEOWNERS)
✅ Require status checks to pass before merging
Require branches to be up to date
Select: build (your CI workflow)
✅ Require conversation resolution before merging
✅ Require signed commits (optional, for high-security environments)
✅ Require linear history (prevents merge commits, enforces rebasing)
✅ Do not allow bypassing the above settings (even for admins)
✅ Restrict who can push to matching branches: Only service accounts
CODEOWNERS File
Create .github/CODEOWNERS to automatically assign reviewers20:
1 # Global owners (fallback)
2 * @YourOrg/tech-leads
3
4 # Metadata changes require model owners
5 /Metadata/ContosoWarehouse/ @YourOrg/warehouse-team
6 /Metadata/ContosoFinance/ @YourOrg/finance-team
7
8 # Pipeline changes require DevOps approval
9 /.github/workflows/ @YourOrg/devops-team
10
11 # ISV models require vendor approval
12 /Metadata/ISVModel/ @VendorOrg/vendor-team @YourOrg/tech-leads
Benefits:
Automatic reviewer assignment: GitHub suggests reviewers based on file paths
Enforcement: Can require CODEOWNERS approval in branch protection
Pull Request Template
Create .github/PULL_REQUEST_TEMPLATE.md21:
1 ## Description
2 <!-- Provide a brief description of the changes -->
3
4 ## Related Work Items
5 <!-- Link to Azure Boards, GitHub Issues, or Jira tickets -->
6 Closes #123
7 Fixes JIRA-456
8
9 ## Type of Change
10 - [ ] Bug fix (non-breaking change)
11 - [ ] New feature (non-breaking change)
12 - [ ] Breaking change (requires version bump)
13 - [ ] Documentation update
14
15 ## Testing
16 - [ ] Unit tests added/updated
17 - [ ] Tested in UDE environment
18 - [ ] Tested in UAT environment
19 - [ ] Performance impact assessed
20
21 ## Screenshots (if applicable)
22
23 ## Checklist
24 - [ ] Code follows project coding standards
25 - [ ] Self-reviewed code
26 - [ ] Commented complex logic
27 - [ ] Updated documentation
28 - [ ] No compiler warnings introduced
29 - [ ] Build pipeline passes
GitHub Advanced Features for F&O Teams
GitHub Discussions
Enable Discussions for knowledge sharing:
Categories: Q&A, General, Ideas, Show and tell
Use cases:
Technical questions about X++ patterns
Architecture decisions (keep history)
Feature proposals before creating issues
"How do I..." questions from team members
GitHub Projects (Kanban Boards)
Create Projects for work tracking:
Go to Projects > New project
Choose template: Team backlog or Kanban
Link Issues and PRs to cards
Automate card movement based on PR status
Integration with Azure Boards: You can still use Azure Boards and link GitHub PRs/commits to work items using the Azure Boards GitHub integration.
GitHub Copilot for YAML Authoring
GitHub Copilot can help you write GitHub Actions workflows:
Example prompt:
"Create a GitHub Actions workflow that builds a Dynamics 365 F&O solution, restores NuGet packages from Azure Artifacts using a PAT, compiles with MSBuild, creates a deployable package, and deploys to a Power Platform environment using service principal authentication."
Copilot will generate a complete workflow with all necessary steps.
Dependabot for Dependency Updates
Enable Dependabot to keep actions up to date:
Create .github/dependabot.yml:
1 version: 2
2 updates:
3 - package-ecosystem: "github-actions"
4 directory: "/"
5 schedule:
6 interval: "weekly"
7 commit-message:
8 prefix: "chore"
9 include: "scope"
Dependabot will automatically create PRs to update action versions (e.g., actions/checkout@v3 → actions/checkout@v4).
⚠️ Limitations & Workarounds
1. No Native Artifact Feed (Yet)
Problem: GitHub Packages doesn't fully support the large F&O NuGet packages (200+ MB each).
Solutions:
Option A: Use FSC-PS (handles packages internally)
Option B: Hybrid approach with Azure Artifacts
Option C: Self-host NuGet feed (e.g., JFrog Artifactory, Sonatype Nexus)
Future: Microsoft is working on PAC CLI-based NuGet restoration that will make this seamless.
2. Longer Build Times on GitHub Runners
Problem: GitHub-hosted runners can be slower than Azure DevOps-hosted agents for F&O builds.
Solution: Use self-hosted runners27:
Set up a dedicated Windows VM (or use existing build server)
Install GitHub Runner software
Configure workflows to use: runs-on: [self-hosted, windows]
Benefit: Faster builds (10-30% improvement), cached NuGet packages, more control
3. Limited Windows Runner Minutes
Problem: Free tier provides 2,000 minutes/month—F&O builds consume 20-30 minutes each.
Calculation:
2,000 minutes ÷ 25 minutes/build = ~80 builds/month
For active teams, this may not be enough
Solutions:
Use self-hosted runners (unlimited, free)28
Purchase additional minutes ($0.008/minute for Windows runners)
Optimize builds (build only changed models)
4. No Built-In Test Plans
Problem: GitHub doesn't have native test case management like Azure DevOps Test Plans.
Solution:
Use third-party integrations (e.g., Xray, TestRail)
Document test cases in GitHub Wiki
Use Issues with labels for test tracking
Keep Azure DevOps for Test Plans and use GitHub for code only
Migration Path: Azure DevOps → GitHub
If you're currently using Azure DevOps and want to migrate to GitHub:
Phase 1: Dual Operation (Recommended)
Mirror repositories: Use GitHub sync to mirror Azure Repos to GitHub
Run parallel pipelines: Keep Azure DevOps pipelines running while testing GitHub Actions
Gradually shift PRs: Start using GitHub for code reviews
Keep Artifacts in Azure: Use hybrid approach for NuGet
Phase 2: Full Migration
Migrate work items: Use GitHub's Azure Boards integration or export/import
Update developer workflows: Switch to GitHub for daily work
Decommission Azure Pipelines: Once GitHub Actions are stable
Migrate or keep Artifacts: Decide based on Microsoft's PAC CLI roadmap
Sample Complete Repository Structure
Here's what a complete GitHub-based F&O project looks like:
1 ContosoD365FO/
2 ├── .github/
3 │ ├── workflows/
4 │ │ ├── ci-build-validation.yml
5 │ │ ├── ci-deploy-uat.yml
6 │ │ ├── cd-deploy-prod.yml
7 │ │ ├── environment-copy.yml
8 │ │ └── scheduled-nightly-build.yml
9 │ ├── CODEOWNERS
10 │ ├── PULL_REQUEST_TEMPLATE.md
11 │ ├── ISSUE_TEMPLATE/
12 │ │ ├── bug_report.md
13 │ │ ├── feature_request.md
14 │ │ └── change_request.md
15 │ └── dependabot.yml
16 ├── Metadata/
17 │ ├── ContosoWarehouse/
18 │ ├── ContosoFinance/
19 │ └── ContosoSCM/
20 ├── Projects/
21 │ ├── AzureBuild/
22 │ │ ├── ContosoWarehouse.rnrproj
23 │ │ ├── ContosoFinance.rnrproj
24 │ │ ├── ContosoSCM.rnrproj
25 │ │ ├── AzureBuild.sln
26 │ │ ├── nuget.config
27 │ │ └── packages.config
28 ├── Scripts/
29 │ ├── Build/
30 │ │ └── Update-ModelVersion.ps1
31 │ ├── Deploy/
32 │ │ └── Post-Deployment-Checks.ps1
33 │ └── Utilities/
34 │ └── Environment-Copy.ps1
35 ├── Docs/
36 │ ├── ARCHITECTURE.md
37 │ ├── DEVELOPMENT_GUIDE.md
38 │ └── DEPLOYMENT_GUIDE.md
39 ├── .gitignore
40 ├── README.md
41 ├── LICENSE
42 └── CODE_OF_CONDUCT.md
Conclusion: Azure DevOps vs GitHub
When to choose Azure DevOps:
You need enterprise Test Plans
Your organization is heavily invested in Microsoft ecosystem
You require granular RBAC for large teams
You're already using Azure DevOps Artifacts successfully
When to choose GitHub:
Developer experience is a priority
You want best-in-class code review and collaboration
You're working with external contributors or open-source projects
You want to leverage the massive GitHub Actions marketplace
Your team is already comfortable with GitHub
When to choose Hybrid:
You're in transition from Azure DevOps
You want GitHub UX but need Azure Artifacts (until Microsoft releases PAC CLI NuGet support)
You want to evaluate GitHub Actions without disrupting production pipelines
You need Azure DevOps Test Plans but prefer GitHub for code
The future is clear: Microsoft is investing heavily in both platforms, but the direction points toward unified, API-first tooling, and mainly GitHub Copilot in general but the principles remain the same:
✅ Everything in Git
✅ Automate everything
✅ Secure by default
✅ Review before merge
✅ Deploy with confidence
Happy automating! 🚀
And just as a reminder, GitHub isn’t just for developers, it also empowers non-technical roles like project managers and business analysts to collaborate securely and effectively. With private repositories, SSO integration, 2FA, and branch protection rules, GitHub Enterprise ensures enterprise-grade security. GitHub Issues and Projects offer intuitive tools for tracking work, managing sprints, and visualizing progress through Kanban boards, tables, and roadmaps. Custom fields and labels help tailor workflows to Dynamics 365 F&O needs, while automation keeps everything in sync. This unified platform bridges the gap between code and collaboration—keeping everyone aligned from planning to production.
Additional Resources
FSC-PS GitHub Repository: https://github.com/ciellosinc/FSC-PS
FSC-PS Template (F&O): https://github.com/fscpscollaborative/fscps.fsctpl
Microsoft Power Platform Actions: https://github.com/microsoft/powerplatform-actions
GitHub Actions Documentation: https://docs.github.com/actions
Azure Artifacts with GitHub: https://learn.microsoft.com/azure/devops/artifacts/get-started-github
Comprehensive Automation with MCP and GitHub Copilot Agent: The Future of X++ Development
AI-Powered Code Generation: GitHub Copilot + X++ MCP Server = Issue-to-Pull Request Automation
One of the most exciting advantages of GitHub over Azure DevOps for Dynamics 365 F&O development is the native integration of GitHub Copilot coding agent with the Model Context Protocol (MCP). This combination enables a revolutionary workflow where GitHub Issues automatically trigger code generation, with Copilot creating fully compilable X++ code and submitting pull requests for review—all without manual coding.
What is Model Context Protocol (MCP)?
Model Context Protocol is an open standard that allows AI assistants like GitHub Copilot to connect to external data sources and tools. For Dynamics 365 F&O, the d365fo-mcp-server (https://github.com/dynamics365ninja/d365fo-mcp-server) provides Copilot with deep knowledge of your X++ codebase:
Why this matters: Without MCP, GitHub Copilot guesses X++ method signatures and produces code with compile errors. With MCP integration, Copilot knows your exact codebase structure, existing Chain of Command (CoC) extensions, ISV customizations, and security hierarchies.
Just for information, I am just using this one but I know other projects in the community have been done. You can for sure use an another one if you prefer, my article will be still the same ; it’s kinda of same thing about which LLM to choose if I summarize quickly ! And also clearly I hope Microsoft will bring back his own one by default and standard ! (Like it was supposed to be done in preview in Septembre 2025)
The Automated Workflow: Issue → Agent → Code → Pull Request
Here's how the end-to-end automation works in GitHub (this workflow is not possible in Azure DevOps due to lack of native coding agent integration):
Setting Up the MCP Server for X++
Prerequisites
Node.js 18+ installed
Visual Studio 2022 with D365 F&O extension
UDE (Unified Developer Environment) or access to D365 F&O packages
GitHub Copilot subscription (Pro, Pro+, Business, or Enterprise)
Installation Steps
1. Clone and Install the MCP Server
1 git clone https://github.com/dynamics365ninja/d365fo-mcp-server.git
2 cd d365fo-mcp-server
3 npm install
2. Configure Environment Variables
Copy .env.example to .env and configure:
1 # Path to your D365 F&O packages directory
2 PACKAGES_PATH=C:\AOSService\PackagesLocalDirectory
3
4 # Your custom models (comma-separated)
5 CUSTOM_MODELS=ContosoWarehouse,ContosoFinance,ContosoSCM
6
7 # MCP Server Port
8 PORT=3000
9
10 # Enable detailed logging
11 LOG_LEVEL=info
Tip: If you're using UDE/Power Platform Tools (and since here in this article we are highly using that), run npm run select-config to auto-detect your packages path6.
3. Extract Metadata and Build Index
1 # Extract XML metadata from all D365 packages (~10-60 minutes depending on model count)
2 npm run extract-metadata
3
4 # Build SQLite search index with FTS5 (~5-20 minutes)
5 npm run build-database
6
7 # Start the MCP server
8 npm run dev
The server will be available at http://localhost:3000/mcp/
4. Connect Visual Studio to the MCP Server
Enable MCP integration in Visual Studio 2022:
Go to Tools → Options → GitHub → Copilot
Check "Enable MCP server integration in agent mode"
Create a .mcp.json file in the root of your Visual Studio solution (next to your .sln file):
1 {
2 "servers": {
3 "d365fo-code-intelligence": {
4 "url": "http://localhost:3000/mcp/",
5 "description": "D365 F&O X++ code intelligence with 584K+ indexed symbols"
6 }
7 }
8 }
5. Enable Copilot Agent Features in GitHub
Navigate to github.com/settings/copilot/features
Enable "Editor Preview Features"
Enable "GitHub Copilot coding agent"
Real-World Use Case: Automating CoC Extension Development
Let's walk through a complete example of creating a Chain of Command extension using the GitHub Issue → Copilot Agent workflow.
Scenario
Your team needs to add custom validation logic to prevent duplicate vendor accounts before insertion into VendTable.
Step 1: Create the GitHub Issue
Navigate to your repository and create a new issue:
Title: Add duplicate vendor validation to VendTable.insert()
Description:
1 ## Requirement
2 Prevent duplicate vendor accounts from being created based on:
3 - Federal Tax ID (if provided)
4 - Email address (if provided)
5
6 ## Technical Requirements
7 - Use Chain of Command pattern on `VendTable.insert()`
8 - Display error message using `Error()`
9 - Use label from our ContosoCore label file
10 - Follow our CoC naming convention: `VendTable_ContosoExt`
11
12 ## Acceptance Criteria
13 - [ ] CoC extension compiles without errors
14 - [ ] Duplicate check executes before record insertion
15 - [ ] User-friendly error message displayed
16 - [ ] Unit test included (use SysTestFramework)
Step 2: Assign to GitHub Copilot
In the issue sidebar, click Assignees
Select @copilot from the list11
In the Optional prompt field, add:
Use the MCP server to find existing VendTable CoC extensions. Follow the project's CoC naming pattern (TableName_ContosoExt). Query the label system to find or suggest a label ID for the error message. Include proper error handling and logging using SysLog. Create a unit test class using SysTestFramework.
Select your repository and target branch (e.g., develop)
Click Assign to Copilot
Step 3: Copilot Works Its Magic
Behind the scenes, Copilot:
Queries the MCP server using find_coc_extensions to check if other CoC extensions already exist for VendTable.insert()
Retrieves exact method signature using search_methods to ensure the CoC uses correct parameters
Searches for similar patterns using search_by_pattern to understand your team's validation logic style
Queries label system to find an appropriate error message label or suggests creating a new one
Generates the X++ code:
1 // File: ContosoCore/Classes/VendTable_ContosoExt.xpp
2 [ExtensionOf(tableStr(VendTable))]
3 final class VendTable_ContosoExt
4 {
5 public void insert()
6 {
7 // Validate duplicate vendor before insertion
8 if (this.validateDuplicateVendor())
9 {
10 next insert();
11 }
12 else
13 {
14 error("@ContosoCore:DuplicateVendorError");
15 // Log the duplicate attempt
16 SysLog::createLog(
17 SysLogType::Warn,
18 strFmt("Duplicate vendor creation attempt: %1", this.AccountNum)
19 );
20 }
21 }
22
23 private boolean validateDuplicateVendor()
24 {
25 VendTable existingVendor;
26
27 // Check for duplicate Federal Tax ID
28 if (this.FederalTaxID != '')
29 {
30 select firstOnly RecId from existingVendor
31 where existingVendor.FederalTaxID == this.FederalTaxID
32 && existingVendor.RecId != this.RecId;
33
34 if (existingVendor.RecId != 0)
35 {
36 return false;
37 }
38 }
39
40 // Check for duplicate email address
41 if (this.PrimaryContactEmail != '')
42 {
43 select firstOnly RecId from existingVendor
44 where existingVendor.PrimaryContactEmail == this.PrimaryContactEmail
45 && existingVendor.RecId != 0;
46
47 if (existingVendor.RecId != 0)
48 {
49 return false;
50 }
51 }
52
53 return true;
54 }
55 }
Generates a unit test:
1 // File: ContosoCore/Classes/VendTable_ContosoExtTest.xpp
2 [TestFixture]
3 class VendTable_ContosoExtTest extends SysTestCase
4 {
5 [Test]
6 public void testDuplicateVendorPrevention()
7 {
8 VendTable vendTable1, vendTable2;
9 boolean exceptionThrown = false;
10
11 ttsbegin;
12
13 // Create first vendor
14 vendTable1.AccountNum = 'TEST001';
15 vendTable1.FederalTaxID = '12-3456789';
16 vendTable1.insert();
17
18 // Attempt to create duplicate
19 vendTable2.AccountNum = 'TEST002';
20 vendTable2.FederalTaxID = '12-3456789'; // Same tax ID
21
22 try
23 {
24 vendTable2.insert();
25 }
26 catch
27 {
28 exceptionThrown = true;
29 }
30
31 ttsabort;
32
33 this.assertTrue(exceptionThrown, 'Expected duplicate vendor to be prevented');
34 }
35 }
Creates a new branch: copilot/issue-42-vendor-validation
Commits the code with a meaningful message
Opens a Pull Request automatically linked to issue #4215
Step 4: GitHub Actions Build Validation
Your pr-validation-pipeline.yml automatically triggers:
1 name: PR Build Validation
2
3 on:
4 pull_request:
5 branches: [develop, main]
6
7 jobs:
8 build:
9 runs-on: windows-latest
10 steps:
11 - uses: actions/checkout@v3
12
13 - name: Restore NuGet Packages
14 run: nuget restore Projects/AzureBuild/packages.config
15
16 - name: Build Solution
17 run: msbuild Projects/AzureBuild/AzureBuild.sln /p:Configuration=Release
18
19 - name: Run Unit Tests
20 run: |
21 # Execute SysTest framework tests
22 ./Scripts/RunXppTests.ps1 -TestClass "VendTable_ContosoExtTest"
Within minutes, you see:
✅ Build successful
✅ All tests passed
✅ No compiler warnings
Step 5: Human Review and Approval
Your tech lead reviews the PR:
Code follows team conventions
CoC naming pattern correct
Error handling implemented
Unit test coverage complete
Label properly referenced
Tech lead approves and merges the PR. The code is now in develop and will be included in the next UAT deployment.
Why This Workflow Is a Game-Changer for F&O Teams ?
Advanced Scenarios: Beyond Simple CoC Extensions
The MCP + Copilot Agent workflow isn't limited to simple extensions. Here are advanced use cases:
1. Automated Form Generation
Issue: "Create a new form for managing ContosoWarehouse configurations with grid, filter panel, and action buttons"
Copilot generates:
Form metadata XML with proper structure
Data source queries
Button event handlers
Label references from your label files18
2. Data Migration Scripts
Issue: "Create a data migration runnable class to import legacy customer data from CSV into CustTable"
Copilot generates:
Runnable class with proper structure
CSV parsing logic
Transaction handling
Error logging and reporting
3. Security Object Creation
Issue: "Create security menu items, privileges, and duties for the new ContosoWarehouse module"
Copilot uses get_security_coverage_for_object to understand existing security patterns and generates compliant security artifacts19.
4. ISV Extension Discovery
Issue: "List all ISV CoC extensions that modify SalesLine.insert() so we can assess upgrade impact"
Copilot queries the MCP server's indexed ISV models and provides a comprehensive report of all extensions20.
Best Practices for Using Copilot Agent with D365 F&O
✅ Write detailed GitHub Issues: The more context you provide, the better the code generation. Include requirements, constraints, and acceptance criteria.
✅ Use custom instructions: Create a .github/copilot-instructions.md file in your repository with F&O-specific coding standards21.
✅ Keep MCP index updated: Re-run npm run extract-metadata and npm run build-database after importing new ISV modules or major updates.
✅ Review generated code carefully: Copilot is powerful but not perfect. Always validate business logic, error handling, and security implications.
✅ Start with simple issues: Begin with straightforward tasks (simple CoC extensions, data entity additions) before tackling complex form generation.
✅ Leverage Copilot for documentation: Ask Copilot to generate README files, inline code comments, and wiki documentation based on your codebase.
But…. while the GitHub Copilot agent can be assigned to an issue from anywhere, the MCP server needs to be reachable by the agent to provide the X++ code intelligence. Hosting it on localhost only works for local development, but for real automation, it needs to be accessible over the internet.
The good news is: yes, the GitHub repo we referenced before until Microsoft finally create one by default… (dynamics365ninja/d365fo-mcp-server) does support deployment to Azure App Service. You can host the MCP server as a public or private web service, and then configure your GitHub repo (via the .mcp.json file) to point to that hosted endpoint instead of localhost.
Here’s a quick summary of how that works:
You deploy the MCP server to Azure App Service (or any cloud host that supports Node.js).
You configure environment variables like PACKAGES_PATH, CUSTOM_MODELS, and optionally AUTH_TOKEN for secure access.
You expose the MCP endpoint (e.g. https://your-mcp-service.azurewebsites.net/mcp/).
In your GitHub repo, you update the .mcp.json to point to this public URL.
Now, when the Copilot agent is triggered (e.g. by assigning an issue), it can reach the MCP server and use your indexed X++ metadata to generate accurate code
Now let me create a comprehensive section on hosting the MCP server on Azure App Service with all the necessary details:
☁️ Deploying the X++ MCP Server to Azure App Service: Enterprise-Grade Hosting
While hosting the MCP server on localhost:3000 works perfectly for individual developers testing locally, real automation requires a hosted, always-available MCP endpoint that GitHub Copilot agents can access from anywhere. When a GitHub Issue is created and assigned to @copilot, the agent runs in GitHub's cloud infrastructure—it can't reach your laptop's localhost.
The solution: Deploy the d365fo-mcp-server to Azure App Service, making it accessible to your entire team and to GitHub Copilot agents via a public HTTPS URL like https://contoso-d365-mcp.azurewebsites.net/mcp/.
Step 1: Prepare Your MCP Server for Azure Deployment
The d365fo-mcp-server repository includes infrastructure templates for Azure deployment. Before deploying, you need to prepare the database artifacts.
1.1: Extract Metadata and Build Database Locally
On a machine with access to your D365 F&O packages:
1 # Clone the repository
2 git clone https://github.com/dynamics365ninja/d365fo-mcp-server.git
3 cd d365fo-mcp-server
4
5 # Install dependencies
6 npm install
7
8 # Copy and configure environment
9 copy .env.example .env
10
11 # Edit .env with your paths
12 notepad .env
Configure .env:
1 # Path to D365 F&O packages (e.g., from UDE or build VM)
2 PACKAGES_PATH=K:\AosService\PackagesLocalDirectory
3
4 # Your custom models (comma-separated)
5 CUSTOM_MODELS=ContosoWarehouse,ContosoFinance,ContosoSCM
6
7 # Include ISV models for full coverage
8 INCLUDE_ISV_MODELS=true
9
10 # MCP Server Port (local only, Azure will use 443)
11 PORT=3000
12
13 # Logging level
14 LOG_LEVEL=info
Alternative: Auto-detect UDE configuration:
1 npm run select-config
This script automatically detects your Power Platform Tools/UDE installation and configures paths4.
1.2: Extract and Build
This is the most time-consuming step (10-90 minutes depending on model count):
1 # Extract XML metadata from all packages
2 npm run extract-metadata
3
4 # Expected output:
5 # ✓ Extracted metadata from 584,799 symbols
6 # ✓ Database size: ~1.2 GB
7 # ✓ Labels extracted: 19M+ across 70 languages (~8 GB)
8 # ✓ Duration: 45 minutes
9
10 # Build SQLite FTS5 index
11 npm run build-database
12
13 # Expected output:
14 # ✓ Created SQLite database: ./database/d365fo-symbols.db
15 # ✓ Indexed 584,799 symbols with FTS5
16 # ✓ Index size: ~1.5 GB
17 # ✓ Duration: 12 minutes
Output artifacts:
1 ./database/
2 ├── d365fo-symbols.db (~1.5 GB - main symbols database)
3 ├── d365fo-labels.db (~8 GB - multilingual labels)
4 └── metadata-cache.json (~50 MB - quick lookup cache)
Step 2: Upload Database to Azure Blob Storage
Azure App Service instances are ephemeral—they can restart at any time, losing local files. To persist the MCP database, store it in Azure Blob Storage and download it on app startup.
2.1: Create Azure Storage Account
1 # Login to Azure
2 az login
3
4 # Create resource group
5 az group create --name rg-contoso-d365-mcp --location eastus
6
7 # Create storage account
8 az storage account create \
9 --name sacontosod365mcp \
10 --resource-group rg-contoso-d365-mcp \
11 --location eastus \
12 --sku Standard_LRS \
13 --kind StorageV2
14
15 # Create blob container
16 az storage container create \
17 --name mcp-database \
18 --account-name sacontosod365mcp \
19 --public-access off
2.2: Upload Database Files
1 # Get storage account key
2 $storageKey = az storage account keys list \
3 --account-name sacontosod365mcp \
4 --resource-group rg-contoso-d365-mcp \
5 --query "[0].value" -o tsv
6
7 # Upload database files
8 az storage blob upload \
9 --account-name sacontosod365mcp \
10 --container-name mcp-database \
11 --name d365fo-symbols.db \
12 --file ./database/d365fo-symbols.db \
13 --account-key $storageKey
14
15 az storage blob upload \
16 --account-name sacontosod365mcp \
17 --container-name mcp-database \
18 --name d365fo-labels.db \
19 --file ./database/d365fo-labels.db \
20 --account-key $storageKey
21
22 az storage blob upload \
23 --account-name sacontosod365mcp \
24 --container-name mcp-database \
25 --name metadata-cache.json \
26 --file ./database/metadata-cache.json \
27 --account-key $storageKey
Expected upload time: 10-30 minutes (depends on bandwidth)
2.3: Generate SAS Token (Optional but Recommended)
Instead of exposing storage account keys, use a SAS token with limited permissions:
1 # Generate SAS token valid for 1 year with read-only access
2 $sasToken = az storage container generate-sas \
3 --account-name sacontosod365mcp \
4 --name mcp-database \
5 --permissions r \
6 --expiry (Get-Date).AddYears(1).ToString("yyyy-MM-ddTHH:mmZ") \
7 --account-key $storageKey \
8 -o tsv
9
10 # Save this token—you'll need it for App Service configuration
11 echo "SAS_TOKEN=$sasToken"
Step 3: Create Azure App Service
3.1: Create App Service Plan
Based on the repository's cost analysis, a Basic B3 tier provides sufficient resources:
1 # Create App Service Plan
2 az appservice plan create \
3 --name plan-contoso-d365-mcp \
4 --resource-group rg-contoso-d365-mcp \
5 --location eastus \
6 --sku B3 \
7 --is-linux
8
9 # B3 tier specs:
10 # - 4 vCPU
11 # - 7 GB RAM
12 # - ~$52/month
Why B3?
The MCP server loads the entire SQLite database into memory for fast queries (<50ms response time)5
7 GB RAM accommodates the 1.5 GB symbols DB + 8 GB labels DB + Node.js overhead
4 vCPUs handle concurrent Copilot agent requests from multiple developers
Cost-saving alternative: Start with B2 (2 vCPU, 3.5 GB RAM, ~$35/month) if you only index symbols and skip labels.
3.2: Create Web App
1 # Create Node.js web app
2 az webapp create \
3 --name contoso-d365-mcp \
4 --resource-group rg-contoso-d365-mcp \
5 --plan plan-contoso-d365-mcp \
6 --runtime "NODE:22-lts"
7
8 # Enable HTTPS only
9 az webapp update \
10 --name contoso-d365-mcp \
11 --resource-group rg-contoso-d365-mcp \
12 --https-only true
Your MCP server will be available at: https://contoso-d365-mcp.azurewebsites.net
Step 4: Configure Environment Variables
The MCP server needs to know where to download the database on startup.
1 # Configure app settings
2 az webapp config appsettings set \
3 --name contoso-d365-mcp \
4 --resource-group rg-contoso-d365-mcp \
5 --settings \
6 NODE_ENV=production \
7 PORT=8080 \
8 LOG_LEVEL=info \
9 AZURE_STORAGE_ACCOUNT=sacontosod365mcp \
10 AZURE_STORAGE_CONTAINER=mcp-database \
11 AZURE_STORAGE_SAS_TOKEN="$sasToken" \
12 ENABLE_DATABASE_DOWNLOAD=true \
13 CUSTOM_MODELS="ContosoWarehouse,ContosoFinance,ContosoSCM"
Step 5: Modify Server Startup Script
Update the MCP server to download the database from Blob Storage on startup.
Create startup.sh in your repository root:
1 #!/bin/bash
2 set -e
3
4 echo "Starting d365fo-mcp-server Azure deployment..."
5
6 # Check if database exists locally
7 if [ ! -f "./database/d365fo-symbols.db" ]; then
8 echo "Database not found locally. Downloading from Azure Blob Storage..."
9
10 mkdir -p ./database
11
12 # Download using Azure Storage SDK or curl with SAS token
13 STORAGE_URL="https://${AZURE_STORAGE_ACCOUNT}.blob.core.windows.net/${AZURE_STORAGE_CONTAINER}"
14
15 echo "Downloading d365fo-symbols.db..."
16 curl -o ./database/d365fo-symbols.db \
17 "${STORAGE_URL}/d365fo-symbols.db?${AZURE_STORAGE_SAS_TOKEN}"
18
19 echo "Downloading d365fo-labels.db..."
20 curl -o ./database/d365fo-labels.db \
21 "${STORAGE_URL}/d365fo-labels.db?${AZURE_STORAGE_SAS_TOKEN}"
22
23 echo "Downloading metadata-cache.json..."
24 curl -o ./database/metadata-cache.json \
25 "${STORAGE_URL}/metadata-cache.json?${AZURE_STORAGE_SAS_TOKEN}"
26
27 echo "Database download complete."
28 else
29 echo "Database found locally. Skipping download."
30 fi
31
32 # Start the MCP server
33 echo "Starting MCP server on port ${PORT}..."
34 npm start
Update package.json to reference the startup script:
1 {
2 "scripts": {
3 "start": "node src/server.js",
4 "start:azure": "bash startup.sh",
5 "dev": "nodemon src/server.js"
6 }
7 }
Configure App Service to use the startup script:
1 az webapp config set \
2 --name contoso-d365-mcp \
3 --resource-group rg-contoso-d365-mcp \
4 --startup-file "npm run start:azure"
Step 6: Deploy to Azure App Service
Option A: Deploy from Local (Quick Start)
1 # Build the project
2 npm run build
3
4 # Deploy using Azure CLI
5 az webapp up \
6 --name contoso-d365-mcp \
7 --resource-group rg-contoso-d365-mcp \
8 --runtime "NODE:22-lts"
9
10 # Or use zip deployment
11 zip -r deploy.zip . -x "*.git*" -x "node_modules/*" -x "database/*"
12
13 az webapp deployment source config-zip \
14 --name contoso-d365-mcp \
15 --resource-group rg-contoso-d365-mcp \
16 --src deploy.zip
Option B: Deploy from GitHub Actions (Recommended for CI/CD)
Create .github/workflows/deploy-mcp-server.yml:
1 name: Deploy MCP Server to Azure
2
3 on:
4 push:
5 branches: [ main ]
6 paths:
7 - 'src/**'
8 - 'package*.json'
9 - '.github/workflows/deploy-mcp-server.yml'
10 workflow_dispatch:
11
12 jobs:
13 deploy:
14 runs-on: ubuntu-latest
15
16 steps:
17 - name: Checkout Code
18 uses: actions/checkout@v3
19
20 - name: Setup Node.js
21 uses: actions/setup-node@v3
22 with:
23 node-version: '22'
24 cache: 'npm'
25
26 - name: Install Dependencies
27 run: npm ci
28
29 - name: Build Application
30 run: npm run build --if-present
31
32 - name: Login to Azure
33 uses: azure/login@v1
34 with:
35 creds: ${{ secrets.AZURE_CREDENTIALS }}
36
37 - name: Deploy to Azure App Service
38 uses: azure/webapps-deploy@v2
39 with:
40 app-name: contoso-d365-mcp
41 package: .
Create Azure Service Principal for GitHub Actions:
1 az ad sp create-for-rbac \
2 --name "github-d365-mcp-deploy" \
3 --role contributor \
4 --scopes /subscriptions/{subscription-id}/resourceGroups/rg-contoso-d365-mcp \
5 --sdk-auth
6
7 # Save the JSON output as GitHub Secret: AZURE_CREDENTIALS
Step 7: Secure the MCP Endpoint
Never expose your MCP server publicly without authentication—it contains your entire D365 codebase structure
Option A: API Key Authentication (Simple)
Add a simple bearer token check to your MCP server.
Update src/server.js to require an API key:
1 const express = require('express');
2 const app = express();
3
4 // Middleware: Require API Key
5 app.use('/mcp', (req, res, next) => {
6 const authHeader = req.headers['authorization'];
7 const apiKey = process.env.MCP_API_KEY;
8
9 if (!apiKey) {
10 console.warn('MCP_API_KEY not configured—authentication disabled!');
11 return next();
12 }
13
14 if (!authHeader || authHeader !== `Bearer ${apiKey}`) {
15 return res.status(401).json({
16 error: 'Unauthorized',
17 message: 'Valid API key required'
18 });
19 }
20
21 next();
22 });
23
24 // ... rest of your MCP server code
Configure the API key in Azure:
1 # Generate a strong API key
2 $apiKey = -join ((65..90) + (97..122) + (48..57) | Get-Random -Count 64 | % {[char]$_})
3
4 # Set as App Service environment variable
5 az webapp config appsettings set \
6 --name contoso-d365-mcp \
7 --resource-group rg-contoso-d365-mcp \
8 --settings MCP_API_KEY="$apiKey"
9
10 # Save this key securely—you'll need it for client configuration
Update .mcp.json in your GitHub repository to include authentication:
1 {
2 "servers": {
3 "d365fo-code-intelligence": {
4 "url": "https://contoso-d365-mcp.azurewebsites.net/mcp/",
5 "headers": {
6 "Authorization": "Bearer YOUR_API_KEY_HERE"
7 },
8 "description": "Hosted D365 F&O MCP Server with 584K+ symbols"
9 }
10 }
11 }
Important: Store the API key as a GitHub Secret and inject it during CI/CD8:
1 - name: Create .mcp.json
2 run: |
3 cat > .mcp.json << EOF
4 {
5 "servers": {
6 "d365fo-code-intelligence": {
7 "url": "https://contoso-d365-mcp.azurewebsites.net/mcp/",
8 "headers": {
9 "Authorization": "Bearer ${{ secrets.MCP_API_KEY }}"
10 }
11 }
12 }
13 }
14 EOF
Option B: Azure AD / Entra ID Authentication (Enterprise-Grade)
For enterprise environments, use Microsoft Entra ID for authentication.
Enable App Service Authentication:
1 az webapp auth update \
2 --name contoso-d365-mcp \
3 --resource-group rg-contoso-d365-mcp \
4 --enabled true \
5 --action LoginWithAzureActiveDirectory \
6 --aad-token-issuer-url "https://sts.windows.net/{tenant-id}/" \
7 --aad-client-id "{app-registration-client-id}"
Benefits:
SSO Integration: Developers authenticate with their corporate Azure AD credentials
Conditional Access: Enforce MFA, IP restrictions, device compliance
Audit Logging: Track who accessed the MCP server and when
No API Key Management: Azure AD handles token lifecycle11
Limitation: GitHub Copilot agent (as of 2026-03) doesn't yet support full OAuth flows for MCP servers. Use API key authentication until GitHub adds OAuth support.
Step 8: Update GitHub Repository Configuration
Now that your MCP server is hosted, update all references from localhost:3000 to the Azure URL.
Repository-Level .mcp.json
Create .mcp.json in the root of your GitHub repository (commit this file):
1 {
2 "servers": {
3 "d365fo-code-intelligence": {
4 "url": "https://contoso-d365-mcp.azurewebsites.net/mcp/",
5 "headers": {
6 "Authorization": "Bearer ${MCP_API_KEY}"
7 },
8 "description": "Hosted D365 F&O X++ Code Intelligence",
9 "timeout": 30000
10 }
11 }
12 }
Important: Use a placeholder ${MCP_API_KEY} instead of hardcoding the key. GitHub Copilot will read this from environment context.
GitHub Copilot Instructions
Create .github/copilot-instructions.md to guide Copilot's code generation:
1 # D365 F&O Coding Standards for GitHub Copilot
2
3 ## General Guidelines
4 - Always use Chain of Command (CoC) pattern for standard table/class extensions
5 - Never modify standard objects directly
6 - Follow naming convention: `{ObjectName}_{ProjectPrefix}Ext` (e.g., `VendTable_ContosoExt`)
7
8 ## CoC Best Practices
9 - Use `[ExtensionOf(tableStr(TableName))]` or `[ExtensionOf(classStr(ClassName))]`
10 - Call `next methodName();` to invoke base implementation
11 - Add proper error handling with `try-catch` blocks
12 - Log errors using `SysLog::createLog()` or `Info()` for user-facing messages
13
14 ## Label Management
15 - Query the MCP server using `search_labels` before creating new labels
16 - Reuse existing labels when possible
17 - Create labels in the format: `@{ModelName}:{LabelId}`
18 - Always provide English (EN-US) translation at minimum
19
20 ## Security
21 - Use `authorize` attribute on new forms and controllers
22 - Always create privilege, duty, and role assignments for new objects
23 - Query `get_security_coverage_for_object` to understand existing security patterns
24
25 ## Testing
26 - Create SysTestCase-based unit tests for all business logic
27 - Use `ttsbegin` and `ttsabort` in test methods to avoid data pollution
28 - Name test classes: `{ClassUnderTest}Test`
29
30 ## MCP Tools Usage
31 When the user assigns an issue to you:
32 1. Use `find_coc_extensions` to check for existing CoC extensions
33 2. Use `search_methods` to get exact method signatures
34 3. Use `search_labels` to find reusable labels
35 4. Use `get_security_coverage_for_object` for security context
36 5. Always validate generated code compiles before submitting PR
Step 9: Test the Hosted MCP Server
Verify Deployment
1 # Check if server is running
2 curl https://contoso-d365-mcp.azurewebsites.net/health
3
4 # Expected response:
5 # {"status": "healthy", "database": "loaded", "symbols": 584799}
6
7 # Test MCP endpoint (with API key)
8 curl -H "Authorization: Bearer YOUR_API_KEY" \
9 https://contoso-d365-mcp.azurewebsites.net/mcp/tools/list
10
11 # Expected response: JSON array of 41 available tools
Test from Visual Studio (Local Development)
Update your local .mcp.json in your Visual Studio solution:
1 {
2 "servers": {
3 "d365fo-code-intelligence": {
4 "url": "https://contoso-d365-mcp.azurewebsites.net/mcp/",
5 "headers": {
6 "Authorization": "Bearer YOUR_API_KEY_HERE"
7 }
8 }
9 }
10 }
In Visual Studio, open Copilot chat and ask:
"Show me all methods of SalesTable"
Copilot should respond in <50ms with a complete list, proving the hosted MCP server is accessible16.
Test GitHub Copilot Agent Workflow
Create a test issue in your GitHub repository
Assign to @copilot with prompt: "List all CoC extensions for VendTable"
Monitor Azure App Service logs to see the MCP query:
1 az webapp log tail \
2 --name contoso-d365-mcp \
3 --resource-group rg-contoso-d365-mcp
4
5 # Expected log output:
6 # [INFO] MCP query: find_coc_extensions for VendTable
7 # [INFO] Found 3 existing CoC extensions in 42ms
Step 10: Maintenance and Updates
Updating Metadata (Platform Updates, ISV Imports)
When you apply a D365 platform update or import a new ISV module:
Re-extract metadata locally on your build VM:
1 cd path\to\d365fo-mcp-server
2 npm run extract-metadata
3 npm run build-database
Upload updated database to Blob Storage (overwrites previous):
1 az storage blob upload \
2 --account-name sacontosod365mcp \
3 --container-name mcp-database \
4 --name d365fo-symbols.db \
5 --file ./database/d365fo-symbols.db \
6 --overwrite
Restart App Service to download the new database:
1 az webapp restart \
2 --name contoso-d365-mcp \
3 --resource-group rg-contoso-d365-mcp
Automation tip: Create a GitHub Action that triggers on ISV model imports to automate this process.
Monitoring and Logs
Enable Application Insights for detailed telemetry:
1 # Create Application Insights
2 az monitor app-insights component create \
3 --app contoso-d365-mcp-insights \
4 --location eastus \
5 --resource-group rg-contoso-d365-mcp
6
7 # Link to App Service
8 $instrumentationKey = az monitor app-insights component show \
9 --app contoso-d365-mcp-insights \
10 --resource-group rg-contoso-d365-mcp \
11 --query instrumentationKey -o tsv
12
13 az webapp config appsettings set \
14 --name contoso-d365-mcp \
15 --resource-group rg-contoso-d365-mcp \
16 --settings APPINSIGHTS_INSTRUMENTATIONKEY="$instrumentationKey"
Key metrics to monitor:
Response time: MCP queries should be <50ms17
Request count: Track Copilot agent usage
Error rate: Watch for 401 (auth failures) or 500 (database issues)
Memory usage: Should stay under 6 GB (7 GB total RAM in B3)
Cost Optimization Tips
Total estimated monthly cost:
Basic B3 App Service: ~$52/month
Blob Storage (2 GB): ~$3/month
Application Insights (5 GB logs): ~$12/month
Optional Redis Cache: ~$27/month
Total without Redis: ~$67/month
Total with Redis: ~$94/month
Security Best Practices Summary
✅ Always use HTTPS (enforce with --https-only true)
✅ Implement API Key authentication (minimum)
✅ Store API keys in GitHub Secrets, never commit them
✅ Rotate API keys quarterly using Azure Key Vault
✅ Enable Azure AD authentication for enterprise environments
✅ Restrict IP addresses to corporate network + GitHub Actions
✅ Monitor access logs with Application Insights
✅ Enable Azure DDoS Protection (Standard tier) if publicly exposed
✅ Use Private Endpoints (requires Premium App Service Plan) for maximum security.
By hosting your d365fo-mcp-server on Azure App Service, you've unlocked the full potential of GitHub Copilot agent automation for Dynamics 365 F&O development:
✅ Issue-to-PR automation works from anywhere—not just localhost
✅ Team-wide access—all developers benefit from shared MCP instance
✅ Always available—GitHub Copilot agents can generate code 24/7
✅ Enterprise-grade security—API key + Azure AD + IP restrictions
✅ Cost-effective—~$67/month for unlimited Copilot queries
✅ Scalable—upgrade to P-tier for larger teams or faster response times
The result: Developers create GitHub Issues, Copilot generates compilable X++ code with perfect method signatures, and pull requests appear automatically for review—all powered by your hosted MCP server that "knows" your entire D365 F&O codebase.
This is the future of low-code D365 development, and it's only possible with GitHub's native Copilot agent integration—something Azure DevOps simply cannot match.
Additional Resources:
d365fo-mcp-server Repository: https://github.com/dynamics365ninja/d365fo-mcp-server
Azure App Service MCP Deployment Guide: https://techcommunity.microsoft.com/blog/appsonazureblog/host-remote-mcp-servers-in-azure-app-service/4405082
Securing MCP Servers with Entra ID: https://den.dev/blog/remote-mcp-server/
GitHub Copilot Agent Documentation: https://docs.github.com/en/copilot/concepts/agents/coding-agent/about-coding-agent
Final Thoughts: Embracing the Unified ALM Era
The shift to a Unified ALM model for Dynamics 365 Finance & Operations—powered by GitHub, Azure DevOps, and the Power Platform Admin Center—marks a major milestone in how we build, deploy, and manage enterprise applications. By embracing modern DevOps practices, YAML pipelines, Git-based workflows, and AI-driven tooling like GitHub Copilot and MCP, we’re not just improving efficiency—we’re redefining the developer experience. Whether you're a seasoned architect or just starting your journey in the PPAC era, the tools and patterns shared here are designed to help you deliver faster, safer, and smarter. The future of F&O development is here—and it’s automated, collaborative, and built for scale. Of course, I will try to update as usual with me in the coming months / years, stay tuned including surely a Youtube Video soon!
Update June 2026 / a quick video I have done recently !